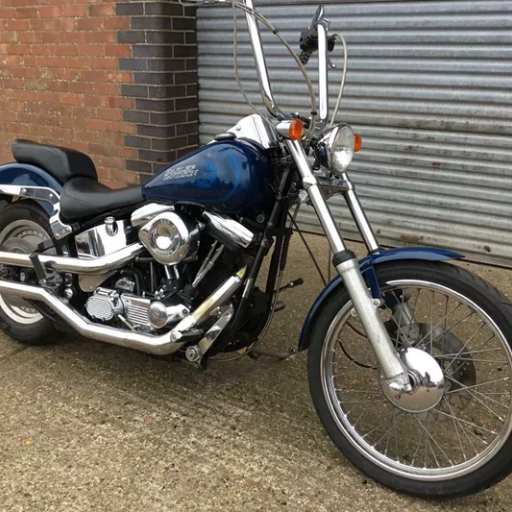
Every motorcycle enthusiast knows that a bike that is in the best shape functions exceptionally well and, of course, is quite safe to ride. Without a doubt, one of the elements that you would want to keep an eye on is the rear wheel sort of bearing. On a 2009 Harley Davidson Softail Custom FXSTC, the rear wheel bearing is important as it facilitates smooth rotation of the wheel and stability of the entire system. Over time, we all know that components do wear out, and the rear wheel bearing component would be one such instance. That is something that may present a host of problems that ultimately compromise the bike’s usability. This guide will help you to replace the rear wheel bearing while providing you with clear steps, key tools needed, and expert tips to make the task as easy and quick as possible. For those who are master mechanics and even for the new DIY Harley Davidson bike, armed with this resource and guide, you will not have to worry about maintaining your bike at all.
What are the signs of a failing rear wheel bearing on a 2009 Harley-Davidson Softail Custom FXSTC?
On a 2009 Harley-Davidson Softail Custom FXSTC, a rear wheel bearing that is on its last legs can demonstrate some telltale signs. Common signs involve weird sounds such as humming or grinding noises emanating from the rear wheel during the ride, rear axle play when the bike is hoisted, and more wear on one tire than the other. You may also start feeling some vibration or wobbling, which may interfere with the way the bike handles itself and its overall stability. These prolonged symptoms must be treated quickly, as a failing bearing will affect both safety and reliability. Do not forget to check and change the bearing if one of these symptoms shows up.
Common symptoms of a worn rear wheel bearing
the process of diagnosing a balled and worn rear wheel bearing often begins with considering the vibration and noise characteristics of the bicycle while in use. The sound of the rear wheel emitting a distinct grinding special, which could often be accompanied by the groan of a bearing, is usually a dead giveaway. So are vibrations or anything that interferes with smooth pedaling. Once the wheel is off the ground, I check how much slack there is in the wheel, If it rotules too much or is very slack, that’s a straight give away that the bearing is probably due for replacement. Therefore, it is paramount to nip these problems in the bud, as letting them go causes more pain and safety hazards.
How to perform a visual inspection of the rear wheel
In order to visually inspect the rear wheel, begin with an examination of the wheel for any cracks, dents, or bent spokes. Also, check if the tire has some sign of degradation, perforation, or bulges, which are likely to pose a threat to the tire. Make sure that the axle is tightened and that the wheel is in a horizontal position in the dropouts. Rotate the wheel and check if it rolls freely without wobbling or making noise. Finally, check the hub area for any leaks, excessive dust, and wear that might have occurred around the bearing seals. Regular detailed forensic visual examinations are important in terms of safe operation and maintenance of performance.
When to replace the rear wheel bearing on your Softail Custom
A reasonable degree of confidence in your Softail Custom comes with a rear wheel bearing replacement, which will allow you to accomplish all sorts of tasks safely and with ease. For the sake of making this explanation simpler, I will outline a guide walkthrough breakdown of this process based on my years of experience in this field. These are the reasons why you might reasonably believe that your rear wheel bearing is due for a replacement:
- Unusual Noises – If, while riding, you can hear sounds coming from the rear wheel, such as grinding, rumbling, or squeaking, then this indicates that the bearing is worn out. When in good condition, bearings should be without noise.
- Wheel Play – Take hold of the back wheel and shake it left and right. If you notice any sideways or wobbling movement, there is a great possibility that the bearing is misplaced or has been worn or damaged.
- Rough Rotation – The rear wheel, after being spun, should spin without effort. If there is any effort, a grinding feeling, or wobbling when the wheel is spun, this is an indication that there is an issue with the wheel bearing.
- Leaking Grease – Inspect the hub region for any indications of grease leakages since this may suggest a breach of the bearing seal with the probability of contamination and moisture entering the bearing and increasing its deficit.
- Excessive Vibration – In case during a ride, your pedal pushes out unusual vibrations that seem of the affect wheel, this is particularly distinctive when the bearing in the wheel is worn out.
- Mileage – In relation to riding conditions, bearings do have an average endurance, but as a rule of thumb, checking or changing them every 20,000 to 30,000 miles seems sound advice. Not too long ago, I needed to get my maths done.
By prioritizing these specific matters in a timely fashion, further damage to the wheel assembly or other parts of the bike can be avoided in a better way. Talking about safety issues, every owner should consult the softail Custom manual for specific instructions. If you are not so sure, then there is nothing better than consulting a qualified mechanic!
How do I remove the rear wheel bearing from my 2009 FXSTC Softail Custom?
The rear wheel bearing of a 2009 FXSTC Softail Custom can be removed following the procedure outlined below:
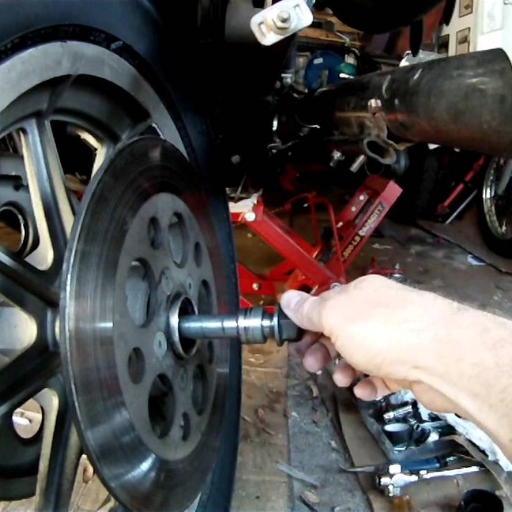
- Prepare Your Workspace -Since it has a weight, park the motorcycle on a durable jack of lift. Ensure the bike is raised enough so that it does not topple over. Make sure you have all the required tools with you: bearing puller, torque wrench, and appropriate sockets.
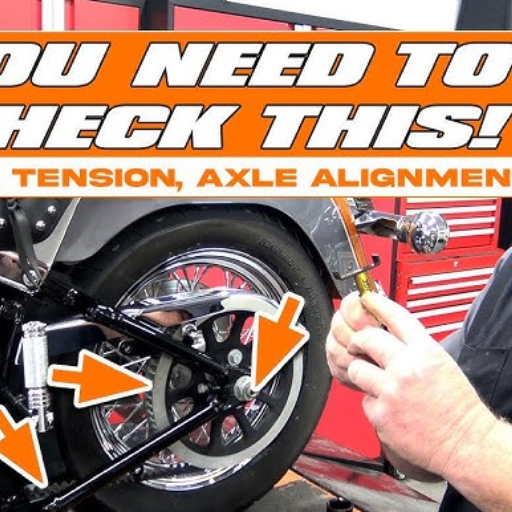
- Remove the Rear Wheel – First, start by loosening the rear axle nut and removing any screws that lock the rear brake caliper. It is necessary to hold a supporting wheel while carefully taking off the rear axle. Next, bring out the wheel that is attached to the motorcycle.
- Access the Bearings – If there is a wheel spacer, remove it first and inspect the hub. Both side hubs contain wheel bearing hubs.
- Extract the Bearings – Using a wheel bearing puller, carefully remove the bearings. Make sure to pull them straight out to avoid damaging the hub. If a retaining ring or clip is present, remove it first.
- Inspect and Clean – Evenly place the new bearings into their respective positions and press them in place with a bearing press or device. Confirm positioning without excessive pressure.
- Replace the Bearings – After that, reinstall the formation of any clips or spacers or ‘washers’, then put the wheel back onto the motorcycle. Insert the axle and tighten the nut to the specified torque. Fit the rear brake caliper and check if it is working as intended.
In case you are having any difficulty at any point, then it is advisable to contact a qualified professional for this task, which would ensure safety on your part as well as accuracy. More than anything else, do not forget to consult the service manual for the individual specifications and details that the Softail Custom would stand out with.
Tools needed for rear wheel bearing removal
For one to be able to successfully perform the operation of removing rear wheel bearings from a Softail Custom, one needs to have the proper tools to make the process easier. First, attach the motorcycle to the motorcycle jack or lift, then get a torque wrench to ensure the screws are properly tightened. Moreover, you’ll need a motorcycle-bearing puller. Furthermore, rubber mallet, snap ring pliers, and an assortment of sockets and wrenches are also recommended. Furthermore, you may own a heat gun or propane torch for the purpose of bearing skates since heating encourages metal to expand slightly. It is very important to always have safety gloves and goggles because when it comes to the wheels, one is dealing with components that require details.
A step-by-step guide to removing the rear wheel
- Prepare the Motorcycle
Position the motorbike onto a platform or a hard surface. Check and ensure the motorbike is in the correct position. Grab some gloves and goggles on for safety.
- Loosen Axle Components
Using a wrench or a socket, commence with removing the axle nut while not completely shifting it as yet. If the vehicle has a chain, then there is no need to remove it but its attachment has to be done with the help of tensioners that are located on the swingarm.
- Remove Additional Attachments
Take out the brake caliper nut appropriately. Slip it off slowly, as one would not want to harm the caliper, especially the brake pads or the rotor. For those motorbikes that are chain-driven, one will have to use either a master link or take out the chain from the sprocket.
- Remove the Axle
When the parts are detached, pull out the axle rod. For reassembling, be careful not to lose any spacers and take good note of the places that they came from. The wheel ought to be able to hang loose by now.
- Lift and Remove the Wheel
Now, moving to the other side, keeping the wheel still in an upright position, you’ll want to pull the rear wheel out, taking care not to knock any remaining brackets or guides that may still be on.
If damage to components is to be avoided, it is possible to remove the rear wheel by following these steps with care. Always refer to the manufacturer’s manual for additional explanations specific to your motorcycle model.
Extracting the old wheel bearing and seal
Removing an old wheel bearing and seal requires certain tools and top-notch skills. You may wish to start with a bearing puller or something similar to take out the wheel bearing. If a bearing puller is not available, applying uniform pressure to the bearing with your hands should be a good alternative and stop the WHEEL bearing housing from being damaged. Read also: The Best Gear Pullers. Once the bearing comes off, examine the area for any particles or oxidants; be sure to clean this properly before proceeding further. Take a flat-head screwdriver and insert it under the edge of the seal, and wiggle it gently to remove it without scratching the surfaces around it. It’s wise to do these steps thoroughly for the good of the spare parts that are going to replace the old ones and the security of the vehicle.
What are the best replacement rear wheel bearings for a 2009 Harley-Davidson FXSTC?
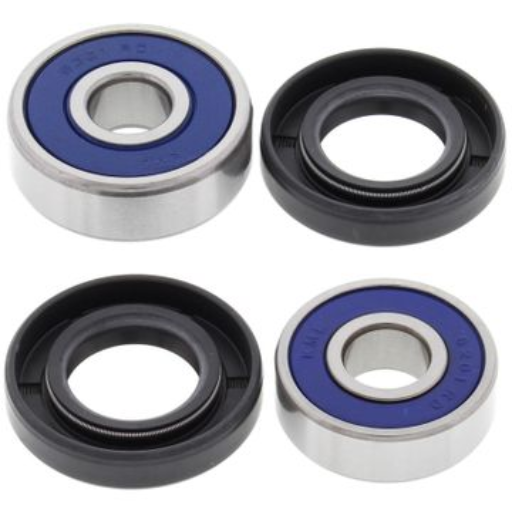
For a 2009 Harley-Davidson FXSTC, there are high-quality bearings available in the form of All Balls Racing Bearings or Timken 205FF while changing the rear wheel bearings. These bearings are said to be capable of withstanding the constraints of a Harley Davidson. Make sure that you install the bearings that are specified for that model of the bike as it will give maximum performance while keeping the bike safe. Always cross reference the service manual of your motorcycle as well as seeking professional fitting in some cases would be beneficial.
OEM vs. aftermarket wheel bearing options
I always tell riders to sensibly choose between OEM versus aftermarket wheel bearing options since they have distinct priorities. OEM bearings are manufactured considering the specific requirements of your Harley Davidson bike, hence they are suited for that particular bike and pass the manufacturer’s quality checks. Their performance and feel are the very same as that of the motorcycle’s original design intent and construction. For Timken, All Balls Racing, and other aftermarket options, excessive performance is frequently able to be achieved and is usually offered in concourse grade, given the options meet or exceed OEM specifications. In my personal experience, aftermarket parts have worked out extremely well for those riders looking to beef up their bikes or want to use them in more dreadful conditions. In the end, it comes down purely to the rider’s preference for stock virus, which has more enhanced reliability and function.
Top-rated wheel bearing kits for 2009 Softail Custom models
selecting wheel bearings kits for your Softail Custom 2009 is mainly a matter of understanding your requirements and ascertaining that some key parameters of the product are met. Thus, I have to employ some force rating measures when buying a wheel bearing kit, and below are some of the best options I would recommend:
- Timken Wheel Bearing Kit
Timken is a reliable brand in the industry known for its great engineering and durability. I have observed that these bearings work beautifully, albeit great in shelf life and wear resistance under heavy loads. The efficient steel utilized allows for less friction on the wheels, thus smoother rotation, something that you will get to experience right away while on the road.
- Material Quality: High-grade bearing steel
- Durability: Excellent for long-term use
- Load Capacity: Ideal for heavier bikes like the Softail Custom
- All Balls Racing Wheel Bearing Kit
Also an outstanding performer is the All Balls Racing kits which are aimed at the riders who abuse their bikes. These kits are often fitted with high-end seals to keep dirt and moisture out, ideal for riders who face extreme weather or off-road conditions.
- Sealing Technology: Advanced seals designed to protect against debris and water
- Performance: Works well in both average and extreme riding conditions
- Compatibility: Fits perfectly onto 2009 Softail Custom
- Drag Specialties Heavy-Duty Bearings
If you want to save money but do not want to compromise on quality, Drag Specialties bearings are the answer. They don’t have all the features that Timken or All Balls Racing has, but for regular commutes and moderate use I found them satisfactory.
- Cost-effectiveness: Provides roughly the same level of essential quality but at a relatively lower price
- Smooth Operation: Performs fairly well at significantly cheaper prices
- Ease of Installation: Doesn’t require much skill and can be done at home
When purchasing a wheel bearing kit, it is imperative to keep these parameters in mind – operational longevity, material standard, sealing capability, load bearing capacity, and it should also be cost-effective. Personally, I would suggest preserving the integrity of the durability and the seal quality if you regularly or harshly use the wheel. For less demanding usage scenarios, inexpensive but satisfactory Drag Specialties would be perfect.
In the end, it’s all about what suits your riding style and what importance you place on maintenance.
Factors to consider when choosing a replacement bearing
The distinctive features of replacement bearings are durability and sealing characteristics that ensure long-lasting reliability in hostile environments. Understand the material characteristics, such as heat and corrosion resistance, in relation to the performance requirements. Check that the load capacity is appropriate for bike requirements because small bearings can work for their intended purpose only for a limited time. Finally, remember to weigh the cost against the quality of the purchase—spending on a well-known brand will save money and solve problems. Always ensure that the specifications of the bearing correspond to the manufacturer’s requirements in order to guarantee efficient operations.
How do I install a new rear wheel bearing on my 2009 Harley-Davidson Softail Custom?
When putting the rear wheel bearing on your 2009 Harley-Davidson Softail Custom, the best approach is to follow each of the steps outlined above in a thorough manner. The first task always begins with the safe dismount of the bike, utilizing either a jack or a lift to ensure its stability during the entire process of disassembling and reassembling. What follows is the removal of the rear wheel by either loosening the axle nut and pulling off the chain or belt, depending on how the bike was set up. Using a bearing puller tool, I extract the old bearings from the wheel hub but take your time on this segment because it’s all about doing it slowly while doing it correctly. Next, I go on to fit new bearings in, and for this to happen, however, I have cleaned the hub very well and also lightly coated it in grease. At this point I press in the new bearings, first into the desired socket for bearing pressing or into a soft mallet, while making sure the pressure is evenly distributed up until it’s seated correctly and properly. After I am finished putting them on, I repackage the wheel and remove any extra elements that are out of the way while adjusting the axle nut to real torque as per company standards. I then afterwards check if everything is aligned and go for a test ride while making sure all parts are intact. Completion of the above steps ensures that the new bearings will be put onto the bike in a smooth way.
Preparing the wheel hub for the new bearing
Tearing a bearing is a pivotal step that should be well planned and applied if the wheel of your bike is to give you a good and long service. From my experience, let me outline it in a step-by-step fashion so as to bring out the details effectively:
- Cleaning the Hub: Firstly, I ensure that every part of the wheel hub is cleaned with a degreaser and cloth because every particle, even dirt, grease, and even debris, can impact the new bearing. Clean washing goes a long way in making the surface ideal for a new bearing, as it will be implanted in a perfect place.
- Inspecting the Hub: The first step is always to examine the hub, which is under installation, for any cracks or distortion. This analysis is critical because a bearing hub form that is defective will result in issues during the installation of even the best bearing.
- Lubrication: One of the most vital components when installing is smearing some grease onto the internal aspects of the hub. Emerging solutions export only the finest quality grease to support bearing installation, which will cut back on heating and optimize rotation once bearings are put in place. Also, this will coat and save against external oxidizing agents.
- Checking Compatibility: I always double-check the size of bearings that are being installed to make sure they fit well with the designated hub since this is an integral factor by the manufacturers. This would ensure no kind of stretching or distortion occurs, and the two parts fit perfectly.
Through the thorough study of each of these steps, I have established a base for fitting the new bearing with the aim of ensuring that the hub functions under all riding conditions in a smooth and reliable manner.
Installing the new wheel bearing and seal
Fitting the new wheel bearing and seal is not an easy task, but I try my best in order to achieve the desired better result. To provide an even load and avoid damage whilst achieving this, I particularly press the new bearing into the hub. Hence, during this step, any misalignment may lead to wearing outside uncontrollable and operational defects at an early stage. Then, I replace the wheel seal which is positioned appropriately on the bearing to block invasion of dirt particles. Adding grease around the edge of the seal will ease friction while making it work better. Through this meticulous work method, I ensure that all components will function in a good and smooth manner while increasing their life cycle.
Reassembling and mounting the rear wheel
Reconstruction and installation of the rear wheel is a delicate step that should be performed accurately. First, I replace the rear wheel with the axle and make sure that the brake fits into its slot. Any gap may lead to unfavorable cases in performance, so I will see everything before moving on. Now, the recoil is bracing the wheel, and I am inserting the axle through the wheel and the frame to make it secure enough not to move the rest slightly in any way when in operation.
In order to maximize efficiency, I always keep these key parameters in focus throughout this process:
- Torque Specifications – – I use a torque wrench to fasten the nuts and bolts as per the manufacturer’s recommendation. This avoids damage to the components caused by excessive torquing or lack of necessary torque resulting in unsecured movement.
- Alignment –For safety, the wheel should be perfectly aligned with the frame. However, even slight imbalances can lead to inconsistency in tire wear and handling.
- Clearance – I ensure that the tire has enough clearance with other components, such as the swing, brake calipers, etc. so that they do not interfere or cause any wear during their revolution.
- Brake Engagement – Once the rear brake is installed, I make sure to check that the engagement works well and does not cause dragging or unnecessary resistance.
Considering these factors are addressed in each case, I can state with confidence that the rear wheel is firmly installed and in place. A brief test ride after the reassembly is advisable so as to check that everything works properly.
What maintenance is required for the rear wheel bearing on a 2009 FXSTC?
As a prerequisite, wheel bearings must be thoroughly maintained. Taking care of these components appears rather simple, though it has an enormous implication on any motorcycle’s safety, in this instance, 2009 FXSTC. In my case, I first inspect the bearings for any abnormal wear, pitting discoloration, or play that appears excessive. Cleanliness is also quite important to me and I make sure to clean the bearings thoroughly after first loosening the old grease by dipping them in a solvent that allows me to do so easily. High-quality waterproof grease is then applied to everything clean. I then proceed with the reassembly, for which I make sure to check the alignment and torque to avoid any stress or uneven wear. Doing all of these steps as part of the maintenance routine would definitely prolong the life of the wheel bearings, and the motorcycle’s ride quality would be better. Moreover.
Regular inspection and lubrication schedule
In order to work efficiently and last long, wheel bearings should be inspected and serviced routinely every twelve to fifteen thousand miles or every year. Depending on the driving conditions, height, and weather, it may be necessary to take them off more often. Always employ good grease and respect specific intervals between service and methods suggested by the manufacturers to maintain operating safety and efficiency.
Tips for extending the life of your wheel bearings
In my findings from work, it is mostly preventative care and focuses on minute details that will help improve the longevity of your wheel bearings. To begin with, make sure that your bearings are sealed, as it is moisture and grit that are the primary causes of exposure wear. Regular cleaning surrounding the area, whenever maintenance is done, can also serve to minimize the ingress of foreign particles. Besides, do not overload your car since too much weight puts strain on the wheel bearings, which makes them wear out faster. When it is necessary to replace them, make sure that they come with good quality OEM standard components. Also, pay attention to your car as it will speak to you – certain tires could hum or grind, and that could be the first signs of the wheel bearings failing, and assistance is immediately required. With regular care and watchfulness, it is possible to improve the time to replace the wheel bearing of your car, and the car will run smoothly.
Where can I find compatible parts and accessories for my 2009 Harley-Davidson Softail Custom FXSTC?
An ideal place to purchase the 2009 Harley Davidson Softail Custom FXSTC is through Harley Davidson dealers and certified online merchants. The hardly ette lacquer, j & p cycles, and Revzilla websites have vast inventories of auto-approved parts that match your bike. Look for part cross-references and verify the use of trusted sources to avoid purchasing fakes.
Reliable online retailers for Harley-Davidson parts
I would gladly suggest a couple of reputable online dealers of Harley-Davidson parts, which I have used in the industry. RevZilla, for example, usually has a good range of nice parts and even OEM and aftermarket products. Another dealer worth mentioning is J&P Cycles; they have a good range and great customer support. Also, Dennis Kirk is usually good with their prices and sends things out quickly. In all my online purchases, I tend to check for retailers who have a good history of being real and supportive of all their parts as well as performance and durability speculations, which are a must for Harley Davidson Parts.
Compatibility with other Softail models (2008-2010)
because of the uniformity in the design over that time, a lot of parts from the 2008-2010 Softail models can be said to be interchanged. Several designs were consolidated across multiple models, such as handgrips, seats, and exhaust systems, which made the years within those models interspersed easily by Harley Davidson. However, it is always good to cross-check any part numbers and fitment charts, particularly for complex parts such as engine housings or electronics. Performance-wise even the slightest differences in brass knobs and wiring schemes are bound to matter, which is why one should check with a reliable dealer or manufacturer.
Reference
- Harley Davidson Softail: How to Replace Wheel Bearings – A step-by-step guide on replacing wheel bearings for Harley Davidson Softail models.
- 2009 Harley-Davidson Softail Custom – FXSTC Wheel Bearings & Seals at Dennis Kirk – A resource for purchasing wheel bearings and seals specific to the 2009 FXSTC model.
- Clymer Repair Manuals for the 2007-2010 Harley-Davidson FXSTC Softail Custom – Offers detailed repair manuals for maintenance and repairs.
Frequently Asked Questions (FAQs)
Q: What tools do I need to replace the rear wheel bearing on my 2009 Harley-Davidson Softail Custom FXSTC?
A: To replace the rear wheel bearing, you’ll need a bearing puller, a press or hammer, a socket set, and a torque wrench. It’s also recommended to have a service manual for your specific Harley Softail model on hand.
Q: Does this rear wheel bearing fit other Harley-Davidson models?
A: While this bearing is designed for the 2009 Harley-Davidson Softail Custom FXSTC, it may also fit other Softail models from 2008-2010. However, it’s always best to check your specific model’s requirements or consult with a Harley-Davidson specialist.
Q: Can I replace just the bearing, or do I need a complete seal kit?
A: For optimal performance and longevity, it’s highly recommended that both the bearing and the seal be replaced. Many shops offer complete seal kits that include the bearing, seal, and sometimes a spacer. This ensures all components are compatible and in top condition.
Q: How often should I replace the rear wheel bearing on my Harley Softail?
A: The frequency of replacement depends on various factors, such as riding conditions and mileage. However, it’s generally recommended to inspect your wheel bearings every 20,000 to 30,000 miles. If you notice any unusual noise, vibration, or play in the wheel, it may be time for a replacement.
Q: Is free shipping available for this item?
A: Shipping policies vary by seller. Some may offer free shipping to the contiguous U.S., while others may have exclusions for AK and HI. Always check the product listing or contact the seller for specific shipping information and any potential deals.
Q: Can I install the rear wheel bearing myself, or should I take it to a shop?
A: While it’s possible to replace the rear wheel bearing yourself if you have the proper tools and experience, many riders prefer to have this job done by a professional shop. Proper installation is crucial for safety and performance, especially when it comes to components like wheel bearings.
Q: Are there any related searches or products I should consider when replacing my rear wheel bearing?
A: Yes, you might want to look into front wheel bearings, complete seal kits, or bearings for other Harley-Davidson models like the Road King or Electra Glide. Additionally, consider searching for “2008-2010 rear wheel bearings” or “Harley Softail bearing replacement” for more specific information.
Q: How do I know if my rear wheel bearing needs replacement?
A: Signs that your rear wheel bearing may need replacement include unusual noises (like grinding or humming), excessive play in the wheel, uneven tire wear, or a feeling of looseness in the rear end. If you experience any of these symptoms, it’s best to have your bike inspected by a qualified mechanic.