Proper maintenance and repairs of the Massey Ferguson 1720 tractor are one of important ways of prolonging its life. Replacing the wheel bearings on the front axle, however, is one of the simple yet important maintenance activities that may be done on your tractor. This detailed article aims to equip you with knowledge as to when a replacement will be due and how to replace the wheel bearings in a systematic order. It does not matter if you are a professional mechanic or a tractor owner who has never carried out such work – inside this article, you will find a step-by-step procedure, tips, and tricks to help you get everything done without any fuss. So let’s get right into it to ensure your Massey Ferguson 1720 tractor is well taken care of!
What tools and parts do I need for the Massey Ferguson 1720 front wheel bearing replacement?
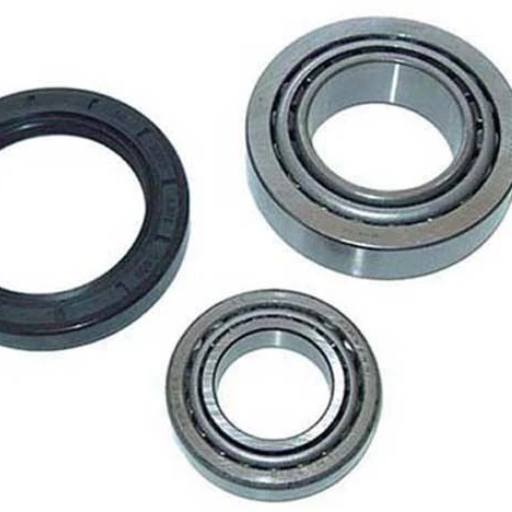
In order to remove and replace the front wheel bearings on a Massey Ferguson 1720, the following tools and parts are required: a jack with jack stands, a set of sockets and wrenches, a bearing puller, a grease gun, and a hammer or mallet. As for the parts, ensure that you have a set of the correct replacement wheel bearings and seals for a Massey Ferguson 1720. Furthermore, good quality grease for the new bearings, as well as miscellaneous cleaning tools, including wipes and a solvent, are also very helpful for accomplishing a clean installation.
Essential tools for wheel bearing replacement
How joyous the experience of owning a Massey Ferguson 1720 must be! To add to your experience, it is time to guide you on replacing the wheel bearings with ease but first, my focus will be to ensure that safety regulations are followed at all times, therefore, always use a jack to securely lift the tractor and then use jack stands to avoid any potential mishaps. Once that is covered, use a socket and wrench to take off the wheel, which will help the hub assembly be accessible. In doing so, a bearing puller will be crucial in removing the old worn-out bearings but without causing any damage to the remaining components. Upon the removal of the worn-out bearings, ensure that the remaining grease on the hub is also gone by thoroughly cleaning it with a solvent and rags.
As the last step doesn’t mention installing new bearings, I would recommend installing high-quality bearings as an important aspect will be to ensure that before placing them on the hub, ensure that you have used a grease gun on them to pack them up with grease as this greatly improves their effectiveness. In doing so, begin by placing the new bearings and seals carefully whilst slightly tapping on them along with reassembling all the components. Upon doing so, take time to evaluate what you have placed in what step to avoid any potential threats in the future. Overall, if all the steps above are followed correctly then you will be achieving seamless operations on your Massey Ferguson tractor.
Genuine vs. aftermarket bearing kits: Which to choose?
In this line of business I am familiar with, a lot of the time, it boils down to whether you require real or aftermarket kit-bearing kits. To assist in clarifying, here are the key parameters to consider when making your decision:
- Quality and Durability –Original bearing kits are made in accordance with specific requirements on Massey Ferguson tractors. They tend to be more robust and dependable with the passage of time, particularly in harsh environments. While some aftermarket kits can match this quality, they vary widely depending on the manufacturer, so it’s critical to research their reputation.
- Fit and Compatibility – Original kits are developed on the basis of the make and model of your tractor so they will fit. In most cases, aftermarket kits may not reach this standard, which later on causes mounting problems and performance issues.
- Cost-Effectiveness – Genuine kits are of a good brand and, therefore, high quality, resulting in high pricing. However, for those who do not have enough resources, after-market kits can serve as a better choice. But bear in mind that lower initial costs will likely mean higher costs further down the line if the aftermarket parts are not reliable and constantly break. Replacing them will become expensive.
- Warranty and Support – Genuine products are generally well supported and well backed up by the manufacturer with concrete warranties Having said that, aftermarket kits can be a hotpot for brands that have an array of warranties and brands that would barely offer any reassurance or service.
- Application and Usage –It is to be appreciated that if the tractor is being put to heavy use or is subject to operational stress zones, then probably only the genuine kits would be able to withstand the strain and offer a longer service life. Whereas for light or infrequent use, a quality aftermarket kit would do the job.
In the end, I recommend consideration of these parameters vis avis your situation. For my part, I tend to prefer genuine kits regarding critical components since the expense is easily justified by the comfort level they provide. Certainly, if you have done your homework and identified a trustworthy aftermarket company, it could be inexpensive for less demanding uses.
AGCO parts and compatibility with Massey Ferguson 1720
As far as I know, AGCO parts fit perfectly to all Massey Ferguson models, including the 1720, which are spare parts manufactured with precision. As to the appropriateness of the handful of items, they also guarantee their durability and free interaction within the system. When it comes to critical equipment, there is no room for guessing, instead it is recommended to go for AGCO parts. Aftermarket replacements may cost less, but as seen across consistency and value, they are, for the most part, a false economy in the long run. Concerning such a machine as the Massey Ferguson 1720, I prefer to spend more than less, as they say, for proper maintenance and reliability of agricultural appliances, which is much more costly.
How do I remove the old front wheel bearings on a Massey Ferguson 1720?
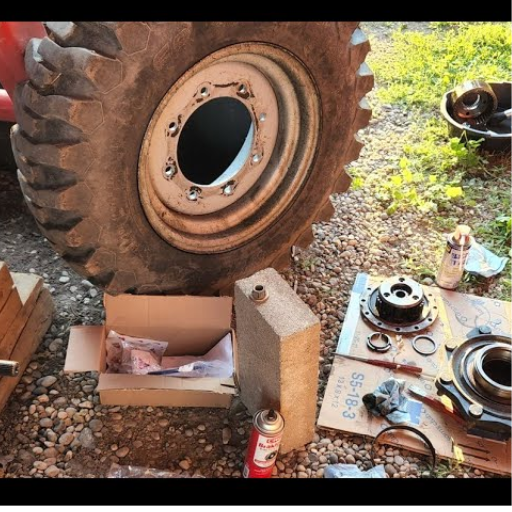
The first step in the process of replacing the front wheel bearings on Massey Ferguson 1720 is securing the front part of the tractor and lifting it while placing jack stands for additional support. The next step is removing the lug nuts on the front wheel to take off the wheel and hub assembly from the axle by sliding it off. Next, remove any attachments like retaining nuts or clips to free the hub. Then, remove the old bearings from the hub using a bearing puller. Make sure that the hub is cleaned before storage and that new bearings are fitted properly. Always remember to check the equipment manufacturer’s service manual.
Step-by-step guide to front axle disassembly
I can confidently state that the disassembly of a front axle will take time and effort if it is to be done in a safe and organized manner. First, verify that the vehicle is evenly distributed and has been lifted off the ground by jack stands. Before going ahead, always confirm whether it is stable. Now loosen the six lug nuts using a wrench and eventually remove the front wheel. Place the lug nuts systematically to avoid confusion at the time of the re-assembly. After that, take off the wheel by sliding it off the axle.
Proceed to finding and removing the retaining components that attach the hub, which usually includes nuts or clips. Depending on the vehicle model, there are instances where certain precision tools may be required to competently complete this step. Once the hub is accessible, take a bearing puller to easily pull out the decaying bearings. Throughout this process, make sure that the hub is clean. Clean to the point that any leftover debris would not be detrimental to the new bearings. Failure to wash and clean severely shows that you did not take the necessary step to care for the assembly when undergoing the repair or changing process. Also, together with these instructions, refer to the service manual for specifics that are more adjusted to your vehicle.
Common challenges when removing old bearings and seals
Corrosion might be common and sometimes makes the extraction of components and lifting off both old bearings and seals difficult. Taking out stuck components might also mean using improper tools or being pushed into using insufficient force to avoid damaging or deforming the neighboring component. Furthermore, the task of aligned removal in an already tight space would be considerably more complex. All of these factors can be dealt with in something as simple as using the right tools, such as bearing pullers, using penetrating oil to get stuck components out and following the necessary guidelines provided by the manufacturer. All of the aforementioned aspects would allow for an efficient and safe removal process.
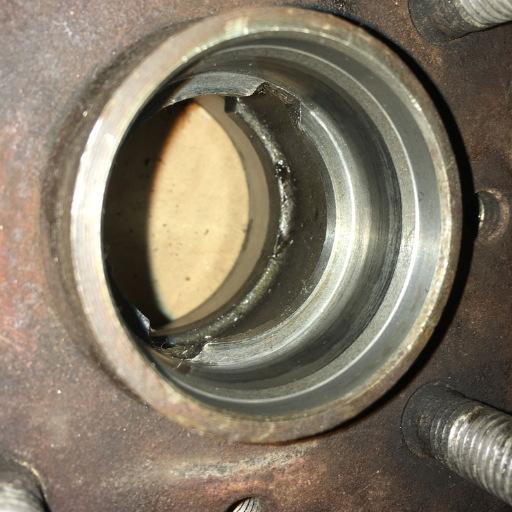
Inspecting for damage to other components
checking other components for damage is an essential and irreplaceable stage that should not be bypassed. More so, I always remember to check areas around the permanent attachment point when reassembling an area with such a fixture. Always look out for any deformities, cracks, or warpages, as these minor defects could cause other more serious issues in the future. However, the process of looking for these defects is made easier and more effective by the use of good lighting and tools, which include magnifiers or precision gauges. I have learned through my experiences that anomalies such as scoring or warpage, when detected early, are very helpful in saving time and cost as well, which guarantees the reliability of the entire system.
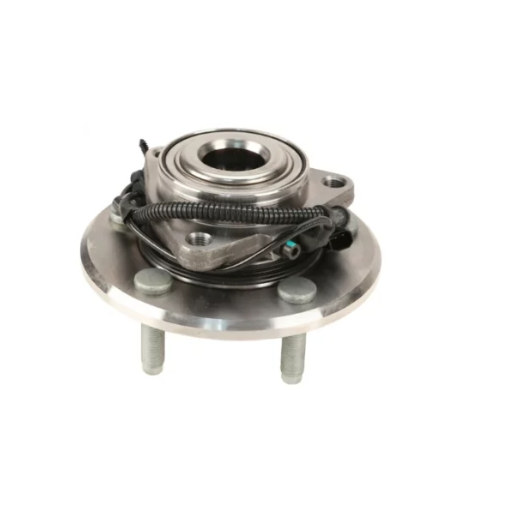
What’s the correct installation process for new front wheel bearings?
Lodging new front wheel bearings is very delicate and requires careful procedures. First, raise the vehicle in a safe manner, then take off the front wheel, the brake caliper, and the front rotor so as to access the hub, which is an assembly. Using a press or the puller tool, remove the old bearing set while ensuring that other components of the installation do not get destroyed. Ensure to thoroughly clean the hub to enable the removal of any dirt or foreign objects. Apply the new bearing onto its required location and, using the required sequence and tools, press the bearing into position while ensuring that no excessive force is applied, which could damage the bearing. All components are to be reassembled in the opposite sequence of disassembly while ensuring that all bolts are tightened to the required torque specified by the manufacturer. Finally and lastly, spin the wheel and check the alignment before pushing down the vehicle. This ensures that it is working effectively and safely.
Proper bearing and seal installation techniques
I always advise you to always pay attention to the guidelines for bearing and seal installation; for me, these are precision and cleanliness. In the course of my career, as I now understand, just the smallest amount of dirt can considerably affect the rate of wear or complete failure of the bearing or seal surfaces, so I make it a principle to scrub every component clean before starting. Along with that using appropriate tools is also critical, when inserting the bearing into position, it is critical to do it gently so as not to distort it, and also to do not exert too much pressure on other components. Furthermore, I also check the torque values when the bearing is fitted to ensure proper calibration and to be certain there is no overstressing, which would be detrimental to the parts and performance. Last of all, I always make sure to perform functional as well as alignment tests on the assembly in order to double-check whether the assembly ladies as planned or if it does works properly. I consider my attention to these installations significant and essential for being able to produce layered sealed bearings consistently.
Adjusting bearing preload for optimal performance
Finding the right balance between tightness and looseness is the procedure needed to ensure optimal bearing preload. An inadequate preload increases vibration, makes the bearing less rigid, or wears out quite fast on the other end. An excessive preload causes increases in energy loss, friction, and overheating. Using correct manufacturer recommendations, using precision measuring equipment such as torque wrenches or dial indicators, and controlling the assembly by means of function tests seem likely to provide the desired reliability and life.
Reassembling the front axle and wheel hub
I am very diligent when reassembling the front axle and wheel hub. If someone takes the time to do it properly, it will all be fine on the first try. I perform the following operations sequentially, italicizing the main parameters of interest:
- Cleanliness and Inspection
I clean every component individually since any dust or debris can potentially result in wear or alignment difficulties in the future. This is also the time when I examine several components like bearings, seals, and fasteners for any visible signs of damage. Anything that doesn’t inspire confidence is replaced so that it doesn’t present issues in the future.
- Preloading the Bearings
I consult the manufacturer’s manual for the required torque values. Choosing and setting the appropriate bearing preload is very important. Thereafter, I employ a calibrated torque wrench to make the necessary adjustments to the preload.
- Key Parameter 1: Proper torque specification (e.g., 20–50 Nm, depending on the vehicle).
- Key Parameter 2: Smooth rotation of the hub without excess resistance or play.
- Greasing and Sealing
I apply good grease provided by the manufacturer to the bearings, which reduces friction and ensures smooth operation. Water or debris contamination can be prevented by proper sealing.
- Key Parameter 3: Use the correct grease type (e.g., high-temperature wheel bearing grease).
- Aligning and Securing the Hub Assembly
In terms of aligning the center of the hub with the axle, I ensure that it is leveled and properly engaged. I also pressure the bolts according to the tightening sequence pattern, which I consider important, ensuring that I always abide by the recommended tightening sequence.
- Key Parameter 4: Bolt torque values (e.g., 80–110 Nm for most hub setups).
- Key Parameter 5: Uniform contact and alignment.
- Testing and Final Checks
Upon reassembly, I routinely carry out a functional test. I rotate the hub to see whether it rotates freely and also check if there are any abnormal sounds. Furthermore, I also checked all the bolts again to ensure that nothing was loose.
- Key Parameter 6: Smooth and quiet operation during a test spin.
- Key Parameter 7: No axial or radial play in the hub.
I firmly believe that by closely adhering to these parameters, the front axle re-assembly, as well as the wheel hub, will be smooth and reliable. Please remember that it is the attention to detail that goes into re-assembling these parts that is critical.
How can I ensure the long-lasting performance of my new wheel bearings?
I emphasize the need for adequate installation procedures and the maintenance of my wheel bearings in order to boost their long-term operation. I take care to install new bearings correctly to avoid using too much force on them, and I always replace components with quality spares when necessary. Reliable lubrication using the appropriate grease minimizes friction and hence the rate of wear. I also look at the condition of the bearings regularly for rust, dirt, or wear and attend to the problems promptly so that they do not get any worse. Worst of all, I do not overload the vehicle; extra weight is a surefire way to cut a significant number of lifespan off the wheel bearings. With these methods in place I can ensure that the bearings wear out slowly and that there will be smooth performance from them.
Proper lubrication and maintenance practices
I consider it my responsibility to make sure that the performance and longevity of machinery equipment are always complemented by routine maintenance checks and usage of proper lubricants. A scheduled maintenance routine has been established to ensure that components are cleaned out and the correct amount of lubricant is reapplied in order to avoid any build-up of dirt or impurities. Routine checks are also important as this allows for early detection of any signs of wear and tear or any alignment issues and dealing with the problem before it worsens. By adhering to these practices, I have been able to keep machinery at optimal functioning levels with significantly lower downtime.
Signs of premature bearing failure to watch for
One of the more prevalent forms of premature bearing failure, which I have noted, is excessive noise, such as grinding, squealing, or clicking, which may suggest extreme damage or contamination. Vibration is also one aspect to consider; higher or uneven vibrations may lead to poor alignment, imbalance, or faulty parts. Temperatures are also of great concern, I also use thermographic inspection to diagnose bearings that are running hotter than the average range as this might infer a shortage of lubricant or friction related problems. However, as can physical check-ups, wearing the surface of the bearing like discoloration, pitting, or cracks is also. Addressing these signs early on has been crucial to preventing escalation and, therefore, improved cost losses when downtimes are considered.
Recommended service intervals for front wheel bearings
Front-wheel bearings are supposed to be serviced at certain intervals, but such factors as the type of automobile, service conditions, as well as the manufacturer’s recommendations, might alter them. it is ideal to adhere to the following parameters so that your wheel bearings are replaced in a timely fashion:
- Vehicle Manufacturer Specifications -It is always a good practice to consult the owner’s manual first. Several manufacturers define service intervals, such as after every 30,000 miles or after reaching the 70,000-mile mark which is common for most vehicles. Bearing’s replacement is also recommended during this service if deemed necessary.
- Driving Conditions – In some cases, it is imperative that the mileage bearing be out as some conditions make off-road driving or covering some form of terrain mud or water which potentially makes a bearing’s integrity weaker, further normal inspection is recommended as well.
- Bearing Type – A vast majority of today’s vehicles have sealed bearings meaning they usually hold up around 100,000 miles without needing maintenance, in addition, older models should have their bearings verified if they’re greased every 25k to 30k.
- Noise or Vibration Feedback – Sour screeches such as snarling or humming vibration can be the cause of a worn bearing and negligence can make the issue worse, hence it is important to make an appointment with a trusted service center even if there is little suspicion about foul play.
- Load and Usage – There are instances where the car in question carries a load on a daily basis or is utilized for towing, such vehicles have a brittle bearing and hence must be taken care of efficiently so stressing the internal integrity doesn’t cause wear and tear faster.
Maintaining a consistent planning structure and regularly following up with the set standard allows you to observe component performance metrics, extend the front wheel bearing lifetime, and avoid any unplanned downtimes.
Where can I find the best deals on Massey Ferguson 1720 wheel bearing kits?
While searching for an affordable Massey Ferguson 1720 wheel bearing kit, I always urge starting with reputable online or nearby agricultural equipment suppliers. TractorSupply.com or distributors of Massey Ferguson parts online often have well-priced and authentic products. Also, it is wise to contact local dealers as sometimes they may have offers that you cannot miss. However, if you are looking for cheaper alternatives, some of the online auction sites or farming forums can be a good option; just make sure that the parts are not used and are in good condition. Also, always keep in mind that spending more is wise rather than low because, in the end, this will save you much more.
Comparing prices from authorized dealers and online suppliers
Always analyze the pricing of authorized dealers and online suppliers in terms of an all-inclusive cost which includes shipping or tax remissions. While authorized dealers’ prices may be high, they also offer a guarantee of product reliability and warranty, and this is an advantage in the long run. Online suppliers, on the other hand, tend to have lower prices, but the main concern is to check their validity and not to receive faked items. In making a good decision, the trade-off between cost savings and reliability and support has to be maintained.
Benefits of choosing OEM vs. aftermarket parts
the choice between OEM (Original Equipment Manufacturer) and aftermarket parts depends on the needs of your project. OEM parts are custom-made and manufactured to suit your equipment perfectly and to perform at its best. They are also provided with reputable warranties and proven reliability. Aftermarket parts, however, can be an inexpensive option, and some of them may be quite good enough. On the contrary, standardization in their quality and suitability might pose some problems. Personally, if I need something that requires extreme precision and durability, I will prefer OEM parts but In less demanding situations where priorities are cost, I see aftermarket parts as an opportunity. It is important to understand your goals so that you make the appropriate decision.
Warranty and return policies to consider
When looking at warranty and return policies, it is best to check the fine print first, as there are terms and conditions that apply. OEM, however, tends to have better warranties, and the blank parts are replaced only when there is a defect with a clear timeline promise attached to it. Such warranties go a step further in providing assurance over a prolonged period. Aftermarket items may possess minimal warranties or none at all, or may just differ in coverage and require you to read between the lines. Also, looking into return policies will give an indication of how easy it will be – well-known resellers of products or components will generally allow the returns or exchanges of unused parts within a stated time period. Unambiguous policies that are in favor of customers should be placed at the top of the list so as to manage risks in the business.
What are some common mistakes to avoid during wheel bearing replacement?
In my opinion, one of the most common errors is not hooking up the appropriate tool for the task. A wheel bearing replacement is a delicate process, and using inappropriate tools can cause the installation or the bearing itself to be damaged. Another frequent mistake is to omit cleaning the hub assembly properly before pushing in the new bearing. Any residual contaminants could potentially be abrasive and wear out the new bearing. Not full screwing in the hub nut or screwing it in too tightly is another mistake I hardly fail to notice; both practices potentially compromise bearing and safety functionality. One cannot afford to ignore the step of examining any other parts that relate to the repair; examples are axle, wheel, and even hu,b, which may have underscored complications that would ruin everything. Everyone must be careful and make sure that each step is performed with caution, which can ensure the safety and maximum effect of the bearing replacement.
Improper torque specifications and their consequences
Improper torque specifications can lead to a variety of issues that compromise both safety and performance. Over-tightening the hub nut can distort the bearing, causing increased friction, overheating, and premature failure. On the other hand, under-tightening can result in excessive play within the assembly, leading to vibration, noise, and potential loss of control while driving. Ensuring that torque specifications are followed exactly, as per the manufacturer’s guidelines, is critical to the longevity and reliability of the wheel bearing and the overall safety of the vehicle.
Importance of using the correct tools and procedures
I cannot stress enough how important it is to have the right tools and do it right when replacing a wheel bearing. There are also various types of bearings and hubs, such as torque wrenches, bearing pullers, ABS hub rim sealers, hub installers, etc. All these tools make sure that there is no damage to other components around while work is being carried out. Well, these drillouts and skimming procedures may seem to be spending unnecessary time and money, but there will be even more expensive and major issues to the components later on, which will be the result of cutting corners. I also maintain that the servicing does comply with the manufacturer’s instructions so that the repair retains integrity and should all go well. You have to buy the right set of tools and know how to use them properly if you want to achieve the desired result every single time.
Reference
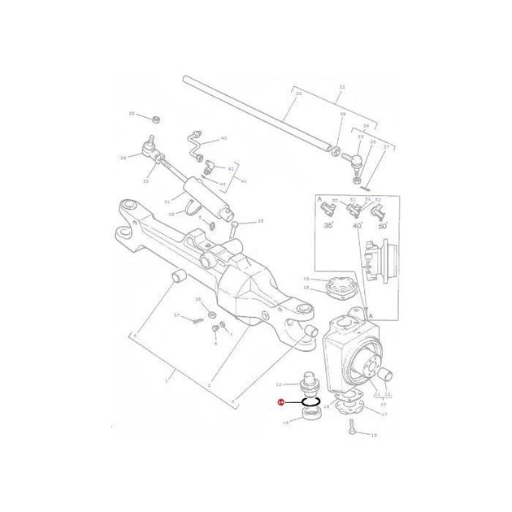
- Massey Ferguson GC1720 Compact Tractors Parts Catalogue Manual – This manual provides detailed information on parts that can be useful for identifying the correct components for replacement.
- AGCO Parts & Services – AGCO is the official provider of genuine replacement parts for Massey Ferguson tractors, ensuring reliability and compatibility.
- Ford 1720 Tractor Parts – While this is for a Ford tractor, it might offer insights into similar parts and repair processes.
Frequently Asked Questions (FAQs)
Q: What specific products do I need to replace the front wheel bearings on a Massey Ferguson 1720 tractor?
A: For this repair, you’ll need genuine bearings, a seal kit, and possibly a new race. It’s important to use parts that meet the engineering material specifications and tolerances for your Massey Ferguson 1720 model to ensure reliability and smooth operation.
Q: How do I determine the correct front wheel bearing for my Massey Ferguson 1720?
A: To find the correct bearing, you’ll need to provide your tractor’s serial number. This helps ensure you get the specific part that fits your model. You can also use our product filter on our website to narrow down the options based on your tractor’s specifications.
Q: Do you offer delivery for Massey Ferguson 1720 front wheel bearing replacement kits?
A: Yes, we ship all our products, including front wheel bearing replacement kits for Massey Ferguson tractors. Delivery options and timeframes may vary depending on your location. Please check our shipping information or contact us for more details.
Q: Are there related products I should consider when replacing my Massey Ferguson 1720 front wheel bearings?
A: Yes, you might want to consider related products such as axle bearings, seals, and lubricants. Additionally, it’s a good time to check and possibly replace other components in the front axle assembly, like the steering linkage or thrust bearings, to ensure optimal performance.
Q: How can I find the right category for Massey Ferguson 1720 front wheel bearing parts on your website?
A: You can easily navigate our shop by selecting the “Massey Ferguson” category and then choosing the “1720” model. From there, you’ll find a subcategory for front axle and steering components, which includes wheel bearings. You can also use our search function or product filter for more specific results.
Q: What information should I provide when contacting customer support about Massey Ferguson 1720 front wheel bearings?
A: When contacting us, please provide your tractor’s model (Massey Ferguson 1720), serial number, and any specific part numbers you’re interested in. If you’re experiencing issues, a brief description of the problem will help us assist you more efficiently. This information helps us provide the best customer service and ensure you get the correct parts.
Q: Do you offer any resources to help with the installation of front wheel bearings on a Massey Ferguson 1720?
A: Yes, we provide product descriptions that include basic installation information. For more detailed guidance, we recommend referring to your tractor’s service manual. Additionally, our customer support team can provide general advice on the replacement process, making us your best choice for both parts and support.
Q: Are your Massey Ferguson 1720 front wheel bearings suitable for heavy agricultural use?
A: Absolutely. Our front wheel bearings for the Massey Ferguson 1720 are designed to withstand the demands of agricultural work. They’re manufactured to meet or exceed OEM specifications, ensuring durability and reliability in various farming conditions. This makes them suitable for all types of agricultural machinery and equipment.