If you have been looking for a place to learn how to change the front wheel bearings, or if you want to do this on your own, you’re in luck! In this article, we’re going to teach you how to tackle the whole process in detail so you won’t have to think twice about what you’re doing and do it like an expert.
First, we will learn why wheel bearings are important and how to figure out when there is an issue with them. We will also discuss the problems that arise as a result of neglecting a front wheel bearing issue, as well as the consequences of putting off maintenance or replacement.
Also, before jumping on to the step-by-step replacement of the front wheel bearings, we will outline the preparation work that is done, such as the instruments needed and the critical safety measures that should be adopted. Getting to know all the parts that you will be working around, like a knuckle and ball joint assembly, will allow you to better comprehend the task.
Then, we will get into the practical parts, such as where we remove the wheel and the brake caliper so that you can reach the wheel bearing securely. Our guide will also allow us to take apart the axle nut and tie rod which will make the disassembly easier.
Then it gets interesting: We will be swapping the front wheel bearing. We will guide you on how to remove the old bearing assembly, how to press the new wheel bearing into the knuckle, and finally, how to put the hub bearing assembly back together. With the help of our detailed instructions, making the swap should be easy.
To wrap things up, we will cover the last few steps concerning the replacement of the wheel bearing. This step includes placing on the new hub assembly and then putting back the brake caliper for a complete job.
With the aid of this complete guide, you can be guaranteed to get enough information on how to change the front wheel bearing efficiently. So, let us prepare ourselves for a safe ride.
What is a Wheel Bearing, and Why is it Important?
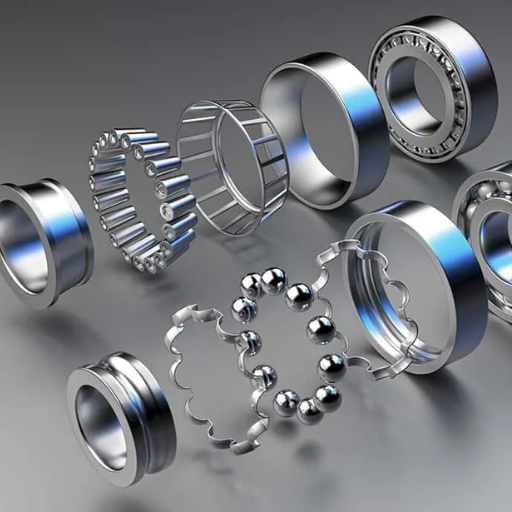
A wheel bearing is defined as an essential part of an automobile’s wheel system,m allowing the associated wheel to revolve with ease. It consists of several metallic balls contained in a circular metal piece which is referred to as a bearing race. The bearing is thoroughly placed within the hub assembly for the distribution of load and to minimize friction caused between the wheel and axle.
The value attached to a car wheel bearing has been explained in the last paragraph owing to the fact that it, along with others, is responsible for providing instant car brakes, which are helpful in ensuring safety for any type of ride. Below are a few key reasons why having proper wheel bearings is crucial to a car:
- Load Bearing: The force exerted on shafts during the acceleration, deceleration, and directional change of the vehicle is borne by the wheel bearings, which also carry the weight of the vehicle. Careful mechanics dictate their design and installation so as to make certain the vehicle performs optimally.
- Reduced Friction: The use of wheel bearings enables the wheels to turn freely which in turn reduces friction between the wheel and the axle. This improves the lifespan of the two parts as well as the vehicle as a whole.
- Enhanced Safety: In the presence of any wheel bearing malfunction, unwanted steering or braking occurs. Bearing failure will cause improper contact between the tire and the road surface, thus making steering and brake stability impossible. This is important to consider when braking or steering suddenly or at faster velocities.
- Comfortable Ride: When the vehicle moves, some vibrations and noise are produced from the road surface, which might interfere with the driving experience. However, because the wheel bearings rotate smoothly, a relaxing and fun experience is guaranteed.
In conclusion, wheel bearings alone carry the load of supporting the vehicle as well, enabling its optimal devastating force. Regular upkeep of these bearings, including replacement of faulty ones, is required to not only assist the vehicle but also to keep the passengers safe.
Understanding the Function of a Wheel Bearing
let us explore the purpose of a wheel bearing. A vehicle’s wheel assembly includes a wheel bearing which allows the wheel to rotate smoothly with no friction. It carries the entire vehicle’s weight and permits the free rotation of the wheels at high speed while the control balance is retained. Wheel bearings reduce the friction and balance the load so that the engine’s power is the most effectively transferred to the wheels, thus enhancing fuel economy and the overall performance of the car. Furthermore, wheel bearings are designed to reduce vibrations and shocks caused by road surfaces and allow the driver to enjoy a smooth drive. After knowing the function of a wheel, you understand the value of performing regular service and the reason for doing it in cases in which the wheel has to be replaced quickly.
Signs of a Bad Wheel Bearing
With great caution, let’s discuss the signs of a bad wheel bearing. Understanding these signs allows you to tackle the problem in time which guarantees high performance and great safety while on the road. This is an industry that I have extensive experience in, and working with bad wheel bearings is never ideal for any vehicle. Here, let’s see a few signs that should set off alarm bells inside you:
- Whining Sound: A rumbling noise coming from the afflicted wheel is one of the most evident indications of a broken wheel bearing. This sound is akin to a growl or a hum when idle, but becomes more intense as the vehicle picks up speed. The noise might be more perceived when the driver turns the steering wheel.
- Remorseful Sounds: The second most well-known and apparent sign of fractured wheel bearing is the noise that is heard when the car starts or rotates the steering wheel. The noise sounds a bit unflattering as there is not one but multiple sources.
- Without Soothing Noise: This means a shrieking sound made when other electrical machines in the car are turned off. With Soothing Noise: As the vehicle reaches higher speeds, one can hear a hum mixed with whine while gently turning the steering wheel. However, the moment the velocity of the vehicle reaches abnormal levels, the sound tends to be clearer. These noises for some seem to be quite unbearable, for others it feels like the battery is low. They should never be ignored and must be dealt with with utmost care.
- Wobbling & Tilted Steering Wheel: Due to faulty wheel bearings, vibrations could be observed that would pass through the frame of the vehicle which made the steering wheel shaky and loose. Additionally, the hard acceleration and deceleration lead to amplified vibrations.
- Abnormal Wear of Tires: The rotation of loose wheels will cause a deviation, which would cause irregular tires. Check your tires closely to see if the outer part has excessive bulging, patching, or ununiform groove patterns.
Make sure to keep an eye out for the signs I’ve mentioned, if you do it is best to have a professional inspect and possibly replace your wheel bearing. Failure to tend to a faulty wheel bearing will have dire effects on both your vehicle’s functioning and your own safety.
Consequences of Ignoring a Front Wheel Bearing Issue
I must know the implications of the front wheel bearing problem if it is overlooked. For starters, it unnecessarily exacerbates the risk posed on the vehicle,e and its operator should one be to ignore a faulty wheel bearing. Here are some of the key consequences to consider:
- Vehicle Performance: As a vehicle’s bearing starts to wear and tear, it can cause considerable issues with the vehicle’s performance. Loosely attached bearings lead to grueling handling issues as slewing of the wheel may occur. Users may face this issue when driving the vehicle or trying to push the wheel on their own.
- Safety Risks: Driving with a worn or bad bearing may prove to be dangerous as the effects can lead to a lack of steering control, malfunctioning of brakes, and losing the bearing itself. Such issues can potentially lead to a vehicle crashing, and drivers and pedestrians alike may get hurt.
- Additional Damage: The bearing, if worn down greatly, can cause damage to the wider wheel assembly as well as the other components connected to it. The more the mounting heats and starts to rub against the other parts, the more damage will be caused which in turn would mean more machine and repair costs.
In light of these outcomes, it is crucial to seek intervention immediately whenever you observe symptoms of a failing wheel bearing. To keep your vehicle roadworthy and safe, it is of paramount importance to get the bearing checked and replaced by a capable technician as soon as possible.
How to Prepare for a Front Wheel Bearing Replacement
I can wager that preparation for front wheel bearing replacement is key for having a smooth bearing replacement. I would like to share a few key points so that you can also prepare for this maintenance. Here you go:
- Gather the Right Tools: Am I good to go? After making sure I have the necessary permits and am equipped with the following items, let me list them – socket set, torque wrench, pry bar, and a maintenance tool known as a bearing press or puller.
- Observe Safety Precautions: Firstly, be sure to wear gloves and safety glasses, prioritizing safety. It would also be wise to ensure the car is parked on flat ground and the parking brake is locked and activated.
- Prepare the Replacement Parts: Get yourself a wheel bearing assembly that is suitable and approved for your car. Next, inspect and ensure that it aligns with the requirements of your car or any scope of the car model group that you might be using.
- Secure a Reliable Work Area: This is an easy part: find a spot with good lighting and plenty of space for rotating, turning, and pulling the wheel assembly. Turn off all the stationary or surrounding items that might create an obstacle for you, ensuring a smooth fixed site.
Adhere to the above preparatory measures so that the front wheel bearing replacement can be hassle-free and the working condition and safety of your car are not compromised.
Tools Required for a Wheel Bearing Replacement
I have put down, at the very minimum,m the tools that you would need to successfully do the replacement for wheel bearings:
- Jack and Jack Stands: As an essential item, these allow you to safely lift and immobilize your vehicle.
- Wrenches and Socket Set: Removing bolts and nuts will be easier with a wrench and socket set with different sizes during the time of replacement.
- Hammer and Pry Bar: The stirrup tools would assist in loosening tight-fit components and removing items such as brake rotors.
- Torque Wrench: This tool is very important When attempting to tighten bolts and again while doing so to ensure it is properly tightened.
- Bearing Puller: This tool is used Click Here unsurprisingly to get rid of the old wheel bearing which is located inside the hub assembly.
- Wheel Bearing Grease: Without the quality grease to lubricate the wheel bearing as a paste between the new bearing and other parts, it might get stuck, ruining the operation.
With the additional information from the manufacturer, these tools will help you immensely with the wheel bearing assist. Do remember to be careful and also check for the appropriate safety setting and torque limit.
Safety Tips Before You Remove the Wheel
here are safety tips to observe when removing the wheel:
- Safety Gear: It is necessary to have the right safety equipment, such as gloves and safety eyewear, so as to protect yourself against possible risks.
- Secure the Vehicle: Turn on the parking brake and park the vehicle on solid ground so that the vehicle does not move without controls.
- Loosen Lug Nuts: Before raising the vehicle, remove the designated wheel’s cover using the wrench, but don’t take the nuts off.
- Use Wheel Chocks: To block the vehicle from rolling in the opposite direction, chocks have to be used, and this adds much more security when taking the wheel out.
- Jack Placement: Check the owner’s manual or equipment manual to find good jacking points. After that, place the jack in any given location of the vehicle.
- Lift Carefully: Using the jack, lift the vehicle so the designated wheel comes off the floor and make sure the vehicle is stable and safe.
- Remove Lug Nuts: Using the lug wrench, you can now take down the loosened wheel and all other nuts to the particular wheel.
- Remove the Wheel: Now the wheel can be taken straight off the hub and put in a safe location away from the working area.
Always wear your seatbelts while in your vehicle and be mindful while operating it. These are a few of the security measures you can take for the wheel removal process.
Understanding the Knuckle and Ball Joint Assembly
many vehicle maintenance enthusiasts overlook the workings of knuckle and ball joint assembly, which is an important component in any vehicle. Signing the knuckle, the component is specifically important as it is a part of the vehicle’s suspension system, linking the wheel hub, the brake rotor, and other parts of the suspension system. It also provides stability to the vehicle, supports its weight and facilitates smooth turning and movement of the wheels.
Interestingly, the ball joint, which is attached to the control arm, is set in between the knuckle and the ball joint. It helps to create the upward and downward motion of the wheels as the suspension adjusts to the bumps on the road and helps to create a pivotal pivot for the steering wheel.
These two parts complement each other in that the knuckle and ball joint assembly is at the core of the vehicle’s suspension system’s workings. Timely servicing and checks for these parts are necessary to be able to use the vehicle with comfort, ease, and effective driving.
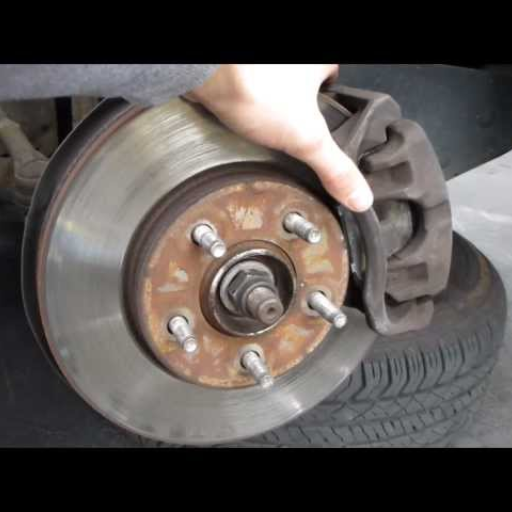
How to Remove the Wheel and Brake Caliper

Being able to witness the removal of a wheel and brake caliper is an interesting phenomenon. To properly understand this process, one should know that it is a great idea to disassemble the rim and caliper in a safe manner. Here’s a brief summary of the procedure for removing a wheel and brake caliper:
- Removing the Wheel:
- Utilize a lug wrench or an impact wrench to release the lug nuts.
- Then, raise the vehicle with the jack and place it on the jack stands.
-
Now, take off the lug nuts entirely and remove the wheel, paying close attention.
- Removing the Brake Caliper:
- Find the brake caliper, which is often secured by bolts or sliding pins.
- Using a wrench or a socket, take out the caliper bolts or slide pins.
-
Gently take the caliper off the brake rotor while ensuring that you do not strain or tug on the caliper-connected brake hose.
When it comes to removing wheels and brake calipers from a brake system, I usually find it helpful to use stepwise diagrams illustrating the disassembling process. Specifically, I like pictures or graphics with numbered stickers directly indicating the right sequence of disassembly. It is important to keep in mind how to adapt any general procedure to the specific make and model or vehicle type, as some mentioned techniques catered to trucks while others didn’t.
Steps to Safely Remove the Wheel
Removing the wheel can be tricky, and to avoid any sort of incident, it is best that you follow standard safety procedures. Here are a few safety reminders:
- Park on a Level Surface: Prior to performing any maintenance, please secure the vehicle on a stable surface, as this would assist in preventing the car from rolling anytime it’s being worked on.
- Engage the Parking Brake: Set the parking brake to avoid any unexpected movements of the car while you work on the wheel rip.
- Use Wheel Chocks: Ensure that wheel chocks are placed on the side of the vehicle that is not being worked on. This helps promote further safety by ensuring that the vehicle does not roll or shift.
- Wear Personal Protective Equipment (PPE): Ensure that you are well protected by ensuring that you have appropriate PPE, such as gloves and safety glasses to protect yourself from becoming prone to some hazards or even debris.
- Consult the Vehicle’s Service Manual: keep in mind that every vehicle is different, and each of them has detailed information on maintenance steps, procedures, and specific requirements; therefore, ensure that proper consultation is done, preferably to the vehicle’s management guidelines for safe wheel detachment.
Here is a source of these safety tips so that you can be sure the removal of the wheel and all maintenance that follows is a process that is safe and easy.
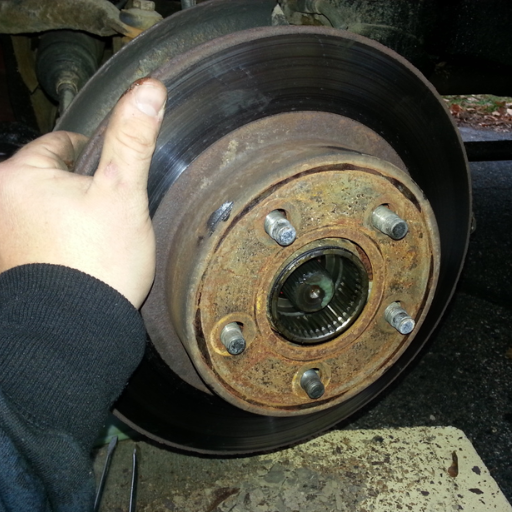
How to Remove the Brake Caliper and Rotor
Dismantling the brake caliper and its rotor is essential when working on the braking system of your vehicle. As an expert in the industry, I understand this concept well, so this guide will walk you through in detail how to do the whole process:
- Gather the Required Tools: To begin with, you have gathered all the tools you will require in advance, i.e., a socket wrench, corresponding socket sizes, brake caliper tool, and C-clamp.
- Prepare the Vehicle: For additional security, The car should be parked on a flat surface and the parking brake activated. For easier access to the brake caliper, turn the steering wheel in the direction of the front wheels that are to be disassembled.
- Loosen the Lug Nuts: To disassemble, grab a lug wrench or a socket wrench and loosen the lug nuts that hold the wheel attached to the brake rotor and caliper. At this stage, don’t take the lug nuts off completely.
- Elevate the Vehicle: With the aid of a hydraulic jack, raise the car above the ground and place it on sturdy jack stands. Maintain the vehicle’s stability and test the location before moving further.
- Remove the Wheel: Now that the nuts are loose, carefully take them off and protect them in a separate place where they cannot be damaged.
- Release the Brake Pressure: With the help of a brake pistol and, at the same time, a c-clamp, allow it to be inverted so the piston and the butt end can resist the urge to be tougher than required.
- Remove the Brake Caliper: The brake caliper can be found either on bolts or slide pins, which have to be removed with the use of a wrench or socket. Once lowered, detach the caliper from the rotor while being careful with the brake hose.
- Inspect and Remove the Rotor: After removing the brake caliper, inspect it for any damage, wear, or even unevenness. Furthermore, if the material seems stuck with the wheel hub, gently tap it with a hammer or rubber mallet until it separates, ensuring the wheel studs are undamaged.
Once the aforementioned surgeries have been done, you can now get rid of the brake caliper alongside the rotor for optimized post-maintenance or replacement purposes. It must be stressed that there are great risks involved while completing surgery, and therefore, the necessary precautions must be taken. Consulting the service manual of the vehicle is highly recommended in order to ensure that no specific precautions and instructions are missed.
Disconnecting the Axle Nut and Tie Rod
the removal of the axle nut and tie rod is an important step when replacing the front wheel bearing. Let me provide you with a clear approach to how to perform these actions properly:
- Disconnecting the Axle Nut: The axle nut can be found in the center of the wheel hub, which can be unscrewed by utilizing the proper socket and wrench. Because this particular nut tends to get tightened to full torque, ensure you have the right tools for the job.
- Separating the Tie Rod: The steering rack’s tie rod end is most likely to be the one attached to the steering knuckle. The tie rod end, which is solidly fastened to the steering knuckle, can be lifted with a wrench or pliers. You may have to seek out a pickle fork or a ball joint separator if the tie rod head seems to be held to the steering knuckle.
Tension the tie rod and reach for the axle nut with a wrench, by following these steps as provided you will be able to successfully remove the axle nut and the tie rod which in turn will make it possible for you to move to the next steps which is replacing the front wheel bearing. Always remember to check the service manual of the vehicle, as your safety remains a priority.
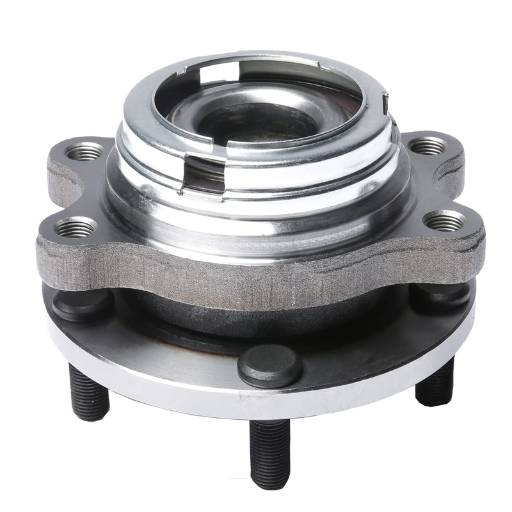
How to Replace the Front Wheel Bearing
There are several crucial procedures that should be followed while assuming the task of installing a front wheel bearing. Below is a stepwise description of the procedure:
- Removing the Old Bearing Assembly: Eliminating the old bearing assembly starts by removing the wheel along with the brake calipers, which gives access to the assembly. Unscrew any retaining bolts or clips that may be present under the old assembly and remove it carefully from the steering knuckle.
- Pressing the New Wheel Bearing into the Knuckle: Using a suitable tool, fit the new wheel bearing into the steering knuckle, ensuring that it is pressed in firmly and sitting evenly into the knuckle.
- Reassembling the Hub Bearing Assembly: H, reinstall any retaining clips or bolts, and reassemble the hub bearing assembly. Please ensure that all components are aligned properly and tightened to the specifications of the manufacturer.
- Finishing the Wheel Bearing Replacement: properly align the new hub assembly onto the spindle, use the additional clamp and rotor along with the caliper, and tighten all bolts securely. Finally, you may optionally place the wheel back and tighten the lug nuts till a certain torque.
The service manual of the vehicle will have detailed information which should be adhered to. Although some general standards do exist, further instructions are provided in the service manual which should be consult when taking safety measures during the wheel bearing replacement, do keep that in mind.
How to Press the New Wheel Bearing into the Knuckle
Replacing a wheel bearing involves an important step which is the pressing of the new wheel into the knuckle. As an experienced industry professional, this is one step that you can’t skip because it could lead to further complications that can compromise the integrity of your vehicle. Keeping this in mind, here is a concise guide that might help you in this procedure:
- Prepare the Necessary Tools, which could be exhausting. Before you start, make sure to have all the necessary equipment, such as a wheel bearing press, a driver set, and an adapter or sleeve that fits the size of the bearing.
- Align and Position the Bearing: Alignment is very important; therefore, place the new wheel bearing on the press bed and align it at the center. The knuckle should sit directly on top of the bearing, make sure it reaches to the center as well.
- Apply Pressure Gradually: Slowly use the press to apply pressure onto the bearing, but do it gradually and in a consistent manner while pushing it into the knuckle. Make sure that no misplacement occurs while inserting the bearing and that the overlap remains smooth as well.
- Check for Proper Fit: Now that the bearing has been pressed into the knuckle, check to see if it has tightened or if it is loose. While rotating the assembly, check that there is no flickering of excess play as well.
Watch closely as we demonstrate how to press the new wheel bearing into the knuckle, thereby completing a critical component of the wheel bearing replacement procedure, provided the wheel bearing heat is applied in a proper manner.
Reassembling the Hub Bearing Assembly
the sixth step in the wheel bearing replacement process is to assemble the hub bearing again with the help of the previously removed bolts and screws. The steps to do the re-assembly of the hub bearing are:
- Clean and Inspect Components: Before reassembly, the hub, bearing, and knuckle must be completely cleaned of any dirt and debris. Also, the parts should be inspected for any cracks or signs of damage.
- Apply Lubrication: High-temperature wheel bearing grease should be placed on the hub inside and the wheel bearing’s outer side in a small quantity. This will help to reduce friction and wear.
- Align and Insert Bearing: Place the wheel bearing in the hub and try to align them in a way that both components are well fitted together. Using a press, or any suitable tool, press the bearing evenly into the hub and recall to check that the bearing is centralized and flush.
- Secure the Hub Assembly: With the bearing in place, the components are silicated by adjusting the retaining nut or bolts according to specifications provided by the manufacturer. Take care not to overtighten, as this will damage the bearing.
All in all, just be mindful of all the details and perform all the mentioned steps above. You are now closer to finishing the wheel bearing replacement as you have successfully put together the hub bearing assembly.
Finishing the Wheel Bearing Replacement
we know that performing a wheel bearing replacement is a step-by-step process. Now that you have managed to reassemble the hub bearing assembly, the process can be said to be complete, even though a few steps are still necessary for maximum performance. The following are the last things to bear in mind:
1. Install the New Hub Assembly
To put in the new hub assembly, carefully position it into the axial area while making sure that there is a secure fitting on the axle housing that is flush. Make use of tools or any other method practiced by the manufacturer to fasten the hub assembly securely against the axle housing dukelone.com.
2. Reattach the Brake Caliper and Rotor
After putting in place the new hub assembly, reinstall the rotor and brake caliper. Ensure that you correctly align them with the hub assembly as well as the recommended torque for the caliper bolts or mounting hardware when aiming to tighten them. This step is vital so as to ensure the efficient operation of the brakes and effective general safety.
3. Put the Wheel Back
The last step would be to re-attach the wheel to the car. Make sure to position the wheel onto the hub assembly in such a manner that the lug bolts or studs fit into the wheel’s lug holes. Slowly snug the lug nuts or bolts in a crosswise manner, one or two at a time, so as to not overtighten any of them. Make sure to follow the manufacturer’s recommended torque specifications for all the bolts and nuts.
Over the months, you have gradually noticed some noises from your car, or you’ve felt some vibrations in the steering wheel. Possessing some automotive skills and following this professional guideline, you can carry out the completion of the wheel bearing replacement confidently, knowing that it will operate smoothly, reduce friction, and give an expected performance to the wheel assembly of your car. Please note that every vehicle has its own service manual, and it is advisable to check your vehicle’s manual for other considerations and outstanding issues regarding your vehicle’s make and model.
How to Install the New Hub Assembly
Putting together a new hub assembly is one of those jobs that needs both precision and attention to detail. So, as one who has worked in the industry, the best way I can assist you with the installation is by providing you with a short step-by-step guide as follows:
- Prepare the Vehicle: Make sure the automobile is parked on a level surface, and the parking brake is released. Put on gloves and safety goggles to protect yourself during the step of mounting the structure.
- Remove the Wheel and Brake Caliper: Raise the automobile using a jack and steady it with jackstands. Loosen and detach the nuts or bolts, fastening the wheel and taking the wheel off. Then detach the brake caliper, ensuring you do not pull the brake hose too much, and tie it carefully out of the way.
- Remove the Old Hub Assembly: Now locate and unfasten the bolts or nuts, fastening the hub assembly to the steering knuckle. In the case of a rough knuckle connection, lightly hit the assembly with a rubber mallet to loosen. If any electrical connectors or ABS sensors were attached, unfasten them as well.
- Prepare the New Hub Assembly: Verify the new assembly does not have any cracks and is compatible with the old one. Prior to fitting in the new hub assembly, apply an anti-corrosion agent on top of the hub assembly to ensure ease of fittings in the future.
- Install the New Hub Assembly: The new hub assembly is to be joined with the steering knuckle while, for the first time, simultaneously lining up the bolt holes or studs that are supposed to match. The mounting bolts or nuts should be inserted and tightened to the required torque specifications. Restore any electrical connections, particularly ABS sensors if available.
- Reattach the brake hydraulic and rotor: Use great care to position the brake rotor over the assembly in such a position that it is seated centrally over the hub. Replace the brake caliper, but make sure the brake pads match the alignment with the rotor. Follow the manufacturer’s specifications on the tightness of the caliper bolts.
- Put the Wheel Back: Align the wheel with the hub assembly, ensuring the lug bolts or studs align with the wheel’s lug holes. Gradually tighten the lug nuts or bolts in a star or crisscross pattern to ensure even and secure fastening, following the manufacturer’s recommended torque specifications.
As such, if you follow these steps carefully and the instructions given by the manufacturer, you will be able to install the new hub assembly without any mistakes, thus confidently ensuring an effective and perfect functioning wheel assembly of your vehicle through reduced friction.
Final Steps to Put the Wheel Back
The tasks that you will be performing are at the cutting edge of your skills as an industry expert. The last bits of ‘putting the wheel back’ are imperative as far as the wheel is fastened and its correct placement is concerned. Following is how the process will be completed:
- Align the Wheel: Without spindling the hub, fit the bolts/studs of the lug with the intended holes of the wheels to their respective locations and start fastening them.
- Gradually Tighten the Lug Nuts or Bolts: Using a star or crisscross method as a guide, begin to slowly tighten the lug bolts or nuts. This helps the wheel to be firmly locked and positioned evenly.
- Follow Torque Specifications: Once you have tightened your lug bolts or nuts in accordance with the manufacturer’s recommended torque settings for your vehicle, pick a torque wrench and set the lug bolts nuts or bolts to the required torque values.
Completing the wheel installation on the vehicle can be a delicate process, but adhering to the instruction manual and securing it shouldn’t be an issue. Don’t forget to check your owner’s manual or the manual provided by the manufacturer in case there are any specific instructions or torque specifications that they may have provided.
Reference
- WikiHow: How to Change Wheel Bearings – A step-by-step guide with pictures to help you through the process.
- Hagerty: Step-by-step instructions on replacing your car’s front wheel bearings.
- YouTube: How to replace wheel hub bearings + useful tips – A video tutorial featuring useful tips for replacing wheel hub bearings.
Frequently Asked Questions (FAQs)
Q: What are the signs that a wheel bearing is bad and needs replacement?
A: Common signs of a bad wheel bearing include unusual wheel bearing noise such as humming, grinding, or growling sounds, uneven wear on front tires, and excessive play in the wheel. If you suspect your wheel bearing is bad, it’s important to address it promptly to avoid further damage.
Q: How do I remove the bearing from the wheel hub?
A: To remove the bearing from the wheel hub, first remove the wheel and brake components, then unbolt the wheel bearing hub assembly. Use a hydraulic press to press out the bearing from the hub. Be cautious not to damage surrounding components during this process.
Q: Can I replace a front wheel bearing without a hydraulic press?
A: While it is challenging, you can replace a wheel bearing without a hydraulic press by using alternative methods like a bearing puller or a hammer and drift. However, using a hydraulic press is recommended for a safer and more efficient process.
Q: What tools are needed to replace a front wheel bearing?
A: Essential tools for replacing a front wheel bearing include a jack and jack stands, lug wrench, socket set, ratchet, torque wrench, hammer, punch, and potentially a hydraulic press to press out and press in bearing components.
Q: How do I remove the rotor from the hub?
A: To remove the rotor from the hub, first remove the caliper and caliper bracket. Then, slide the rotor off the wheel studs. If the rotor is stuck due to rust or corrosion, gently tap it with a rubber mallet or use penetrating oil to loosen it.
Q: What is the role of the cotter pin in wheel bearing replacement?
A: The cotter pin secures the axle nut in place, preventing it from loosening over time. When replacing a front wheel bearing, you will need to remove the cotter pin to access and remove the axle nut. Always replace the cotter pin with a new one during reassembly.
Q: How do I know if I need to replace both the inner bearing and the outer bearing?
A: Inspect both the inner bearing and outer bearing for wear, damage, or noise. If one bearing is bad, it’s often recommended to replace both to ensure even wear and prevent future issues.
Q: Can I watch a tutorial on how to replace a wheel bearing?
A: Yes, you can find many tutorials online, including the world on YouTube, which offer step-by-step guides to help you learn how to replace a wheel bearing in your car.
Q: Why might I need to change the hub and bearing together?
A: Sometimes, the hub and bearing are integrated into a single assembly. If the wheel bearing hub is worn or damaged, it’s often more efficient to replace the entire hub and bearing assembly to ensure optimal performance.
Q: What should I do if I hear wheel bearing noise after replacement?
A: If you hear wheel bearing noise after replacing the bearing, double-check to ensure the bearing was installed correctly and that all components are torqued to the manufacturer’s specifications. If the issue persists, consult a professional mechanic.