Who knew that changing a wheel bearing on your own was as simple as sticking to a series of easy steps? The correct tools, knowledge, and diligence are a few prerequisites. First begin with checking if your car is parked on a level surface with the wheels chocked, then go ahead and use a jack to lift the car. Thereafter, the hub will be accessible by removing the wheel and brake components. Now remove the hub assembly; however, keep in mind that depending on your car model, the bearing will be attached with nuts, rods, bolts, or screws. With the assistance of a bearing press or an appropriate tool, the old bearing needs to be removed, afterwards the new bearing can be installed in the hub. Always keep a manual close while performing repairs, removing or entering the engine bay, or disassembling your car.
What is a Wheel Bearing, and Why is it Important?

A wheel bearing is an important part of a vehicle’s wheel system, which considers the friction low in order to allow smooth rotation of the wheel. It is made of a set of steel balls or rollers captive in a ring of metal to bear radial and axial forces when driven. These parts are key in properly aligning the wheel and working with other system parts by carrying the weight of the car, minimizing wear, and maintaining safety. The absence of functional wheel bearings seriously degrades the driving economy and compromises the spatial stability and safety of the vehicle.
Understanding the Wheel Bearing Function in Your Vehicle
Wheel bearings play an essential role in the smooth running of the car, providing support and balance and, most importantly, facilitating the movement of the wheels that rotate. They not only support the load of the car, but they also ensure there is accurate alignment of axles and wheels, thus increasing safety while driving. Taking care of the matter is made easy, as if the wheel bearings start getting excessive vibration, buzzing sounds, or worse, wheel failure, they can easily be replaced.
Signs Your Wheel Bearing Needs Replacement
There are some signs that indicate that your car wheel bearings are bad and need to be replaced. I have seen vehicles make a humming sound or a scary growling noise, particularly when you are trying to turn the car, which is an obvious indication that the car will change its wheel bearings in the near future. Also, one gets excessive vibrations in the steering wheel, or the car tends to pull one way or the other. More pronounced is the uneven tread wear of tires, which is often a symptom involving the wheel bearing. If you are having any of these issues, it is crucial that your vehicle gets inspected in order to avoid more severe damages or dangerous situations to occur.
Risks of Ignoring a Bad Wheel Bearing
Let us not forget the dangers of driving around with a bad wheel bearing. Whether you drive with a wobbling wheel or a wheel that decides to detach while being roamed, safety is compromised grossly. This is not just limited to altered wheel movements; a good wheel bearing also decreases friction, which decreases the chances of surrounding parts like axles or hub being overheated. Furthermore, if you try neglecting the repairs, not only will it put others at risk, but it will also result in costly future repairs that were easily preventable.
How to Remove the Wheel Safely?
So you need to take off your car wheel and put it back on safely, eh? That’s as easy as pie, but I always recommend working slowly and carefully just to be on everyone’s safe side. Firstly, my first advice is to park the car on a flat surface and turn on the parking brake. Secondly, to prevent any potential wobbles, I place wheel chocks onto the non-operated wheels. Now, it’s time to lift the car using a jack. For this, I do a bit of a hack; I slightly loosen up the lug nuts while the wheels are still on the ground since that makes it much easier to remove later on. Lifting jacks have a maximum rated lifting point, so make sure to position the jack under that and lift the vehicle until the specified wheel is high enough to be taken off. Once the vehicle is off the ground, remove the lug nuts completely and voila, the wheel pops out. Throughout this procedure, I alternatively check my car and jack, ensuring the entire setup is steady and nothing wobbles. All in all, this process is fairly straightforward and minimizes the risks of getting injured or damaging the car.
Tools Required to Remove the Wheel
I believe that with the right tools at hand, removing a wheel can be efficient and can also be done easily and in a safe manner; here are some tools that you will need to have along with the reasons for their necessity:
- Lug Wrench or Tire Iron
This device comes in handy when loosening and removing the wheel nut. Most cross-shaped lug wrenches are here to save the day as they give a boost in support. However, a breaker bar may also assist in the removal of stout lugnuts.
- Car Jack
Differing from regular mechanics jacks, a scissor jack or a hydraulic floor jack is a must when lifting the car for repair. Always ensure that it has the capacity to lift a greater weight than the weight of the car. And while placing the jack, do it on the endorsed strata of the car only.
- Jack Stands
For enhanced security, after raising the vehicle, always put jack stands beneath that car. These stands are strong enough to keep the vehicle secure when you are working on it with lowered assistance.
- Wheel Chocks
Chocks, when inserted behind non-raised tires, ensure that the vehicle doesn’t go off rolling. While this is a simple task, it offers protection to the vehicle.
- Work Gloves
Although not a requirement, work gloves aid in providing protection to your hands against dirt, grease, and any abrasions, making the work much more convenient.
- Torque Wrench (Optional but Recommended)
You may find a torque wrench helpful when removing or fixing the wheel since it allows you to tighten the lug with respect to their standards. Over-consuming would add more stress to the wheel, whereas under-consuming would expose the joints in the wheel.
When utilizing these tools, and if necessary precautions are exercised, safely removing a wheel can be done without incurring any injuries or damaging the car.”
Steps to Safely Remove the Wheel
- Park on a Level Surface and Secure the Car
To start, I place a vehicle in a location where it is on an even surface so that the wheels do not move. Then, I place the handbrake, and if I have access, moving chocks are placed behind the other wheels. This step mitigates the chance of any movements while servicing the vehicle.
- Loosen the Lug Nuts Slightly
Working towards taking the car off, I get the wrench and unscrew the nuts on the wheel I plan on removing while the car is still on the ground so that the wheel is still intact. It is important to do this because the wheels spinning makes it more difficult to do so.
- Lift the Car Safely with a Jack
In order to lift a car up, I reach for the car jack and identify where the designated placing areas are underneath the car. (be sure to consult the owner’s manual for the specific areas, as the wrong places can damage the car). After putting the Jack in the right position, I carefully rotate the turning knob to raise the car until the desired position is reached and the wheel is dangling off the ground.
- Place a Jack Stand for Extra Support
Safety is non-negotiable, so I firmly placed a jack stand underneath the car to provide extra support to the car. This step provides more reassurance that the car won’t drop when being lifted up and also assists if the jack is removed or turns during the wheel change.
- Remove the Lug Nuts Completely
Detach the Lug Nuts As the car sits lifted, I take out the already loosened lug nuts making sure to put them aside safely so that none are lost.
- Take Off the Wheel
Thereafter, I take the wheel off the hub by gently pulling it away, if rust or stale dirt had built up then the wheel may rotate with the hub which is expected. A little nudging on the tire resolves the issue easily.
Absolutely! If these steps are carefully executed, ensuring that adequate safety measures are taken, then wheel removal can easily be done within the right context.
Precautions While Removing the Wheel
The first step I take is to put safety first when it comes to taking off a wheel. I make sure the car is fully placed on a flat, solid surface, and I use the parking brake to eliminate the risk of rolling. Securing the car properly with a jack stand is essential—never trust a jack alone since it might break. Cutting my hand on sharp edges or dirty surfaces is something that I always try to avoid, and putting on gloves is a good first step. Last but not least, I check the car and my tools and equipment to make sure everything is where it should be. Time after time, I have been able to carry out the task properly as a result of such measures.
How to Replace a Wheel Bearing?

Wheel bearing replacement is not just a simple twisting of a wrench. It is a multi-step process combined to ensure that the work is done right. It all begins with jacking up the vehicle and disconnecting the wheel by removing the lug nuts, the brake, and any calipers if necessary. A puller comes in handy when removing the wheel hub, or one can simply unscrew the bolts. Next, with the help of a bearing press, the previous bearing can be pressed off. After that, the new bearing is installed, components are reassembled in the reverse order, and the bolts are tightened. Last but not least, the installation is checked by testing the vehicle and following the service manual for instructions.
Preparing to Replace a Wheel Bearing
For a DIY’er, this task may seem worrisome. A step-by step instructions seem highly doable. It’s a great contest for waiting for strength and skill. To bear in mind, the first and foremost necessity of such a task is to have all the tools; it may include a jack, stands, bearing press, or torque wrench. One never has to compromise on safety and working space. It is always recommended to work in firm and leveled space with the correct gears on. Next comes the fun: make sure to read the vehicle manual to get a good, strong feel of the components and functionality since it’s a good way to prevent any chances of error. However, once you ensure that everything is done, correct planning allows easier strategies to be put in place for the task. The best part of the task is fulfilling it, which requires strength and calmness.
Detailed Steps for Wheel Bearing Replacement
- Secure the Vehicle and Gather Tools
To begin with, I make it a point to place the vehicle on a flat-level surface and set the parking brake. Then, I use a jack to lift the vehicle up and place jack stands under the vehicle for safety. All my tools, including sockets, a pry bar, and a torque wrench, are all in one place and easily within reach. Anything that I need, I would be in close proximity so that I do not need to go hunting for them during the process. This is a much more efficient approach as it saves a lot of time.
- Remove the Wheel and Brake Components
I first take off the tire using a lug wrench or impact driver. After that, I take off the brake caliper and rotor very carefully and with great precision. During these moments, it is vital to support the caliper so as not to put too much force on the brake line, and I always make an effort not to break these parts.
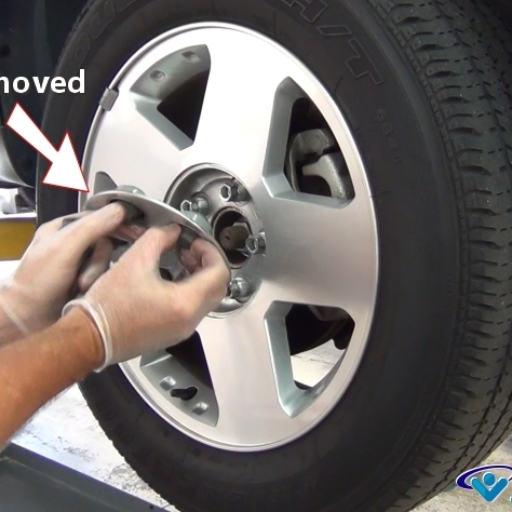
- Access and Remove the Old Wheel Bearing
After this, I remove the wheel bearing assembly. It could be necessary to take off the hub or additional bolts holding the bayonet bearing, which is common for other types of sensors. I have found a bearing press to be really useful in the safe removal of the old bearing from the housing. Particularly, there is a need for patience because haste will only lead to difficulties.
- Install the New Wheel Bearing
For this step, I remove the new bearing from the bearing press & install it. While doing so, I ensure that it is properly seated in place and is torqued to the specifications provided in the vehicle servicing manual. It is essential that we verify and double-check this step, as it has a significant impact on future breakdowns.
- Reassemble and Test
After this, I follow the reverse order & start connecting all parts and components after making sure that each bolt and other fastening devices have been thoroughly tightened. I then put the wheel and brake assembly back into position, lower the car, fit in the right torque on the lug nuts, and take a short drive so that I can make sure that there is no noise or any other obstruction.
By adhering to these guidelines step by step, including care, the replacement of wheel bearings becomes a job that can be accomplished with confidence, and still, one is not adept in automobile maintenance.
Common Mistakes When You Replace a Wheel Bearing
In my view, a couple of the most frequent mistakes made while changing a wheel bearing are the indiscriminate use of tools and not diagnosing the issue at hand. As mentioned previously, mischainage of the wrench and claim can lead to excessive repairs if one even recognizes the core issue. Omit’s second most frequently made mistake is that in-appointment bearing installation tools are not being used, or worse, jury-rigging methods are used to install a bearing to avoid damaging other parts or components of the device. The improper application of torque, in this case, over-tightening and under-tightening bolts and lug nuts, will invariably lead to a greater drive or wear and tear of the machine. Collating oil and installing the bearing halts proper installation; this is all basic cleanliness. In conclusion, a haphazard bearing cleaning strategy will increase and extend the span of relative failure of MTBF (Mean Time Before Failure). Ensuring that all these details are focused upon solves a majority of issues.
How to Install the New Wheel Bearing?
To start, ensure you have a clean working space and parts in order to avoid contamination during the installation of the wheel bearing. Use a jack to hold the vehicle in place and tension the jack stands to remove the wheel before proceeding to detach the brake assembly in order to get access to the hub. Using a puller or specialized press, carefully pull the old bearing off to avoid any damage. After doing this, take the proper tools and press the new bearing into alignment. Make sure all parts are properly assembled after all the bolts are torqued to the required specifications. Before lowering the vehicle, make sure to spin the wheel to test its smoothness and look out for any issues. It is advised to take precision very seriously at every step of this process, given facility and safety depend on it.
Choosing the Right New Wheel Bearing
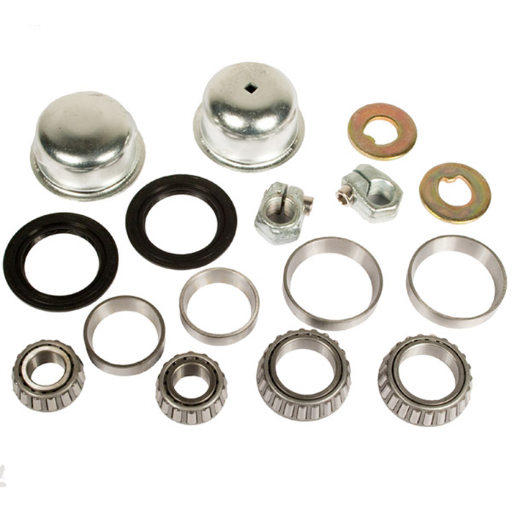
When one is choosing a wheel bearing, quality, compatibility, and performance should be taken into account. Focus on purchasing from manufacturers of good credibility and recall. Look into the make, model, and specifications of the vehicle to ascertain the size and type, whether it is ball or roller bearings. What are the working conditions of the equipment? Vehicles operating in very hot or very cold weather or heavy bearing loads might need heavy-duty or sealed bearings. Also, check the manufacturer’s warranty and certifications to be sure that the constructing work is of high quality. Getting the right wheel bearing guarantees that the components and systems of the vehicle operate perfectly and even increases the life of the components.
Step-by-Step Guide to Install the New Bearing
- Prepare Your Workspace
First, make sure the car is lifted on a solid, flat surface using a hydraulic stand. Take a socket set, grease, and a torque wrench with you to your workspace.
- Remove the Wheel and Brake Assembly
Take the wheel off by removing the nuts and calipers carefully, along with the rotors, so that the hub assembly is in full view.
- Detach the Old Bearing
Thirdly, remove the previous wheel bearing alongside the hub assembly, clean the rust or any impurities left in the area, and use the bearing puller otherwise.
- Install the New Bearing
Put the new bearing in place, check for correct alignment, and carefully fit it in the hub assembly, which should not cause any damage to it.
- Reassemble the Components
Take torque wrenches and use them to attach the hub tightly together alongside the brake calipers and rotor with the wheel.
- Test the Installation
Go on and take the car out for a drive. This way, you could hear and check if there were any strange sounds coming from the framework due to the bearing and if it was fitted properly or not.
Testing After New Wheel Bearing Installation
To check if the new wheel bearing is installed correctly, first, drive at low speeds and listen for odd sounds. After that, gently accelerate to highway speeds in order to ensure the vehicle can operate smoothly without any vibrations or pulling. Moreover, check if the steering and brakes are stable to determine if the alignment and performance are good or not. If any issues arise, check the installation again.
When Should You Consult a Mechanic?

If you hear any unusual sounds, feel excess vibrations, know that the wheel bearing damage has affected surrounding components, or don’t have the right tools to fix it, you should reach out to a mechanic for assistance. They make sure that your vehicle is in good condition to perform complex activities.
Identifying Complex Wheel Bearing Issues
Complicated bearing issues may be evident due to the combination of uneven tire wear, ABS light blinking, and too much play during manual checks. Grinding or roaring noise that gets more pronounced when the speed increases or while the vehicle is turning can be more serious signs as well. One should make sure that these symptoms are addressed by a professional if they do not go away after some surface checks or servicing.
Benefits of Professional Mechanic Assistance
Enjoying quality services provided by professional mechanics guarantees proper diagnosis, efficient repairs, and the correct use of equipment, as well as minimizes the possibility of further damage having occurred. Their presence increases the level of safety, timeliness, and efficacy of the vehicle, saves your time, and stresses you out less.
Cost Analysis: DIY vs. Hiring a Mechanic
Employing a professional mechanic often proves to be cheaper in the long run than repair work that is done by the owner. A common belief is that the do-it-yourself approach is cost-effective because of the low upfront cost. However, the lack of skills and proper tools could lead to uncompleted repairs, which may result in further damage or safety concerns which will eventually cost more. An expert mechanic will diagnose the problem correctly, use genuine manufacturer parts, and do the repair with all the craft standards required, thus providing a better deal because the vehicle will last longer and there will be no the same problems appearing.
Reference
- WikiHow: How to Change Wheel Bearings – A step-by-step guide with pictures to help you through the process.
- Goodhood Auto: DIY Guide to Replacing Your Car’s Wheel Bearings – A detailed DIY guide covering the necessary steps.
- NSK: How to Replace a Wheel Bearing – Offers professional insights and tips for wheel bearing replacement.
Frequently Asked Questions (FAQs)
Q: What are the signs that your wheel bearing is bad?
A: Common signs of a bad wheel bearing include unusual noises such as grinding or humming from the wheel area, uneven tire wear, and vibrations in the steering wheel. If you experience any of these symptoms, it’s crucial to check the wheel bearing hub assembly.
Q: How can I learn how to replace a front wheel bearing?
A: You can use this information to learn how to replace a front wheel bearing by consulting detailed guides and tutorials available online. Many DIY mechanics find video tutorials helpful, as they show each step in the replacement process.
Q: What tools do I need to change a wheel bearing?
A: To change a wheel bearing, you typically need a jack, jack stands, a lug wrench, a socket set, a wrench set, a hammer, a torque wrench, and possibly a specialized tool to remove the hub bearing assembly. The exact tools may vary based on your vehicle’s make and model.
Q: How do I remove the brake caliper when replacing a wheel bearing?
A: To remove the brake caliper, first, ensure the vehicle is securely lifted and supported. Then, use the appropriate socket or wrench to unbolt the caliper from the caliper bracket. Carefully lift the caliper off and secure it to avoid stress on the brake hose.
Q: What steps are involved in removing the rotor and hub bearing assembly?
A: After removing the brake caliper, you need to remove the rotor by taking off any retaining screws or clips. Once the rotor is removed, you can access and unbolt the wheel bearing hub assembly from the wheel’s hub.
Q: Why is it important to replace a front wheel bearing promptly?
A: Replacing a front wheel bearing promptly is crucial because a failing bearing can lead to more serious issues, including damage to the wheel’s hub and potential loss of vehicle control, which can be dangerous while driving.
Q: How do factors beyond ChrisFix’s control affect changing your wheel bearings?
A: Factors beyond ChrisFix’s control, such as the specific make and model of your car or varying levels of mechanical experience, can affect the ease and method of changing your wheel bearings. It’s important to consider these when using guides or tutorials.
Q: What should I do after replacing the wheel bearing?
A: After replacing the wheel bearing, ensure all components are properly reassembled and torqued to the manufacturer’s specifications. Lower the car carefully and test drive it to check for any unusual noises or handling issues that could indicate a problem.
Q: Can I use the information contained in this video for other vehicle repairs?
A: While the information contained in a specific video may provide valuable insights, always ensure that the repair techniques and specifications match those required for your particular vehicle make and model. Each vehicle may vary in its repair requirements.