Bearing removal may be daunting, but it is paramount nonetheless when you are dealing with a mechanical or automobile repair. Be it a motorcycle, car, or heavy-duty machinery, knowing the correct approach to removing a bearing without compromising the rest of the components is of utmost importance. This present article seeks to offer a concrete presentation of the use of a bearing separator, which is one of the most applicable tools when it comes to removing the most stubborn of the bearings, which are the separators. We’ll take you from how it looks, how to use it and how it will all help you in removing bearing parts. Having finished this guide, we would like to thank you in advance for all your appreciation and hope you are excited about your next repair project because, with this tool, the possibilities are endless.
What is a bearing separator, and why do I need one?
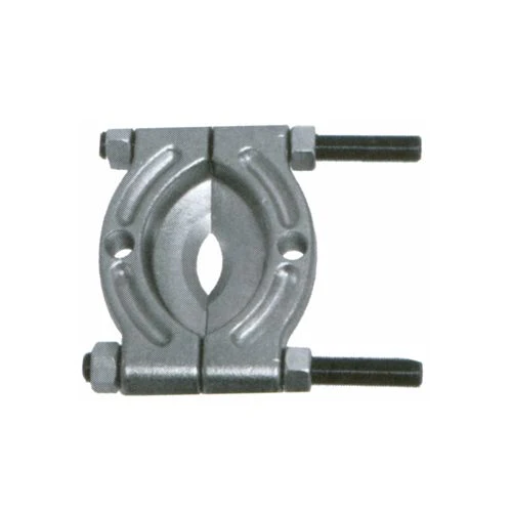
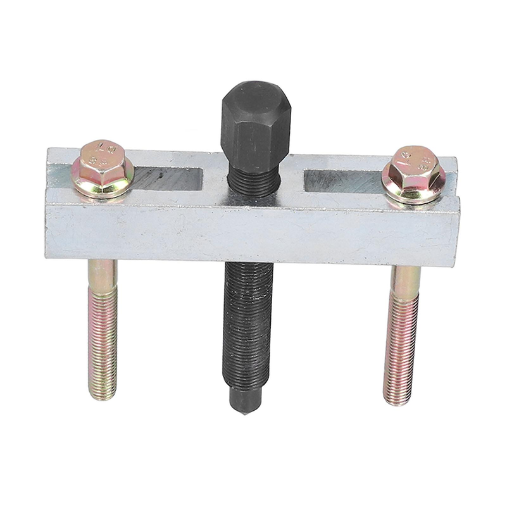
The bearing separator is specifically used to aim for more precise removal of gears, bearings, or even shaft components without inflicting any damage. It works by applying force on the outer edge of the component to be removed so as to avoid damaging other components attached to it. Such a tool would be very helpful for most professionals and even amateurs because it makes the process of removing parts more effective, safe,r and faster than using just bare hands while making sure that the equipment stays intact.
Understanding the purpose of a bearing separator
a bearing separator can be said to be absolutely helpful when dealing with machines and mechanical parts. I have noticed that its main use is to remove easily parts such as bearings or gear which are placed forcefully on shafts or even placed in the housings. Otherwise, the components or the machine itself tend to get damaged. It allows me to exert uniform and distributed pressure without compromising on the maximal strength endured by the parts… Thus, time wastage and money spent on repairs or replacements are avoided, which in such cases definitely makes a bearing separator a handy tool for any mechanic.
Advantages of using a bearing separator over other removal methods
In comparison to other methods of removal, using a bearing separator guarantees greater accuracy and effectiveness. It also ensures that there is no concentration of stress on the bearing or the housing, which might render them damaged. Bear in mind that separation using prying or hammering may create misalignments and deforms parts, hence a separator is a more refined option. This, by definition, not only protects the parts’ integrity but also cuts downtime and repair costs, which renders it a crucial piece of equipment in the hands of maintenance and repair professionals.
Types of bearings that can be removed with a separator
the industry uses bearing separators in order to take off almost all types of bearings: ball bearings, roller bearings, and tapered bearings, which can be found in various machines and cars, and even thrust bearings and needle bearings that are found in some special devices. I believe/bear in mind that these are economically powerful tools because they work on press fit bearings and compact build assemblies with great protection and delicacy I view this as why I always revert back to using these.
How do I choose the right bearing separator for my needs?
Selecting a bearing separator that meets your needs is not as difficult as it may appear. Through the years, I have discovered that the secret is in identifying your needs and finding where the features of a tool meet those needs. So here’s how I would do this:
- Size of the Bearing:The crucial factor to bear in mind is the size of the bearing to be worked on. There are various sizes of bearing separators, therefore, picking one that is equal to or greater than the bearing size guarantees a tight fit and eliminates damage risk to both the tool and the component.
- Type of Bearing: Different jobs require a variety of bearings at times. For example, ball bearings or needle bearings might require sharper-edged and more precise separators, while larger components such as roller bearings might require the use of a coarser separator.
- Material and Durability: The material used to make the tool is always a prerequisite for checking. I have a deliberate preference for heavy-duty steel separators because they are more reliable and can withstand high-force applications. Quality tools are constructed of quality materials and are, therefore, more long-lasting and reliable instruments.
- Adjustment Capability:Separators that are adjustable are preferred. This feature makes it possible for you to work with bearings that are of different sizes while using a single tool, thus conserving time and materials.
- Ease of Use: A tool that is easy to use is new and well-designed; hence, from the onset, it makes sense to use it. It is worthwhile to note that if you have never used a separator before, look for one that has clear-cut instructions, a simple setup, good grips, and is ergonomically made.
- Application Environment: Think of how the separator will be used. If you are to work in confined areas or with press-fit parts, a thin and small separator may be needed.
Bearing in mind all these elements, it is easier to choose the most appropriate bearing separator that fulfills their objectives of short-term needs and is also beneficial in the long run. It is a tool that is a combination of precision, power, and versatility, and I believe such a tool is always worth having!
Sizing considerations for bearing separators
With regards to the size of separators bearing the following can be emphasized:
- Jaw Capacity: This has to do with the maximum diameter of the bearing or components that the separator can continue to work on. Please remember always to check the outer diameter of the bearing you want to use and make sure the separator’s jaws have the appropriate capacity to grip the bearing securely. Any bigger parts will be impossible to work on as the device does not have the appropriate jaw capacity.
- Blade Thickness: The thickness of the blades varies in such a way that certain blades can fit in between the separator and the bearing and the supporting structure with ease, and likewise, other blades may not suffice. In such cases, having a surrounding interference fit or forcible press-fit components requires devices with slimmer blades to fit in that space accurately while avoiding any damage to the surrounding components.
- Puller Size Compatibility: A lot of bearing separators are not effective on their own and are used alongside pullers in order to remove bearings themselves. It would be best to check the type of separator you already have in terms of size and functionality with the puller tools you have in order to use them together effectively and not cause problems during the process.
- Material Composition and Strength: What determines the strength of the separator is the material from which it is made. It is advisable to look for substituents that are made from hardened steel or other like materials because these are capable of withstanding heavy stress without bending or cracking, which makes them suitable for heavy-duty jobs.
- Bolt Size and Threading: Numerous bearing separators utilize bolts in a uniform manner in order to separate the different components. Check the size and threading and make sure they are suitable for use as planned. Here compatibility is important in securing and conducting proper extractions.
- Weight and Portability: A Lightweight, strong separator will also help in reducing the hustle of the work if you always change locations or have to work in close quarters or above the head with your tools.
Reviewing these parameters before the selection ensures that the specific operating case will be dependable and effective.
Features to look for in a quality bearing separator kit
Durability and versatility should always be stressed when you are choosing a quality bearing separator kit. The kit should be manufactured from high-strength steel so that it can be used in demanding applications without fear of warping or breaking. To me, precision machined components are a prerequisite – they allow for appropriate bearing clamping with minimal slippage and risk of damage. Also, they should enable you to work over a broad spectrum of small and large industrial components since this adds more versatility to the kit. In addition, look out for lightweight tools that are nicely labeled and easy to assemble, as these enhance efficiency and user experience on the job enormously.
Hydraulic vs. manual bearing separators: Which is best?
At the end of the day, the choice between a hydraulic bearing separator and a manual one depends on the task and the workload. If the job involves larger bearings or multiple bearings, which are tough to deal with, then a hydraulic separator is the better choice, as it saves on user effort and gets the job done quickly. However, when the task is uncomplicated and doesn’t require extreme portability, low cost, or ease of use, a manual separator is far more suited. As a general rule, across a majority of industries including industrial applications, once hydraulic separators have enough force, they tend to be more useful than manual bearing separators, contrastingly manual bearing separators are better suited for less demanding applications.
What’s the step-by-step process for using a bearing separator?
Bearing separators are very effective tools only if one follows the correct instructions. It can take some time; however, once you get the hang of it, it’s very easy.
- Preparation: To begin with, thoroughly clean the working place and remove any dirt or employment of debris. Choose the bearing separator that is suitable for the size and check if it is broken or worn out.
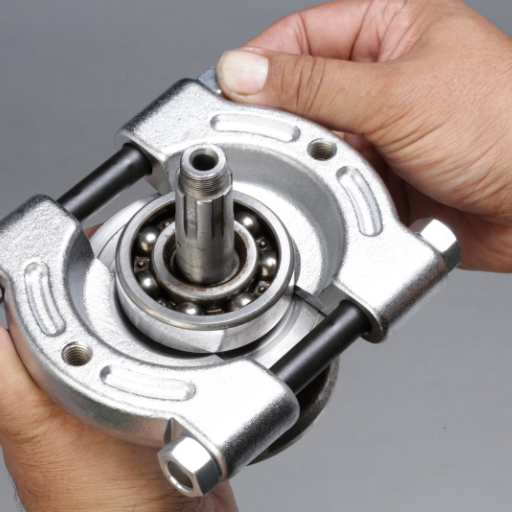
- Positioning: Grasp the bearing separator jaws and cautiously insert the device into the space between the bearing and the surface it is fastened to. Verify whether the edge of the separator is well placed under the bearing to prevent it from lever and being pulled with an uneven force.
- Securing: Fasten the forcing screws equally so that the separator grips the bearing well; this step is essential so that slippage while removal is avoided.
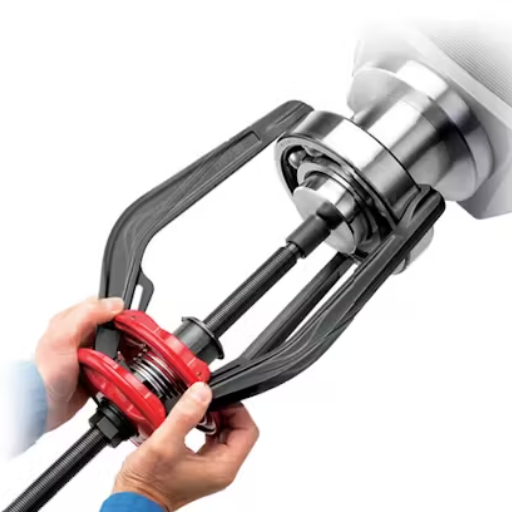
- Attachment: Place the separator onto a pulling device or a press. For transfers requiring lesser force or effort, a manual puller aids well, but using a hydraulic press makes removal easier for heavy applications, ensuring it is smooth and controlled.
- Removal: For bearings that are dully fixed or stuck until they are unscrewed or removed, perseverance and moderate pressure on the puller or a press ensure success. This step relies heavily on the attention given by the individual to ascertain the bearing and equipment being used.
- Post-Removal Check: After repair, examine the bearing as well as the equipment for signs of wear or damage and restore the tools to their original position after cleaning them.
Downtime is now reduced remarkably, and equipment is undamaged in any way. Problems such as extracting bearings can be handled effectively by following the guidelines mentioned above.
Preparing the work area and gathering the necessary tools
To start, ensure you have a tidy and very well-organized working place since this will prevent accidents from occurring or components from being misplaced. Such tools include wrenches, pullers, lubricants, safety gloves, and eye protection, depending on the required task. Ensure the tools are within easy reach and inspect their condition before usage. Such an arrangement enhances not only efficiency but also safety during the bearing removal procedure.
Positioning the separator behind the bearing
I tend to first lock the separator’s jaws on the bearing base. When I position the separator, I make sure it is centrally aligned with respect to the bearing without pulling or pushing force onto the bearing. Here, precision is crucial, any error may apply the undue stress or damage the equipment. When this is done, I bring down the bolts carefully so that the separator is well-fastened behind the bearing and is fit for removal.
Applying force and removing the bearing safely
A hydraulic press or puller that matches the type and size of the bearing can be used to apply force and extract the bearing. Please make sure that the force is uniformly distributed and applied directly along the center axis of the bearing to avoid causing damage to the bearing as well as the components in the housing. Accordingly, effort should be applied gradually while monitoring the direction to ensure no any opposition was met, in the course of efforts stop if there is any misalignment. Always use proper clothing and follow the manufacturer’s instructions so that the process becomes both secure and efficient.
Are there any tips for using a bearing separator on different vehicle parts?

Of course. a bearing separator is available for several vehicles’ parts, but before using it, the size and material of the part in question must be understood. One of the most common issues that I observe is that the arms of the separator do not get properly placed under the bearing, thereby preventing the risk of slippage or excessive force from being applied. Applying insufficient pressure on sensitive parts or correctly utilizing grease can make the removal of the components much easier. Also, consider the environment around the component as crowded environments, which sometimes require the adjustment of one’s tools or changes to the method being employed. Finally, the factor of time is the most significant; one piece may take a great deal of time in order to complete but in the long term, it proves to be much better than hurrying and damaging everything in sight.
Removing wheel bearings with a separator
Let’s discuss everything related to safely and effectively removing wheel bearings, specifically when a separator is involved. I’ve been dealing with different types of bearings and tools and can help you by outlining the process step by step. What I suggest based on key parameters that you need to look at is the following:
- Material of the Bearing – Finding out how the bearing is constructed is critical. For normal steel bearings, a standard separator is able to accomplish the process if there are no problems. However, if you’re dealing with more brittle materials or corrosion resistant bearings (such as ceramic hybrids), pay attention as the force necessary for removal should rather be softer, otherwise, damage might occur.
- Size and Fit – The size of the bearing is an important factor. Bigger bearings are likely to need a more heavy separator and, sometimes, more force. To start with, always check that the arms of the lower half of the separator fit just under the edges of the bearing,g as this would reduce the chances of slipping. Any oversight in this can cause slippage or sometimes uneven pressure.
- Lubrication – In the event that the bearing is trapped or in position for too long, a penetrating oil will prove most helpful. The lubrication helps to lower the friction and ease the process of removing the bearing. Be careful to let enough time pass between the oil application and the removal process for the oil to soak in.
- Force Application – Steadily and evenly, try to apply your greatest force. If you have a manual or hydraulic separator, depending on the tool employed, turn in small amounts, and if there’s any pushing or tension, stop. Especially don’t twist too quickly because it can hurt the bearing and the parts around it.
- Surrounding Environment –Sitting in a cramped environment can make it hard to maneuver and work efficiently. In some instances, repositioning your separator or extending its reach may allow you access to the bearing so that you can work on it properly. Whenever you’re tasked with a new job, always analyze the working area and decide which equipment will be best for that area.
When removing a wheel bearing it is essential to analyze what the essential parameters are and perform the operation slowly to both minimize any risk of damaging the bearing as well as ensuring that the removal is performed efficiently. Once the bearing is loosened, examine the surface of the bearing for wear and tear, such as scratches or cracks, to see if a replacement or machining process is essential. Safety first — accuracy as well!
Tackling transmission and differential bearings
proper disassembly and assembly of bearings in the transmission and differential is of utmost importance. One can’t stress enough the importance of these components if there is a need to operate a vehicle’s drivetrain, so great care should be taken when removing and fitting them onto the vehicle. Begin washing the area to ensure there are no contaminates that can cause a problem. I even advise using high-grade pullers and bearing splitters to remove the old bearings carefully without wrecking up the surrounding designs. When assembling, always try to employ even pressure and use tools that provide the necessary alignment. Since you are at it, don’t forget to check the gears and the engine casing for wear because this will save you the trouble of fixing it later on. The key, in this case, is really the attention and confidence in your work.
Using a separator for pilot bearings and gear removal
Utilizing a separator for pilot bearings and gears removal is concerned chiefly with the effective level of injury sustained by components throughout the removal process. In my experience, the following is the correct way to do it: stepwise.
- Choosing the Right Separator Size – It is essential to always have a snug fit separator around the bearing or blade being worked upon, as having a loose fit can result in an area concentration of force, which can cause damage.
- Positioning the Separator Blades – The separator blades are to be slid into the sections behind the gear or bearing that’s being separated. A careful placement of the blades evenly is crucial to ensure balance whilst removing shafts.
- Securing the Separator – Always tighten the bolts of the separator slowly and on both sides evenly. This guarantees the application of uniformly distributed force whilst also ensuring even alignment thus avoiding excessive and unwanted strain on the component being unscrewed.
- Applying the Puller – Attach the arms of the puller or the puller threads directly to the separator. Allow more time for each of the steps, including using a wrench or a ratchet to turn the center bolt of the puller, which ensures either an upward or outward movement is being applied. These actions are crucial as overspeeding any one of them increases the chances of turning or jerking the bearing or gear.
- Inspecting Surfaces Post-Removal – After the bearing and gear have both been disassembled, it is advisable to check the parts carefully for any form of tearing, gouging, or cut marks. It is important to mention that these have to be dealt with in advance; otherwise, they get problematic over time.
If at first, you are precise, consider removing the parts in the first place. Few people would vice wrench let’s say a lever that s quite far out unless they were trying to force it, so part integrity shouldn’t be an issue. One thing to remember is parts are not cheap, regardless of the case. It is also more economical to utilize the correct patch for the damaged component. The result is that greater consideration should be given to the small details. There is no need to rush through every step, yes, it might take time and slow things down but it is certainly worth it considering you will save money on repairs or replacements down the line.
What safety precautions should I take when using a bearing separator?
As a safety precaution, wear proper PPE, such as gloves and safety goggles, for protection from debris and accidental slippages whenever you employ a bearing separator. Ensure the target area is well-lit, stable, and free of any unnecessary components so as to lessen the chances of an accident. Loosening the bearing before securing the bearing separator should be done properly, and its alignment should be checked so that slipping or applying uneven pressure is avoided. Use the right tools when applying and assembling everything, and stay within the limits of the separator’s capacity at all times. Finally, keep in mind that attention and focus are needed for the task, and any distraction should be avoided completely as bearing removal operations are delicate and careful operations that assist in not injuring or damaging any components of the equipment.
Personal protective equipment recommendations
When using bearing separators, safety must always come first. A good personal protective equipment (PPE) kit will include safety goggles, heavy-duty gloves, and steel-toe boots. Hearing protection should be used when carrying out activities that can lead to prolonged noise. Furthermore, a proper fit, such as a strong, good-quality work apron, can add substantial protection from tool or other material contact. At the end of the day, bearing separators are great tools, but without following strict adherence to PPE rules, the risk outweighs the reward.
Avoiding common mistakes and potential hazards
a positive approach towards any work is to prepare properly in order to prevent mistakes and avoid any hazards. So, what I do is carry out an inspection of tools and materials for any flaws before commencing any work. This is an important step because if someone uses a faulty piece of equipment, it may malfunction and cause harm. Also, an organized space is great, as maintaining an orderly area reduces the chances of one getting tangled in wires and various tools. Keeping things in their positions would eliminate the chances of fumbling for tools. Another way in which I seem to slip is underestimating the effort required to complete a task: cutting corners to save time is a bad idea as it sometimes makes one skip processes or steps. Lastly, being focused is crucial, as any distractions or tiredness results in a person making mistakes or getting hurt during the job. Thus caution is a key element whenever someone wants to work in a safe manner.
How do I maintain and care for my bearing separator tool?
Caring for and looking after your bearing separator tool requires commitment around a few basic principles. Firstly, it is recommended to wash the assembly frequently after application in order to eliminate grease, contaminants, or metal particles that may lead to wear over an extended period of time. Make a periodic inspection for any sign of damage or rust, and make sure to apply machinery oil on all moving parts to avoid rust and ensure ease in operating the tool. Place an oil coating of machine oil on the moving parts of the tool to prevent rusting. Put away the equipment on dry and clean surfaces or its case to minimize exposure to moisture and shock. Following the instructions mentioned above should increase the life and dependability of your bearing separator tool.
Cleaning and storage best practices
The other key focus is ensuring that the bearing separator tool is always clean; the tool should be well taken care of throughout usage that includes cleansing after every single use and appropriately stashing the tool in hand. After each use, I try to do a rudimentary cleaning with a clean cloth on the tool to remove any debris and residue left on the tool. To get rid of lockout tagout, for strong grease a mild degreaser does a good job. Once clean, I apply a very thin layer of rust protectant and machine oil for the smooth functioning of the parts. For safekeeping, the tool is always placed in a case, ensuring safety from dust, moisture, and physical force. These steps have really assisted me in amassing the tool’s performance in all aspects while also extending its lifespan.
Inspecting for wear and damage
To guarantee the safety and proper functionality of the bearing separator tool, regular inspections are paramount. In my case, I try to put aside some time to evaluate it for excessive wear or damage before and after each usage. I properly looked at the tool to see if it had any edges chipped off, cracks, and uneven surfaces. Loosening or wearing down are two things that bolts and screws can do, so I also check them too. Any problems that arise, and that is rather any problems, I try to rectify straight away, like, say, replacing a component that is damaged or perhaps re-tighten a few loose parts. Over the years, catching this problem at the initial stages has saved me financial, emotional, and, most importantly, time loss on numerous occasions.
Lubricating moving parts for longevity
For durability and smooth operation, the moving components of your bearing separator tool must be lubricated correctly. A lubricant that is appropriate for your bearing separator tool should be applied. It should also be masked airlessly on the pivot points, screws, and threads as a means of corrosion control. Lubricants add value to the device, so remember to take off old grease. Routine lubrication must be followed to ensure the efficient operation of the bearing separator tool as well as to prevent wear.
Can I use a bearing separator for installation and removal?
Yes, A bearing separator can be used to both insert and extract bearings, but with a few conditions. In my case, from what I have seen, bearing separators are more suited to serve the purpose of removal. Since they have removal procedures that guarantee minimal damage taken to the part being removed, they, however, can in some way be useful during installation. Nevertheless, utilizing an overhead tool such asa bolt while doing the task should be avoided as it can push too hard and create bending. As for installations, I usually use a press along with the separator that allows a smooth and precise fit of the bearing without the threat of bending. It is a multipurpose tool, but knowing its threshold and having the correct supporting procedures is the best way to get adequate results.
Limitations of bearing separators for installation
Before fitting the bearings, it is okay to use bearing separators for installation, although their design does not allow their widespread usage. One key drawback is that bearing separators do not have a force balance system that would allow the bearing to be evenly loaded during pressing, thus heightening the risk of distortion or misalignment. Also, they do not allow precise control to be wielded by purpose-made installation devices, such as bearing pressing tools. For best results, bearing separators should be used alongside the appropriate support equipment and properly controlled when doing installation tasks.
Alternative tools for bearing installation
For the bearing installation, bearing presses and bearing installation kits are the best tools to use in general. The use of bearing presses makes it easy to achieve perfect positioning, as well as the application of the correct amount of pressure, thereby minimizing any possibility for damage or improper seating. In addition, because installation kits frequently have multiple sleeves and adapters for different sizes of bearings, they can also assist in quick and proper installations. These tools are specialized and meant to bear the burden of bearing installation which makes them a better choice than bearing separators for this particular job.
Reference
- Bearing Removal Tools: Puller Types and Uses – This guide explores various bearing puller types and their applications.
- Car Wheel Bearing Removal Tools: A Comprehensive Guide – This article provides detailed information on using a bearing separator and other tools.
- Bearing puller vs bearing separator: what’s a better tool? – A discussion on Reddit comparing bearing pullers and separators, offering insights from various users.
Frequently Asked Questions (FAQs)
Q: What is a bearing separator, and how does it work?
A: A bearing separator, also known as a bearing puller or bearing splitter, is a tool used to remove bearings from shafts or housings. It works by applying pressure to the outer race of the bearing while pulling on the shaft, effectively separating the bearing from its mounting.
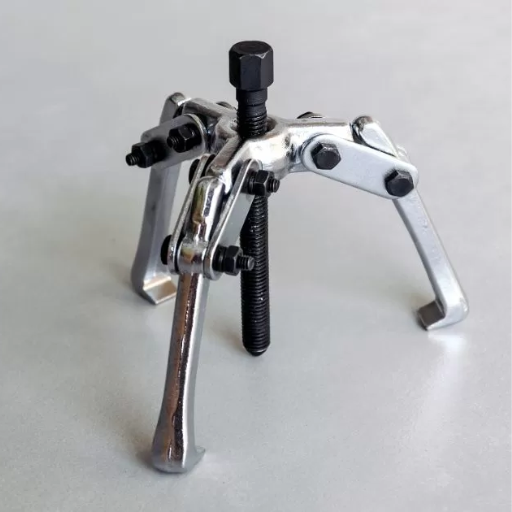
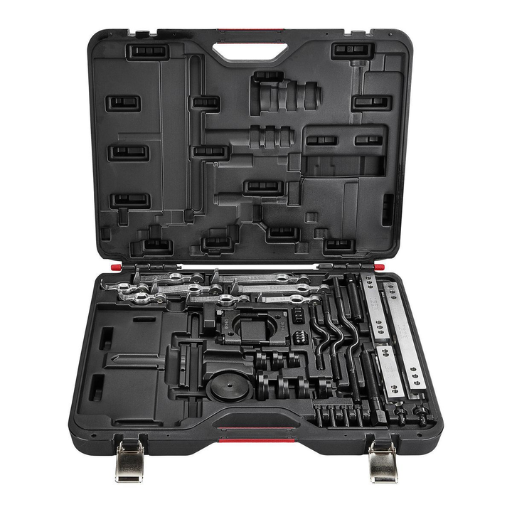
Q: What are the key components of a bearing puller set?
A: A typical bearing puller set includes a separator tool with adjustable jaws, a forcing screw, and various sizes of pulling plates. Some sets may also include a hydraulic puller for more stubborn bearings. These components work together to provide the necessary force to remove bearings of different sizes.
Q: How do I choose the right bearing removal tool for my job?
A: To choose the right bearing removal tool, consider the size and type of bearing you’re working with, as well as the available space. For smaller bearings, a manual puller may suffice, while larger or more stubborn bearings might require a hydraulic puller. Ensure the tool you select can accommodate the bearing’s dimensions and has enough clearance to work in your specific application.
Q: What’s the first step in using a bearing separator?
A: The first step in using a bearing separator is to properly position the tool. Place the separator’s jaws behind the bearing, ensuring they have a good grip on the outer race. Make sure the forcing screw is centered on the shaft or axle. This proper setup is crucial for successfully removing the bearing without damaging surrounding components.
Q: How can I safely remove a bearing from a wheel hub?
A: To safely remove a bearing from a wheel hub, first clean the area and inspect for any retaining devices. Use a bearing puller set with a separator of the appropriate size. Position the separator behind the bearing, ensuring it’s seated properly. Apply even pressure using the forcing screw, and if necessary, use penetrating oil to help loosen stubborn bearings. Work slowly and steadily to avoid damaging the hub or surrounding components.
Q: Are there any special techniques for removing bearings from a Ford or Jeep?
A: When removing bearings from specific vehicles like Ford or Jeep models, it’s important to consult the manufacturer’s service manual for any special procedures. In general, use a bearing puller set that fits the specific bearing size. For some models, you may need to remove the entire hub assembly first. Always use the correct adapter plates and ensure proper alignment to avoid damaging the axle or yoke during the removal process.
Q: How do I deal with limited space when using a bearing separator?
A: When working in tight spaces, consider using a compact bearing puller or a bearing separator with tapered edges for better access. Some puller sets offer different lengths of forcing screws or extendable arms to accommodate various clearances. If possible, remove surrounding components to create more working space. In extremely tight areas, you may need to use a specialized bearing splitter designed for confined spaces.
Q: What precautions should I take to avoid damaging components during bearing removal?
A: To avoid damaging components during bearing removal, always use the correct size and type of puller for the job. Ensure the separator is properly seated and aligned before applying pressure. Work slowly and evenly, stopping periodically to check progress and realign if necessary. Use penetrating oil to help loosen stubborn bearings and avoid excessive force, which could damage the shaft or housing. If you encounter unusual resistance, stop and reassess your approach.