This article will be of great service to those who want to know how to press in a new bearing using a bearing press kit. In case, however, you are experiencing some wheel bearing problems and wish to put them to rest, this article will be very useful as well since it will provide the appropriate tools and explain how to replace the bearing from beginning to end. We will also explain how to press in the new bearing and provide some useful tips regarding front wheel drive systems, as well as outline common mistakes that should be avoided. More importantly, whether you are an experienced DIY expert or a novice, after reading this guide, you will feel confident and ready to take on this task. Let us begin by learning how to replace the wheel bearing!
What Tools Do You Need to Press the Hub into the Bearing?
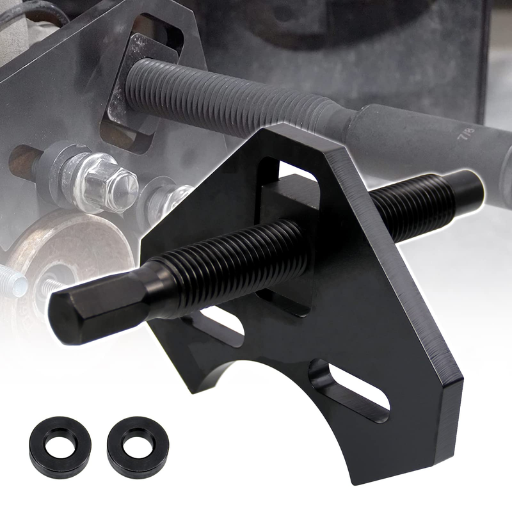
the peripheral equipment necessary to insert the hub into the bearing is:
- Hydraulic Press: A hydraulic press is used to easily carry the process of putting the hub into the bearing because it applies within a controlled range of pressures. The only prediction that can be made concerning maintenance practices is that attention should be paid to safety considerations during the use of the equipment.
- Bearing Puller Tool: While generous in their application, a bearing puller tool is useful for removing the old bearing from the wheel hub assembly without difficulty. It gives an additional arm and minimizes the component’s wear.
Adding these tools to your toolkit will make it easier and quicker for you to perform the wheel bearing replacement task. Safety and proper working procedures should be observed at all times while using these tools.
Essential Tool Kit for the Job
From a practitioner’s point of view, to be able to replace the wheel bearings in vehicles properly and efficiently, he needs to have certain equipment. So, in summary, here is an answer to the questions made in the above sections:
- Hydraulic Press: The accuracy and evenness of the force applied when installing the new wheel bearing are best achieved by a hydraulic press, which is an essential tool for this operation. This tool also allows sufficiently precise adjustments for the securing fits to be achieved.
- Bearing Puller Tool: A bearing puller tool is not necessary but usually has great advantages when it is needed to pull the old bearing out of the wheel hub assembly. It can offer some mechanical advantages so that parts do not end up being damaged.
Thanks to this arsenal of tools, you will be ready to approach the wheel-bearing replacement project with courage. Again, ensure that safety is taken into account and all the proper protocols are adhered to when working with these tools for the best outcome.
Using a Hydraulic Press Safely
Because it applies considerable pressure to the bearing, the careful use of a hydraulic press is paramount in replacing a wheel bearing. Here’s a list of dos and don’ts:
- Safety First: As opposed to the usual safety protocols, a hydraulic press presents a new mode of operation. Amongst the foremost approaches in troubling hydraulic pressure while malfunctioning would be abuse throughout the process regardless of how it would perform. Subsequently, be cautious and observe the practices set out by the manufacturer while valuing its instructions as well.
- Inspect the Press: The first step in machine intervention is examination. Similar to any exam, a pill should check for faulty designs and active leaks that alter fluid levels.
- Choose the Right Tools: Almost all the working parts undergo potent interference when either the hub or bearing is pressed on the borderline. Use appropriate tools that don’t break apart, too, for this particular job.
- Secure the Workpiece: Set the bearings in a manner that gives clearance for attachments that work in harmony with the hydraulic press. In a nutshell, hide that perturbs the work steady while making sure the wheel is properly secured to the machine bed.
- Apply Pressure Gradually: Along the way feel free to increase the pressure slowly while keeping a keen eye on the assembling wheel pressure of all bearings so that the machine parts can absorb centrifugal force without distortion.
- Ensure Proper Alignment: Check thoroughly if the settings align the wheel hub with the dimensions setting in the bearing machine. Otherwise, the parts begin to expand when the heat makes its way, resulting in a complete rupture.
- Monitor Progress: Always oversee the pressing operation. Focus on any odd sounds, efforts, and misalignments. If anything doesn’t feel right, stop and examine the situation before proceeding.
- Follow Best Practices: Always comply with the manufacturer’s guidelines as well as the industry hydrapress best practices. Take breaks to cool down and make sure this hydrapress is being used within its limits.
Hiccups such as maintaining the integrity of your vehicle’s components or achieving desired results can be avoided if you use a mobile hydraulic press according to the instructions.
Optional Bearing Puller Tool for Easier Removal
you are able to follow several steps that would ensure a proper and smooth old wheel bearing removal process. Although using a bearing puller tool is not the most recommended option, it is very useful in ensuring the old bearing is removed. This specialized tool assists in applying moderate exertion and provides leverage through engineering impassive to allow for easier and more efficient removal. With the use of a bearing puller tool, you are able to limit the chances of causing damage to the bearing or any other parts that are attached to it, which translates to a more efficient process.
How to Properly Remove the Old Bearing?
An industry specialist makes it very clear that in order to guarantee a smooth and successful process, the old bearing is replaced correctly. This can be done by adhering to the following essential points:
- Inspect and Prepare: Focusing on whether the area surrounding the old bearing needs to be replaced due to damage or erosion. Collect the needed instruments, including a bearing puller tool, if possible, so that the removal of the bearing can be performed easily.
- Secure the Vehicle: Level the car and activate the parking brake. Work on the front wheel in case you need to rotate the steering wheel more in order to have better access to the bearing compartment.
- Remove the Wheel and Brake Assembly: Safely raise the car on top of a jack and put jack stands all around it. Begin to unbolt the wheel while removing the treat and rotor of the brake caliper only if it’s needed in order to get to the bearing components.
- Detach the Bearing Assembly: There are two types of methods to remove the bearing, Which involve either removing the knuckle that is located on the outer end or removing the hub that is located in the center; the type depends on the design of the car. This can vary, therefore always refer to the service booklet of the vehicle.
- Utilize the Bearing Puller Tool: This device eases off the strain in the bearing, aiding in the removal and replacement of the part while ensuring the component stays intact and undamaged.
Do all the steps outlined and make use of the bearing puller tool, if available, so as to guarantee a secure and proper taking out of the old bearing, which is less time-consuming while at the same time reducing the probability of component damage.
Steps to Remove the Wheel Hub
I am well aware that the wheel hub removal procedure includes its own essential steps in order to make the process both successful and efficient. Here is a short and sweet answer that you can follow to understand the process of removing the wheel hub:
- Preparation: Before you begin, collect all the required materials, including a bearing puller tool or even a bearing puller if you have one. This tool will allow for even pressure to be transmitted and leverage to be applied which makes removal easier as well as reducing any chances of bearing or any other part or component damage.
- Detaching the Knuckle: Following the manufacturer’s specified instructions, carefully detach the knuckle from the assembly. Be cautious that during this step, no surrounding parts become damaged.
- Extracting the Old Bearing:
Either the bearing puller tool or other suitable means can be used to remove the old bearing from the structure. It must be handled in a way that pressure is distributed evenly to prevent forceful push towards the component, which risks bearing any damage.
If the conditions observed are appropriate, thinking of using pulling tools during the removal of the old bearing would save time, risk of damaging the assembly parts, and effort used during the removal process.
Detaching the Knuckle with Care
The strategy for removing and replacing the wheel bearing, as articulated by an industry expert, begins with the careful detaching of the knuckle. A chain of careful actions is taken during the replacement of the knuckle with the aim of making sure that it is not destroyed in the process. Here are some videos of how to do that:
- Proper Support and Stability: Ensure that the vehicle is securely supported on jack stands or a lift prior to unstitching the knuckle, hence providing stability and strength through the process.
- Loosening Fasteners: First, fasten the mentions of loosening the knuckle’s fasteners, which are connected to the other parts of the suspension unit, either the control arms or struts. Cutting corners in the knob’s repair spare parts or repair kits will essentially damage them, so utilize adequate devices.
- Separating Ball Joints and Tie Rod Ends: This will depend on the vehicle type; you might have to detach the ball joints from the knuckle or the tie rod ends. Use an appropriate tool for this to avoid damage- a ball joint separator, joint puller, or even a hammer can be used for this.
- Removing Brake Components: Other related components attached around the knuckle area may need to be detached, such as brake calipers or rotors. The specified guidelines and procedures associated with the breakdown of brakes should be followed, hence making sure ignored brake parts would not be harmed.
- Supporting the Knuckle: When moving the knuckle, adequate support should be provided to stop it from either descending or dangling down if it’s held by the wheel bearing, which could lead to severe consequences. Get a handy support tool, or get someone to aid you with this.
- Inspecting and Cleaning: Again, the sequence is acceptable, and it stands to reason that once the knuckle is unbolted, it is cleaned of any debris or crude. This step guarantees the proper fitment and working of the new wheel bea.r
If you follow these instructions carefully and take due care all the time, you will be able to achieve the safe steering knuckle detachment and also replace the wheel bearing which will serve the assembly in a much better condition.
Extracting the Old Bearing from the Assembly
we must elaborate on the removal of the old wheel bearing from the assembly, which,as the industry expert explains, is the most critical step in the process of wheel bearing replacement. As Rivers has rightly stated above:
To take out the old wheel bearing from the assembly, do the following:
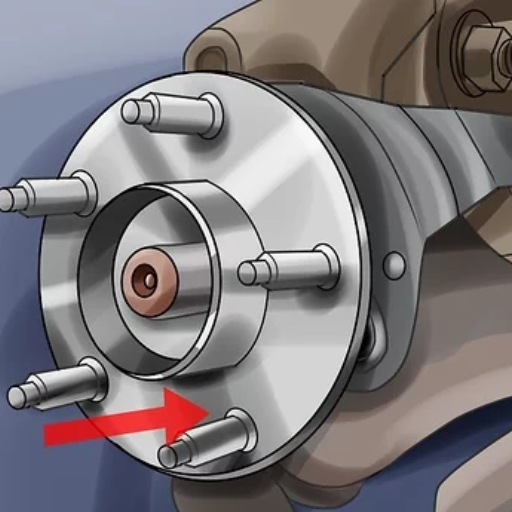
- Remove the Wheel: First things first. Properly elevate the vehicle and remove the wheel so that there is complete accessibility to the wheel hub assembly.
- Detach the Brake Caliper and Rotor: In some vehicles, it might be necessary to suspend the brake caliper and rotor to have accessibility to the wheel hub assembly together with the bearing. You may refer to the vehicle service page to get guidance on how to go about the specific disassembly.
- Unbolt the Wheel Hub Assembly: The next step is finding and unscrambling the bolts/setscrews that fastened the wheel hub assembly towards the knuckle region. In doing so, ensure that you have the right tools to do the job and that care is taken to avoid damage to the surrounding areas.
- Separate the Wheel Hub Assembly from the Knuckle: After separating the bolts from the knuckle, slowly pull the wheel hub assembly away from the knuckle. In any case, if the need arises, you can also use a rubber mallet or even apply a slight force to aid separation.
- Inspect and Clean: Take advantage of the moment the wheel hub assembly is free, examine all the attached pieces, and remove any collected dirt. This step goes hand in hand with preparing the guide to measure and install the new wheel bearing.
If you take your time and stick to the guidelines highlighted above, you will be able to remove the old wheel bearing from the assembly without any trouble. In doing so, you ensure that it is possible to proceed to the next step, that is, the installation of the new wheel bearing. Avoid cutting corners, be sure to always check the manufacturer’s guidelines when working on specialized tools and procedures, and refer to the vehicle service handbook yourself for further elaborations.
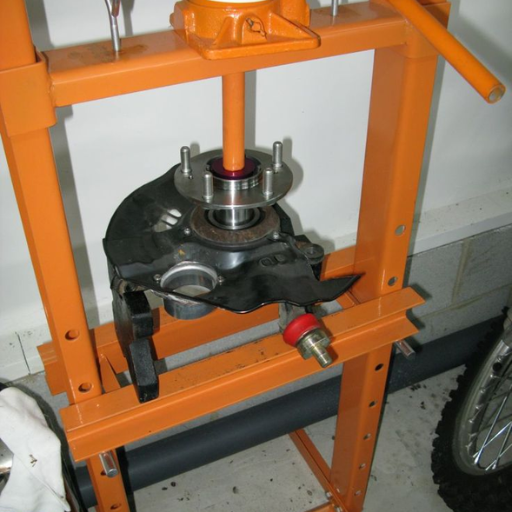
How Press in a New?
There are some general steps that need to be followed to ensure the successful thermal assembly of a new wheel bearing. Here’s a conventional lighting guide to pressing in a new wheel bearing:
- Preparing the New Wheel Bearing for Installation: Before pressing the new wheel bearing into place, make sure it is neat and properly greased throughout its surface. Take out the additional wrapping and smear some premium quality wheel-bearing grease in the space of the inner race and shred rollers.
- Aligning the Hub into Bearing Correctly: Making sure the hub with which the wheel assembly is being tackled fits onto the inner race of the new wheel bearing. The alignment here is solid as it is essential for the working and the sustainability of the bearing.
- Using a Wheel Bearing Press Tool Effectively: It is ideal to use a wheel bearing press tool during the fitting to apply concentrated pressure for proper installation. The press tool presses on the outer race of the bearing which pushes it onto the inner wheel hub assembly. This must be done with caution, as excessive pressure on a single area may ruin the bearing as well as the hub assembly.
The two-piece design consists of an inner bearing ring, a roller cage, and an outer ring; if you are pressed in a new wheel bearing, these instructions should serve you well. If proper care of the vehicle is to be achieved, it is expected to understand the guidelines of the manufacturer before proceeding in order to opt for the optimal outcome.
Preparing the New Wheel Bearing for Installation
I understand the demand for correct preparation for installing a fresh wheel bearing. Furthermore, in order to achieve a seamless installation procedure, the following tips should assist:
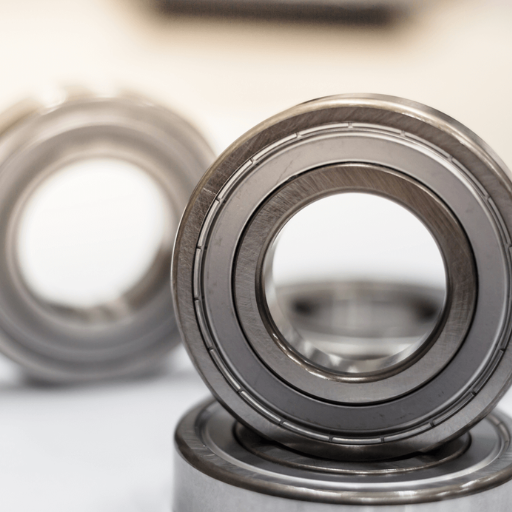
- Inspect the Bearing: Always conduct a thorough inspection of the new wheel bearing and step down before the installation. It should be confirmed if the bearing’s make and model fit that of the vehicle. Please verify.
- Clean and Lubricate: Clean the bearing, and the vicinity well, removing all the grime and old grease left. A thin coat of wheel bearing grease must be rubbed to both the race interiors and the exterior joints.
- Check Compatibility: Check if the bearing will fit or match the assembly of wheels and the required operation. Guidelines may be followed that are provided by its manufacturer, as well as the service manual of the vehicle for requirements that may be required.
- Proper Handling: Bearings should be treated carefully, as striking them or really handling them roughly will damage many parts inside them. When stopping contamination of oils or dirt because of skin, use gloves.
In this way, one can optimally ensure that your new wheel bearing is prepared for the next step, which involves installation, thus optimizing its performance.
Aligning the Hub into Bearing Correctly
the most crucial element when externally assembling a wheel hub is inserting the hub into the bearing correctly. Here’s how to do it in a simple way:
In order to properly fit the hub into the bearing, you will have to:
- Cleanliness and Inspection: The internal surfaces of the bearing and hub should be cleaned prior to installation and free of any contamination, dirt, or grease. Also, check them for any damage or wear that could impair their operation.
- Grease Application: Using high-quality wheel-bearing grease, coat the inner and outer bearing surfaces with a thin and uniform layer of grease. This will enhance smooth rotation by minimizing friction.
- Align the Inner Race: Align and place the inner race of the bearing onto the spindle or axle shaft without displacing it. But do be careful not to harm the bearing by any means.
- Press Fit: There are plenty of various tools available for installing wheel bearings, so making sure the proper tool is used is vital; the press tool must ensure that pressure is evenly distributed against the outer race, motivating it into the hub assembly. Additionally, the alignment of the tool should be perfect to prevent any damage occurring to the bearing or hub.
- Verify Alignment: After pressing the bearing it contact with the hub assembly, inspect the component to ensure it has been properly pressed into place. This will help to prevent impending problems with the vibration of the wheel along with its movement disruptions.
If these phases are observed and proper alignment is ensured, the hub should be fitted tightly and correctly into the wheel bearing, which guarantees the best operational and survival characteristics of the wheel assembly.
Using a Wheel Bearing Press Tool Effectively
To start with, it is essential to understand some points clearly that could help in using a wheel bearing press tool efficiently and effectively. One key element, especially in a performance setting, is the correct mounting of wheel bearings since it helps prolong the life of a wheel assembly. Some recommendations to keep in mind are outlined below:
- Choose the Right Press Kit: It is critical to note that the press kit is one of the most important components to have during any installation of a wheel bearing. The size and technical parameters of the bearing should, in turn, correspond to the kit in the appropriate selection.
- Prioritize Safety: It should always be remembered that a wheel bearing press tool can be a dangerous piece of equipment, thus precautions should be taken commensurate with its use. As an example, one needs to put on gloves and safety goggles as part of one’s PPE to protect against possible dangers and threats. In addition to that, it is important that the devices are operated according to the manufacturer’s instructions to reduce the likelihood of accidents or injuries.
- Apply Even Pressure: Proper and even force should be applied when the bearing is being pressed into the hub assembly to ensure that it is well-fitted. This could in turn cause bearing/hub or even the whole equipment to shift or wear off. The press tool in this case should be used with caution and in such a way that it possesses adequate alignment for efficiency purposes.
- Verify Alignment: Following the fitting of the bearing to its required position, then the next thing to do is to check for alignment to ensure that the bearing and the hub assembly are in the right location. This will ensure that there are no problems with wheel movements or vibrations during operation that may affect the functioning of the vehicle.
By following these guidelines and paying attention to proper alignment, you can use a wheel bearing press tool effectively, achieving a secure and accurate fit of the hub into the wheel bearing. This, in turn, sets the stage for optimal performance, safety, and longevity of the entire wheel assembly.
What to Consider When Using Front Wheel Drive Systems?
there are some vital considerations that one should put in mind for appropriate wheel-bearing installation and maintenance, particularly when dealing with front wheel drive systems. Let’s examine some of those considerations:
- Load Distribution: A considerable part of a vehicle’s weight is transferred to the front wheels in front-wheel drive systems. This increased weight could impose more strain on the front wheel bearings, and thus, these components will require more checks and possibly replacement, too.
- Torque and Traction: A front-wheel drive will engage the front wheels to perform both torque and traction work; therefore, this can alter the actual wear on the wheel bearings as well. Regular maintenance and sufficient lubrication are required to achieve the best performance and to achieve a longer service life for the components.
- Alignment and Suspension: Front wheel bearings are designed to work within certain loads and angles, thus the essence of good wheel alignment and suspension system is to ensure these bearings function within their limits. Wrong alignments or issues in suspension would give rise to excessive or unequal loading, resulting in exposure of the wheel bearing system to premature wear or failures.
- Maintenance and Inspection: A well-detailed and regular maintenance and inspection of front wheel bearings is required to look out for signs of wear and tear. Spotting and fixing such problems in a timely manner is important as this will minimize damages and guarantee the safety of the vehicle.
Any front-wheel-drive system will be able to deliver satisfactory performance if suitable guidelines are observed as far as acceptable limits in operating parameters are concerned.
Unique Challenges with Front Wheel Bearings
it is essential to understand the complexity of handling front wheel bearings. Addressing and looking into these complexities is extremely crucial as they can affect how the vehicle performs and the safety of the vehicle. Some key points are:
- Load and Stress Distribution: The vehicle’s front wheel bearings or front hub bearings carry the highest load, which is the weight of the vehicle, in addition to the steering and braking forces applied on it. This not only makes it uncomfortable while driving but exposes the front wheel bearings to constant load and stress distribution, which can only mean wear and tear come over, justifying the requirement and frequency of maintenance and inspection.
- Environmental Factors: Front wheel bearing grease is intended to endure high temperatures in order to keep the bearings free of moisture, dirt, and road debris, the worst enemy of the rim system, without which a firm system would last longer and would subsequently do away with quick wear and tear of the bearing. Having clean and protected bearings is critical for optimal performance.
- Misalignment and Suspension Issues:In order to protect the front wheel bearings, the suspension system and alignment must be done in the right manner. The opposite is true, as even minor misalignments or suspension issues are significant enough to be considered abnormal and lead to overloading, increased chances of early failure of the rim bearing system, extreme wear, and more. It is always recommended to regularly check and make micro adjustments to fix such issues in a timely fashion.
Thus, by grasping and tackling such peculiarities, you are able to guarantee the life and proper functioning of the front wheel bearing system, providing safe and smooth vehicle operations on the roads.
Tips for Managing Front Wheel Bearing Installation
Here, are some useful pointers to help you guarantee a successful installation process of the front wheel bearings:
- Proper Tools and Equipment: Use the appropriate press specifically made for the installation of front wheel bearings to ensure sufficient force is applied when pressing them with a minimal risk of damage.
- Attention to Snap Ring: it is used to hold the bearing in position and, for some reason, is completely neglected. To ensure that the bearing does not move or dislodge during operation, ensure that the snap ring has been fitted correctly and is in the right place.
- Even Pressure Distribution: Ensure that during the pressing of the bearing, there is an even amount of pressure applied to it. If not, it can cause the bearing to become misaligned or damaged, which negatively affects the bearing’s performance and lifespan. A press tool that is specifically made to evenly apply pressure to the bearing can help perform the task correctly.
Following these recommendations will provide clarification for the bearing fitting process to reduce the risk of misalignment, premature wear, or failure of any components of the wheel bearing unit. If there is time to do the bearings well the efficiency and also the safety of the vehicle will enhance.
Common Mistakes to Avoid During the Pressing Process
one must be self-aware and avoid repeatedly making certain mistakes while pressing a front wheel bearing. Let’s point out three such mistakes:
- Not Using the Right Press Kit: In order for the installation to be done right and securely, it is imperative to use the appropriate press kit. Using improvised or incorrect tools can result in misalignment or a bearing that is either damaged or affects its performance. It is very important that a press kit that matches the size and type of bearing you are working on is used.
- Ignoring the Importance of a Snap Ring: The snap ring is an extremely important part because it ensures that the bearing is positioned and secured in the right place. Improperly installing or placing the snap ring puts the security of the snap ring and the bearing into jeopardy since, during the operation of the supplied bearing, movement or even dislodging may occur. Always make sure that the snap ring is correctly placed and firmly secured.
- Applying Uneven Pressure on the Bearing: Equally important to the pressing process is the pressing pressure that needs to be uniform across the bearing, Using pressure which is inconsistent increases the likelihood of misalignment or damage such that the bearing fails to function correctly and have a shorter life span. Press tools that allow uniformity of pressure application would enable the desired even pressure distribution.
Considering these basic errors and adhering to the standard order of events during the front wheel bearing replacement will allow you to make the replacement seamless and effective. Such precautions will very much minimize the likelihood of early deterioration, misalignments, or breakdowns in the wheel bearing system, which, in the end, improves the overall efficiency and safety characteristics of your automobile on the roads.
Not Using the Right Press Kit
the first point that has to be stressed is the necessity of a press kit for front wheel bearing installation. By employing a press kit that is wrong or poorly fitted, the bearing can become defective or cause a host of problems that will inhibit its usefulness. This is the reason why the use of an appropriate press kit is important:
- Proper Fitment and Alignment: The front wheel bearing can be mounted in the flange properly using a dedicated press-fit kit, which guarantees the bearing is centered within the wheel hub. Such an installation of the bearing is necessary in order for the bearing to operate optimally over an extended time period.
- Even Distribution of Force: An ideal press-fit kit is one that allows the even distribution of force during the pressing of the components. This means that the resultant pressure is adequate but not too much that would risk damaging or misaligning the bearing. With the use of press-fit kits that are ideal for the task, the bearing is effectively protected against distortion thereby improving its performance.
- Reduced Risk of Damage: A press kit designed for mounting the bearing enables you to decrease the chance of damaging the bearing or its components. This also minimizes the possibility of using excessive force or incorrect positioning, which could lead to wearing out, misalignment, or breakdowns of the wheel bearing. Using the correct press-fit kit allows one to avoid expensive repair works while cultivating the proper working of the wheel bearing system of the vehicle.
In this way, you show that you understand the significance of using the right press kit and take the front wheel bearing installation performance and professionalism to a whole new level. Such attention to detail will not only maximize the efficiency and lifespan of the bearing but also increase the general usability and dependability of your vehicle while in movement.
Ignoring the Importance of a Snap Ring
it is reasonable to imagine what would happen to the consequences of a wheel-bearing installation if the snap ring was not appropriately catered for. The snap ring is quite integral in locking the bearing and preventing its movement in the axial direction or sliding. For inability to consider the presence of the snap ring or use it appropriately, the following problems can occur:
- Instability and Misalignment: Increased instability and misalignment are evident for the bearing within the wheel hub due to the absence of a snap ring. Because of this, the forces will be distributed unequally, the operational capacity will be affected, and the bearing and other engine parts will be more damaged.
- Risk of Premature Failure: A snap ring is a significant component in a bearing, its absence increases likelihood of early failure. The absence of a snap ring leads to axial movement or displacement, which increases the bearing load and leads to increased friction, causing the burning out of the inner structure of the bearing.
- Safety Concerns: The compromise in snap rings directly translates to the vehicle being insecure and unreliable. The snap ring and the wheel bearing system balanced forces when rotating. When this system deteriorates, the kinetic stability is jeopardized, meaning steering is weakened and thus will pose security threats on open roads.
In conclusion, the snap ring should not be seen as an accessory to a wheel bearing or anything that can be disregarded during wheel bearing installation. Its involvement guarantees appropriate positioning, strength, and lifespan of the bearing, which helps in enhancing the safety and performance of the car as a whole. The importance of a snap ring should be properly understood and appreciated; this contributes significantly towards ensuring the accuracy, dependability, and quality of a wheel bearing installation.
Applying Uneven Pressure on the Bearing
I can state that bearings do not deal with loads well when they are applied unevenly, and this can lead to the bearing’s underperformance or complete failure. This is due to the fact that turning a bearing involves large amounts of unevenly distributed forces which can in turn cause an increase in wear and tear, raising the temperature and fatigue of the bearing, this makes the entire mechanism much more unstable and uncontrollable which is a large safet risk. It is imperative to note that during the fitting of a wheel bearing, sufficient uniform and equal pressure needs to be applied to prevent the bearing from being misaligned, thrown out of place or damaged, when these components are met, it improves the reliability and overall restraint of the vehicle.
Reference
- HOW TO USE THE ATD BEARING PRESS KIT PART 1 – A YouTube video demonstrating the use of a bearing press kit.
- How to Use a Bearing Press Kit (Update) – Another YouTube video focusing on using a bushing kit to press wheel bearings.
- How to Change Wheel Bearings: 12 Steps (with Pictures) – A step-by-step guide on changing wheel bearings, including using a press kit.
Frequently Asked Questions (FAQs)
Q: What tools do I need to press in a new wheel bearing?
A: To press in a new wheel bearing, you will need a wheel bearing press kit, a shop press (such as a 5-ton or 20-ton press), a bearing separator, and potentially other hand tools, depending on your vehicle’s design. Additionally, a bearing race removal tool and a slide hammer may be necessary to remove parts.
Q: How do I use a wheel bearing press kit to install a new bearing?
A: Begin by securely placing the wheel bearing press kit onto the shop press. Remove the knuckle from your vehicle and use the bearing separator to pull the old bearing out. Then, position the new bearing on the hub and carefully press them together using the appropriate attachments from the kit.
Q: Can a 5 ton press handle the installation of a new wheel bearing?
A: Yes, a 5-ton press can typically handle the installation of a new wheel bearing, although a 20-ton press might be recommended for larger or more stubborn bearings. Always ensure that the press you are using is suitable for your vehicle’s specifications.
Q: Why is it necessary to remove the snap ring before pressing in a new bearing?
A: The snap ring holds the bearing in place and must be removed to allow the old bearing to be pulled out and the new bearing to be pressed in. Failing to remove the snap ring can damage the bearing or the knuckle.
Q: How do I remove the old bearing race off the hub?
A: To remove the old bearing race off the hub, you can use a bearing race removal tool or a bearing splitter. These tools help safely extract the race without damaging the hub or surrounding components.
Q: Is it possible to press a new bearing onto the hub without professional help?
A: While it’s possible to press a new bearing onto the hub using a wheel bearing tool and a shop press, it requires careful handling and proper tools. If you’re unfamiliar with the process, you might want to consult a mechanic or look for the World on YouTube videos to guide you through the steps.
Q: What should I do if the bearing is really tight and won’t come out?
A: If the bearing is really tight and won’t come out, you may need to use additional force or specialized tools like a slide hammer to remove it. In some cases, visiting a shop to have them press out the bearing might be necessary.
Q: Can hand tools be used for bearing removal and installation?
A: Hand tools alone are typically insufficient for bearing removal and installation due to the high pressure required. However, they can be used in conjunction with a wheel bearing press kit and a shop press to assist in the process.
Q: What is the role of a bearing separator in the process?
A: A bearing separator helps to evenly distribute the force around the bearing, making it easier to pull the bearing or race off the hub without causing damage. It’s an essential tool for ensuring a smooth removal and installation.