Every trailer owner must learn the importance of replacing trailer wheel bearings, as this will keep the trailer in great condition. If the wheel bearings are not misplaced, they will be working properly and will also help maintain safety during use, as they prevent chances of wear and bearing failure, which are repairable but could cause dangerous situations while driving. Guide entails all the tools, stages and knowledge that should ease you into a replacement task. It doesn’t matter if you are a DIY pro or someone trying to learn to do this – this article will neatly split the task into smaller chunks, right from collecting the tools to instructions and tips for future maintenance, aiming to make the revision easy for you. At the end of this article, you will be knowledgeable and prepared to keep your trailer long-lasting and ensure its safety when used.
What Are the Signs of a Failing Trailer Wheel Bearing?
The failure of the trailer wheel bearing can be diagnosed by several signs. One of the most noticeable signs is the unusual noise that is emitted from the wheel, e.g., squeaking or humming. At times, excessive heating can be observed at the center of the wheel as the bearing is faulty due to friction. In most instances, while towing, a vibration or wobbling effect would be noticeable, which indicates that the bearing is failing in its support to the wheels. Abrasive wear at the hub due to grease leaking is one of the prominent signs of the bearings being damaged. These signs should not be ignored, and the required mechanisms should be inspected and replaced at the earliest in order to prevent complete wheel failure or unsupported towing.
Common Symptoms of a Bad Bearing
detecting unfortunate faults on a bearing has a detrimental impact on the safety of the machinery and its overall functionality. I suggest that strange sounds like grinding or rumbling should be paid close attention to concerning a sound emanator’s shifting component; this is probably the first impression something may be wrong. Looking for excessive heat or checking for grease leaks during preventative maintenance could save you from expensive repairs later on. If I feel any vibrations during towing, I consider it critical and review it on the spot. Addressing these signs at the earliest possible stage not only provides for a comfortable journey but also augurs well for the safety of conditions of towing overall.
How to Inspect Your Trailer Bearings
Employing a professional mechanic often proves to be cheaper in the long run than repair work that is done by the owner. A common belief is that the do-it-yourself approach is cost-effective because of the low upfront cost. However, the lack of skills and proper tools could lead to uncompleted repairs, which may result in further damage or safety concerns which will eventually cost more. An expert mechanic will diagnose the problem correctly, use genuine manufacturer parts, and do the repair with all the craft standards required, thus providing a better deal because the vehicle will last longer and there will be no the same problems appearing.
When to Seek Professional Help for Bearing Replacement
Conversing with your trusted expert is a good option when the maintenance checks you do can no longer sort the problem out, and you start noticing suspicious noises or exert too much heat onto the bearings, or even damage it further. Furthermore, if you do not possess the tools or knowledge to execute the replacement of bearings or if you are not confident, then hiring an expert ensures that it is done accurately and properly, thus reducing the chances of any future problems.
How Do You Replace Trailer Wheel Bearings Yourself?
Conversing with your trusted expert is a good option when the maintenance checks you do can no longer sort the problem out, and you start noticing suspicious noises exert too much heat onto the bearings or even damage them further. Furthermore, if you do not possess the tools or knowledge to execute the replacement of bearings or if you are not confident, then hiring an expert ensures that it is done accurately and properly, thus reducing the chances of any future problems.
Step-by-Step Guide to Bearing Replacement
My objective with relining trailer wheel bearings is to optimize the process while observing all the necessary safety and durable precautions that can increase its longevity. This is how I go about it:
- Prepare Your Tools and Workspace
Gather all the necessary pieces and tools lest you want to be interrupted during the whole process. The tools that I use include a lug wrench, jack stands, pliers, a hammer, a flathead screwdriver, a bearing packer, grease, and replacement bearings,s which are designed specifically for the trailer being worked on. Shifting gears, I also make it a point that wherever I intend to work, the surface is flat and stable.
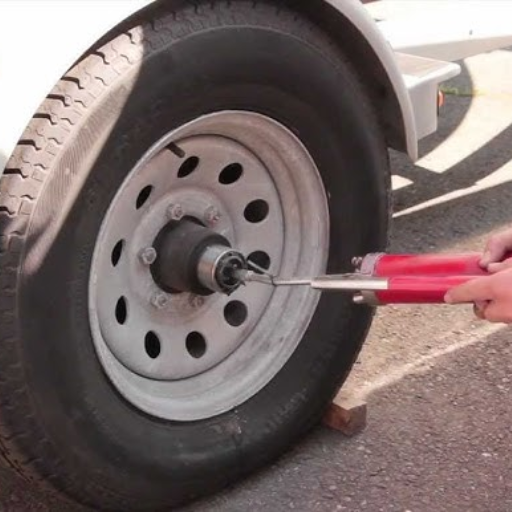
- Secure the Trailer
I also start by parking the trailer somewhere straight and then placing wheel chocks to prevent the tires from rolling. After that, I used a jack to hoist the axle until the wheel was not in contact with the floor before placing the jack underneath the frame for support.
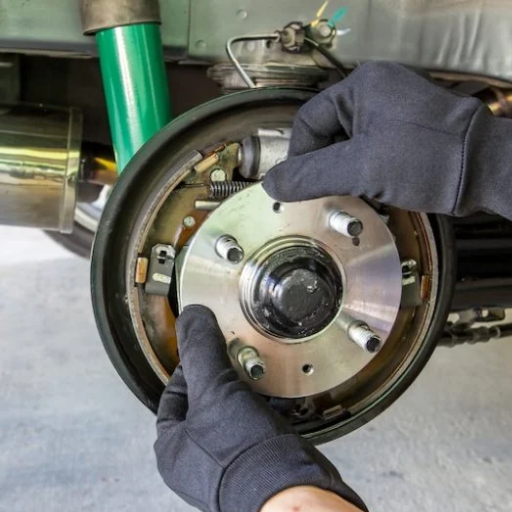
- Remove the Wheel and Hub
In a clockwise direction, I turn the lug wrench to untighten the wheel nuts and remove the wheel. Following that, I grab and pry off the dust cap, remove the cotter pin, and use pliers or a wrench to loosen the retaining nut. This exposes the hub, which I then take off the spindle.
- Inspect the Components
Upon removing the bearings, races, and spindle, I take a look at their surfaces to see if they wear or rust. Any parts that show pitting, scoring, or discoloration are signs that something needs to be changed. Moreover, in order to work on a clean canvas, I take extra time to scrub any old grease.
- Pack the New Bearings
It is very important to pack new bearings with grease, and for that matter, I use a bearing packer to embed grease. It is important to ensure enough lubrication as this reduces the friction and increases the life span of the bearings.
- Reassemble the Hub
When the bearing is packed, the grease seal is applied if necessary before putting it back on the hub. Next, I reattach the hub to the spindle and then replace the retaining nut and adjust it. It is crucial not to apply too much pressure to the nut as that can lead to wheel rotation issues.
- Install the Cotter Pin and Dust Cap
The last steps are also very important as they hold other parts securely in place, so the cotter pin is put into the place where the nut was turned, and the dust cap is hammered on both sides as well. These forms of assembly safeguard the bearings from dirt and moisture.
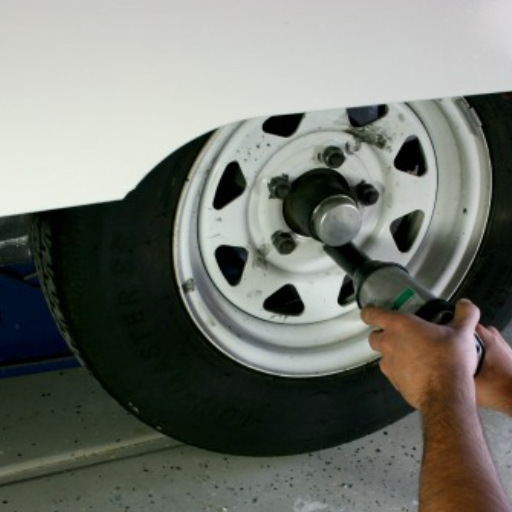
- Reattach the Wheel
To the hub, I reattach the wheel and utilize crosswise over cross sequence while tightening the lug nuts so that pressure is even applied. Thereafter, with stable wheels, I lowered the trailer after removing the jack stands.
- Perform a Final Check
Before starting the journey, I move the steering wheel to ensure free movement. I also manipulate the wheel to discern side-to-side movement. Any excessive excess movement is indicative of bad installation or a bear nut adjustment problem.
Working through this vision step by step, I make it my top priority that my trailer remains secure, works perfectly, and is always ready for another ride. Such maintenance work enhances the operation of your trailer and increases bearing longevity.
Tools and Materials You’ll Need
In order to perform these repairs in a professional manner, you need the following tools and materials:
- Spanner or socket wrench set
- Bearing grease or a grease gun
- Some form of wheel chocks
- Jack, along with jacks stands
- Some clean old rags/shop towels.
- Screwdriver and pliers
- If required, replacement bearings
- Safety goggles and gloves
If you’ve got these tools and materials nearby, it will help to make sure that the process runs smoothly and that your trailer is in a working condition.
Common Mistakes to Avoid During Replacement
- Failing to Check Compatibility
Checking if the new parts will fit well with the kind of trailer you have is critical. In the event that such parts were to be used, you would put the functionality of the trailer and safety measures at risk.
- Neglecting Proper Torque Settings
Twisting bolts either too tightly or lightly could risk the integrity of the assembly. Always make sure to use a torque wrench that doesn’t deviate from the specifications.
- Skipping Safety Precautions
Safety is very crucial, and consider yourself lucky to have safety gloves or protective eyewear as they come in handy quite often.
- Overlooking Regular Inspection
If one simply changes components without further inspecting all of the other ones that are interrelated, one might run out of certain optimizations which will begin to lower the quality of the product.
- Rushing the Installation
Going too fast or cutting corners throughout the procedure will greatly increase the chances of mistakes being made. Focus on the task and always obey the step-to-step instructions carefully.
How to Repack Your Trailer Bearings
Only a few steps are necessary to completely repack your trailer bearings. First, properly jack the trailer up and take off the wheels in order to reach the hubs. Start taking apart the hub, taking note of the order of the bearings, seals, and washers. Use a good degreaser to clean the bearings and hub, remove old grease with the aim of making sure that there is no wear or damage on any of the parts, and replace where necessary. Coat the bearings with the appropriate grease evenly and put back the hub. Finish off by attaching the wheels, making sure they are tightly fastened to their appropriate torque specifications. Finally, check the trailer to ensure it operates smoothly. Proper maintenance will ensure a longer lifespan and a safer towing experience.
Understanding the Importance of Repacking
Repacking may seem a trivial maintenance task but it is very important in regards to the performance as well as safety of the trailer components. Having the bearings packed on a regular basis ensures that there is no overuse, wear, friction, or excessive heat produced, or the bearing may fail during towing. If this practice is overlooked, it can lead to excessive repair costs as well as a risk on the road, making it a primary obligation for the owners and operators of the trailers.
Using Bearing Grease Effectively
During my work, I have learned that the proper application of bearing grease begins with the right grease selection. Remember to always use high-quality wheel bearing grease that is specifically designed for wheel bearings, as it provides the best performance even during the strenuous process of towing. Also, the application itself is very crucial – check that the bearings have been serviced and that the old grease has been completely removed before applying fresh grease to minimize contamination. In my view, an ideal grease application device is a grease packer since it helps to pack grease without packing, which helps in distributing the lubricant, even grease over the entire part, spreading the heat, which will reduce any excessive heat. When applied timely and carefully, bearing grease is one of the best “tools” for maintaining the trailer in the best condition for as long as it is needed.
How Often Should You Repack Your Bearings?
How often trailer bearings are repacked depends on some factors such as environmental conditions, usage and weight load. Here’s a breakdown to help you better understand how often your bearings require a schedule.
- Mileage and Usage
Generally, repacking the bearings is recommended once a year or after every 12,000 miles, whichever occurs sooner. However, a high mileage makes repacking necessary more often, especially with heavier-duty trailers, particularly for long road trips.
- Weight Load
Baring wears out in relation to the load that the trailer carries, in that, the higher the load, the faster the wear. Heavy duty loads mean more frequent bearing checks and repacking, at least every six months or 6,000-mile intervals.
- Environmental Conditions
Corrosion poses a great risk to boat trailers since they are often exposed to water and its different elements are used for other different types of trailers. If your trailer is regularly wet, then a bear replacement is recommended every six months or so to protect it from moisture and damage.
- Signs of Wear and Tear
Caution must be taken, as always, when checking for defects in these parts for things like odd noise, wheel wobbling, and grease leakage, which are major signs the part has exceeded its repacking stage regardless of whether this is the time for maintenance or not.
Considering these elements, you can guarantee that your trailer bearings are properly taken care of, thus ensuring the safety and durability of your journeys. Remember to conduct routine checks since a bit of preventive maintenance does wonders!
What Role Does the Hub Play in Trailer Wheel Bearing Replacement?

A trailer’s safety depends largely on the hub, regardless of whether it is installed on fifth-wheel models or hydraulic ones. The hub holds the bearings in place and also facilitates the proper rotation of the wheel. As a result, most truck trailer hubs usually end up without any issues. During the hub replacement process, a proper inspection of the bearings should be conducted. The bearings should be clean, lubricated properly, and above all replaced where necessary. Given the conditions, an overhaul of the trailer’s hub isn’t needed often, allowing its users to enjoy consistent performance across all types of models.
Exploring Hub Assemblies and Their Components
I would speak from experience when I say hub assemblies are amongst the essential components of a trailer because they affect the operability as well as the safety of the trailer. Hub assemblies usually comprise of the hub, bearings, seals, studs and in most cases a grease cap. Each of them aids in proper functioning of the hub by making sure the trailer wheels rotate properly. On one side, the bearing surfaces reduce wear and allow free movement, while the seals maintain the cleanliness and dryness of surrounding dust and moisture. Each of the components must be cleaned and checked every time the part is replaced, or maintenance is done. If any single component is ignored, then in the long run, it is possible that there could be unnecessary wear or, worse, failure when on the road. One detail I can assure you is remarkable: how much time and effort is put into this aspect and how much it pays off!
How to Properly Inspect Your Trailer Hub
In order to conduct a proper inspection of your Hubs, start by safely raising the trailer and placing it securely on solid jack stands. To get to the hub assembly, take off the wheel. Look into the bearings to check if they have any signs of wear, slight or full pitting, or have been dented, as these are indicators of damage. While doing that, examine the seals as well to see if they are cracked or leaking in any way, which will ensure that the surroundings are safe from outside particles. Look if the studs are bent or damaged or are loose – if so, they should be tight. To conclude, it would be necessary to evaluate the grease: if it is old and dirty, replacement would be essential. After the completion of these activities on a regular basis, the safe functioning of the hub assembly and the trailer is ensured.
When to Replace the Entire Hub
When the harm or wear rate has exceeded certain individual components, such as bearings or seals, replacing the entire hub becomes imperative. Where visible cracking, warping, or corrosion of the hub assembly is apparent, deterioration of the structural integrity of the hub is evident, necessitating replacement of the unit. Also, if the hub has been subjected to overheating due to bearings failure or the studs can not be tightened due to thread damage, it is prudent to replace the whole unit. Opting safety over other considerations is paramount, thus, it is better to go for a new hub whenever the available repairs do not guarantee reliable operation of the component.
How to Maintain Your Boat Trailer Bearings?
Taking care of the bearings found in the boat trailer is crucial, as regular checks, cleaning, and replacement are essential. Assess the bearings first and try to ascertain if there are any signs of damage, for instance, noises when the bearings are grinding or a rough feeling while moving. Discard old deposits of great,e wipe the bearings fully in case a problem is detected, and check if they are damaged. Micronic grease has to be packed into the bearings to enable protection against seepage of water and rust. Make sure that the seals are intact to allow no moisture inside the bearing, and be sure to check that lubrication is sufficient prior to commencing every trip. Each of the above measures will guarantee the quality of the boat’s towing as well as increase the longevity of the bearings.
Preventive Maintenance Tips for Boat Trailers
It is very important to maintain your boat trailer for its durability and efficiency and I can assure you that preventive maintenance works, having said that always remember to check your tires before going on a drive, watching out for signs of low air, or damaged tires. I recommend flushing your trailer with water after every launch because sand and salt tend to accumulate and damage metals. Always check the connections and bulbs of the trailer’s lights—make sure they are in good working condition. Since towing can vibrate trailers and loosen all the bolts and fasteners, it is critical to check and retighten them from time to time. Doing such maintenance of the trailer will keep it in good condition and help you with expensive repairs in the coming years.
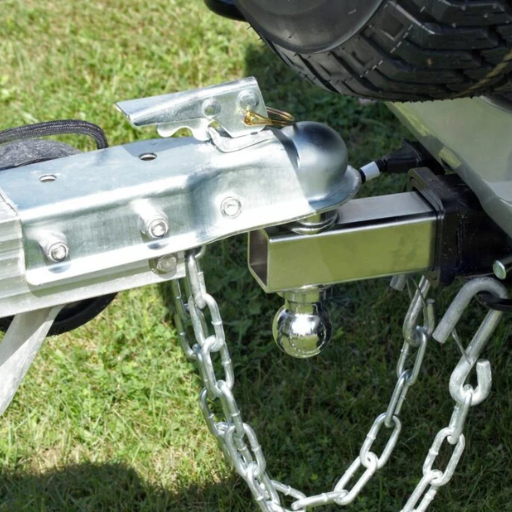
Using Bearing Buddies for Extra Protection
I think the most important addition to my boat trailer has to be the fitting of Bearing Buddies. And it’s for a good reason as well – these mechanical gadgets load grease under spring tension, which seals the wheel hubs, preventing water and debris from entering – the pesky reasons behind a bearing failure. So the installation is pretty quick and painless, and it helps a lot with the normal wear and tear that comes with immersion in water. For me, they not only increase the service life of the bearings but also reduce the maintenance time. Simply keep an eye on the grease and refill it when necessary. Pulling your trailer equipped with bearing buds means that your bearings are safe, no matter the conditions.
Long-Term Care for Your Trailer Bearings
If you wish to keep your trailer bearings intact for many more years to come, proper maintenance is essential. Based on my empirical evidence, I suggest inspecting the bearings on an annual basis or once you’ve traveled 10,000 miles or more. Always start the inspection by scrubbing away the old grease so that you can check for wear, enabling you to inspect for rust, discoloration, and roughness around the bearing area. If any of these indicators are evident, replace the bearings. After cleaning, tape them well with modern, high-quality marine grease. Also, remember to check the seals—they are your best defense against water. By being diligent and taking these steps, you can avoid expensive repairs and ensure that your trailer is in shape for every trip.
Reference
- How to Replace Bearings on a Trailer (with Pictures) – wikiHow
- How to Change Wheel Bearings on Your Trailer – Pro Tool Reviews
- How to Replace Trailer Bearings – Lippert
Frequently Asked Questions (FAQs)
Q: What tools do I need to replace the wheel bearings on my trailer?
A: To replace the wheel bearings on your trailer, you will need a jack, lug wrench, pliers, a hammer, grease, a bearing kit, and possibly a zerk fitting. It’s also helpful to have a torque wrench and a breaker bar.
Q: How can I tell if my trailer’s wheel bearings are bad and need to be replaced?
A: Signs that wheel bearings are bad and need to be replaced include unusual noises like grinding or squealing, a wobbly wheel, or excessive heat around the wheel hub. Regular inspection is a key maintenance item to ensure safety.
Q: How do I remove the inner bearing from the wheel hub?
A: To remove the inner bearing from the wheel hub, first remove the dust cap and castle nut. Then, remove the hub from the axle spindle and tap the inner hub gently to release the inner bearing. Be careful not to damage the bearing and seal during this process.
Q: What is the difference between sealed bearings and regular bearings?
A: Sealed bearings are pre-lubricated and sealed to prevent contamination, requiring less maintenance. Regular bearings need to be greased regularly, but can be serviced more easily if they become worn.
Q: How do I know the correct part number or bearing kit for my trailer?
A: The part number or bearing kit can usually be found in the trailer’s manual or on the bearing itself. You can also consult with an auto parts store or check with the brand bearings manufacturer for assistance.
Q: Do I need to replace both the inner and outer bearings at the same time?
A: It’s generally recommended that both the inner and outer bearings, as well as the bearings and races, be replaced at the same time. This ensures even wear and optimal performance from the bearing assembly.
Q: How often should I grease the wheel bearings on my trailer?
A: The frequency of greasing will depend on your trailer usage. As a general rule, greasing every 12 months or 12,000 miles is recommended. Use good quality grease and ensure it’s applied evenly into the bearing.
Q: Can I find tutorials online on how to replace trailer wheel bearings?
A: Yes, there are numerous resources available. Many people find watching videos from experts around the world on YouTube very helpful for visual guidance on replacing trailer wheel bearings.
Q: What should I do if I notice wear on the side of the bearing?
A: If you notice wear on the side of the bearing, it’s an indication that the bearings and wheel hub may need to be replaced. Inspect the entire bearing assembly and consider replacing it to ensure safe operation.
Q: How important is it to use the correct torque on the castle nut?
A: Using the correct torque on the castle nut is crucial to secure the bearing assembly properly. Incorrect torque can lead to premature wear or failure of the bearings, affecting the circular motion and safety of your trailer.