We all know how important minor parts of an RV or a trailer can be for a safe and smooth ride. Take the wheel, for instance, the headmost feature on the axle; what’s of greater concern are the numerous parts inside the wheel – wheel bearing dust caps, for example, which admittedly serve their primary function of wrapping the bearings. Given the importance of wheel-bearing dust caps, this guide is targeted at exploring their understanding, importance, and proper maintenance. This is because neglecting their maintenance would ultimately have negative repercussions for your wheel bearings, and being an owner, whether you’re an RV veteran or a newbie, you wouldn’t want that. This blog goes beyond just theoretical knowledge and aims to help you optimally maintain the wheel bearings. Effectively saving you time, money, and a lot of hullabaloo.
What is a wheel-bearing dust cap, and why is it important?
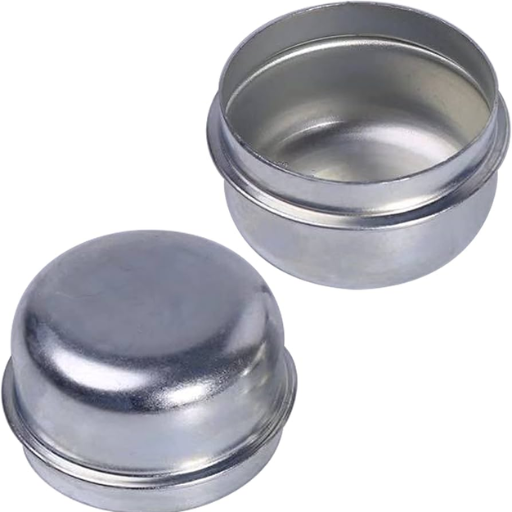
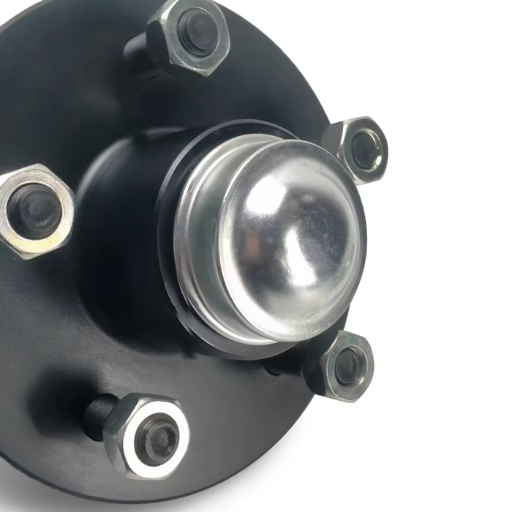
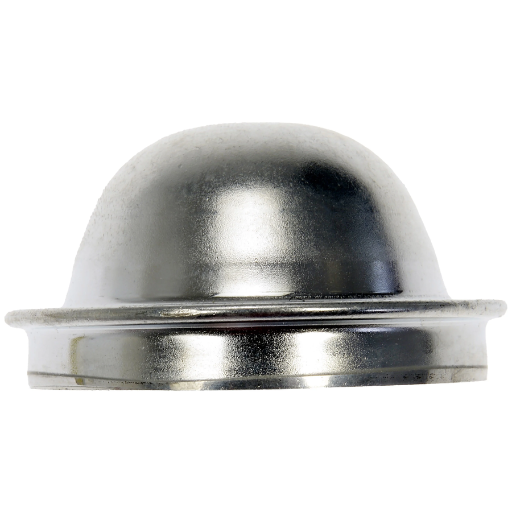
Dirt, particles, and moisture can be blocked from compromising the wheel taring through the use of a dust cap,p which is a small metallic or plastic cover. The primary purpose of the dust cap is to make sure that the wheel bearings remain intact, lubricated, and function adequately. Without effective dust caps that protect the bearings from dreadful surroundings, their lifespan is shortened, and the chance of failure is increased. This explains why wheeled systems, including cars and trailers, are required for safe and effective operation.
Understanding the function of wheel-bearing dust caps
it is clear that a wheel-bearing dust cap often appears to be a minor part, but its contribution to the wheels is of utmost importance. A dust cap protects the wheel bearing from the external environment, thus preventing wear and tear. It is certain that a loose or badly fitted dust cap would result in dirt and moisture getting in, and this directly affects the lubrication of the bearings. Compromised lubrication means increased friction, higher temperature, and finally, destruction of the bearings. I am working with several experienced farming professionals, and I can assure you that maintaining dust caps can help you enhance the life of your vehicle/trailer in the easiest way possible.
How dust caps protect your wheel bearings
If there is one part of any truck that you should pay attention to, it is without a doubt the dust caps on the wheels; these are crucial in capping off your wheel bearings, as someone who has been in this field for quite some time, I can tell you just how vital they are. To put it simply, dust caps act as a barrier that does not allow any intrusive elements to disturb the sensitive parts of your wheel bearings. Here are the key ways they shield components from damage:
- Blocking Dirt and Debris
Road dust, along with other substances like tiny stones, can make their way inside a vehicle and potentially harm its performance, but dust caps provide the vehicle with necessary protection such that it does not let any kind of dirt or debris the bearing contact. While in the long term, all of the crud could potentially rub up against the bearing surface, which is a very bad result, however, dust caps do act as a barrier.
- Sealing Out Moisture
Rust, as well as corrosion, can be caused by rust and water, which are two natural enemies of a wheel bearing. Whether it’s rainwater, road spray, or even snow, a well-fitted dust cap manages to always keep the wheel bearings intact, which in turn makes sure that the wheel assembly comes with all the desired functionalities, keeping the harsh weather out.
- Maintaining Lubrication
Wheel bearings require grease to work effectively, which is meant to reduce friction, and in order to allow the grease and lubrication to remain intact without mixing with the outside, the best dust caps are used. This is extremely important because, without dust caps, the lubricant might get dry, leading to bearing failure due to overheating.
- Temperature Control
In order to ensure that the heat does not build up or does not let outside water and debris make their way inside the bearing, dust caps are quite helpful because they allow the lubrication to be located inside the bearing. By doing so, the lifespan of both the bearing and its grease is increased, which is an optimal situation because it has the desired result.
With respect to each of these issues, dust caps are critical in prolonging the service life and reliability of the wheel bearings. It is advisable not to ignore dust caps since, as I stress, the development of a big problem later on is a real likelihood!
Signs of a failing or damaged dust cap
The wear on a damaged or failing dust cap is not particularly straightforward to identify, but there are some key factors that you cannot overlook. For example, if there’s a lot of grease leaking from the wheel hub, it is likely that the dust cap is either broken or badly fitted, which is another telltale sign. An abnormal noise could suggest an internal grinding of the parts due to water or dust being washed into bearings as a result of damaged bearing dust caps. Look for signs like dings, rust, or loose fittings, and those tip you off that this component must be fixed as soon as possible. I assure you, if you are able to detect these signals before they get comprehensively damaged, then you will be able to save a lot of money in the future.
How do I select the right dust cap for my vehicle or trailer?
Choosing the correct dust cap for your vehicle or trailer pays attention to a few logical aspects, such as checking the specifications of your wheel hub to ascertain the appropriate size and fit, as dust caps are not universal. It is also important to consider the operational conditions and choose either steel, which is durable, or rubber, which is flexible. Take into consideration the environment in which the vehicle or trailer will be used; for instance, where water exposure is frequent, the use of water-resistant caps is very important. Finally, make sure the dust cap matches the type of wheel bearing you have because using parts that are not designed to work together can result in inadequate protection and even damage.
Determining the correct size and fit
To select the proper size of dust caps, I would advise taking precise measurements of the cap and hub seam, starting off with a caliper. This takes the guesswork out of selecting a dust cap that would not be too loose or too tight on the hub bore. Also, cross-referencing such measurements with the manufacturer’s specifications can potentially save one a lot of unnecessary trouble later on. Another tip I swear by is to dry-fit the assembly of parts before the commencement of the actual installation. A wheel bearing should respond when pressed softly with the bare hand but should not require one to put excessive force when being fixed to ensure durability.
OEM vs. aftermarket dust caps: Which is better?
The decision to use either OEM or aftermarket dust caps will depend primarily on your requirements. OEM dust caps are made for a particular vehicle and are, therefore, very reliable and dependable because they fit exactly. In case the priority is strict compliance with the criterion of exactness and compatibility, especially for recent cars or respecting the warranty conditions, they are a no-brainer. In contrast, the aftermarket dust caps are not only easier on the wallet but, depending on the brand, can be of decent quality. I have personally observed the performance of many decals and other aftermarket options in various settings, and they work really well, especially when the OEM parts are difficult to find. However, in my opinion, it is best if you consider your priorities, be it exact fit, easier on the wallet, or availability, before rolling these dice.
What’s the process for replacing a wheel-bearing dust cap?
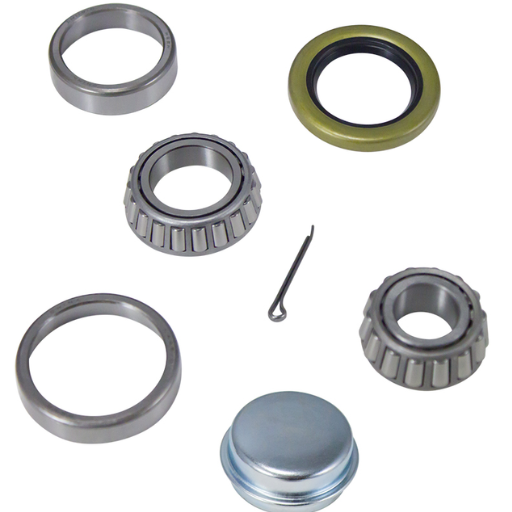
Replacing the wheel bearing cap should never be a problem if one takes care and possesses the right tools. To begin with, raise the car and place it on jacks. Remove the rim from the wheel assembly. Using a flat screwdriver or suitable pry insert, make gentle movements around the edges of the dust cap to peel it off without damaging it or the hub. After that, thoroughly clean the surface to prevent any dirt from getting into the bearing. If a new cap is to be fitted, fit the cap appropriately and use a hammer to knead the cap to make it fit perfectly. The wheel can then be refitted, and the vehicle can be lowered. Whenever the cap is fitted, always check that it is secured to the bearing in order to prevent bearing wheel movement.
Step-by-step guide to dust cap replacement
Routine tasks can contribute significantly to the lifespan of your wheel-bearing assemblies. In my experience, the key to success hinges on precision and patience. Begin by securely placing your car on a jack before detaching any parts. When taking out the cap on the dust cover, I usually recommend the use of a flathead screwdriver or a purpose-built dust cover removal tool, removing it with caution. You can either consider lubricating the area or simply wipe away any residue left. This holds true, especially for dust caps, which, when not cleaned out, will significantly degrade the performance of the bearings.
Paying attention to detail is extremely critical when swapping out dust caps, as many tend to forget this during installation. Many of the malfunctions I have encountered up my career have stemmed from the cap in question being crooked or being incorrectly placed when being screwed in. So, do ensure that you take your time. Use a weighted hammer to tap the cap onto its desired location. Then, take the wheel and fasten it back onto its spot as one last step while making sure that the cap is in its desired location before putting the vehicle back on the ground. This will make a world of difference in terms of money saved when future repairs are conducted.
Tools needed for the job
- Rubber mallet
- Clean rags
- Socket wrench set
- Jack and Jack stands
- Safety gloves
- Pry bar or flathead screwdriver
Tips for proper installation
ensuring proper installation practice at the first attempt requires following certain steps and highlighting specific aspects. As such, these are my suggestions:
- Clean the surface thoroughly.
Before beginning, the location where the cap will be placed should be devoid of all sorts of dirt, dust, or grease. Otherwise, the cap will be unable to create a tight fit, which in turn may adversely affect the position in the long run. Clean rags can be used to wipe down the surface, and when necessary, a gentle cleaning wipe will suffice.
- Check the cap’s alignment.t
The main cause of this discrepancy is the incorrect fitting caused during the installation process. Hence, this instance demands that the encasing be erected over the hub in the right position. If it is indeed off, a corrective measure that is severely ineffective may very well have to be subjected at a later time.
- Apply even pressure with the right tool.
Using a rubber mallet, which isn’t strong enough and, in this case, should be wrapped in cloth, tap the cap into position. Start tapping around in an orderly manner, aiming to get all the edges. Don’t strike too hard, or else the cap will end up getting a dent but do aim to succeed in the orderly tapping.
- Double-check the fit
Once the cap is in place, inspect it from all angles. It should sit flush with the wheel hub without any visible gaps. You can also give it a slight twist to confirm it’s secure.
- Take your time during reassembly.
Turn the cap and inspect it again after it has been placed all around the perimeter and pulled back slowly ‘and twisted to fit. It should be properly flush against the wheel hub to fully secure any gaps visible to the eye.
To achieve the expected result, a sequential assembly procedure must be followed. After affixing the cap, carefully reinstall the wheel ensuring that the vehicle is not in a swung motion. Before lowering the vehicle make sure that all the parts are seated properly. Neglecting the details during this step will cause trouble in the future.
Are there different types of dust caps for various applications?
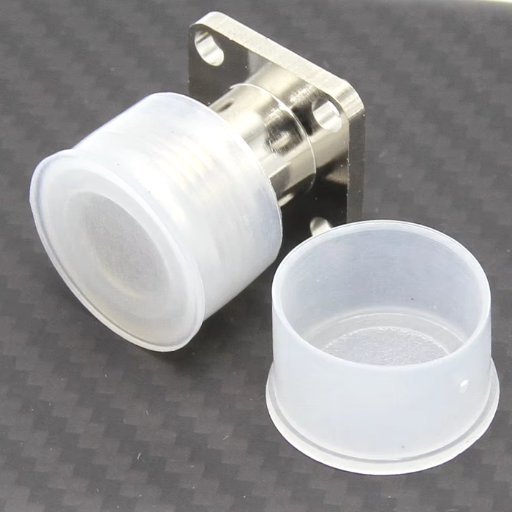
Yes, dust caps are classified as per their applications. In my understanding, the selection of a dust cap would depend on the fitting machine requirements, such as the vehicle’s mounting. For example, light fixture applications tend to have caps made of standard plastic, whereas high-end or industrial applications use metal dust caps, which are more robust. In the same category, other variations are available that are designed for specific environments where there is dust, dirt, or moisture with a seal to block particles from entering the machine. A right-fitting dust cap guarantees not only safety, but wear and tear may be reduced upon prolonged use.
Trailer-specific dust caps vs. passenger vehicle caps
The trailer dust covers are specifically designed for carrying and heavy usage, ensuring that they are able to protect from dirt, moisture, and any debris. These are customarily large in size, staying to relatively thicker materials, and they have sophisticated sealing systems that will make sure that the inside parts are not contaminated in highly stressed conditions. On the other hand the passenger car dust covers are designed to be smaller in size since these are specifically required in normal driving conditions and don’t employ much stress, hence the design focuses more on being light weight and easy to use. Thus, the specified type provides availability, durability, and satisfaction with the variables of the requirements of the vehicle selected.
RV dust cap considerations
some of the most important aspects to consider when making an RV dust cap with regard to your needs are outlined below:
- Material Durability – Ensure you look for dust caps produced from high-grade materials such as aluminum or tough plastics. Tough materials help the cap withstand tear and wear even under harsh conditions such as off-road or different weather patterns.
- Sealing Effectiveness – A good dust cap should have an effective sealing system, such as gaskets and rubber rings, that efficiently controls moisture, dirt, and debris. This adds an extra layer to the protection of the wheel bearings, which is critical in RV applications.
- Size and Fit – There is a variation inthe sizes of RV dust caps, so always ensure that you do a measurement of your axle hub diameter before ordering. A correct fit is crucial in terms of the installation and ensures that the cap does not come off while on the road.
- Vibration Resistance – Due to a greater size and longer trips, RVs are more subjected to vibrations. It is advisable to use dust caps that are meant to secure themselves in place during high-vibration conditions so as to enhance their functionality over time.
- Compatibility with Grease Systems – This difference in circumferential strength means that there is a sharp interface at the inner margin which is the region where the locking pins are located.
With these parameters, it is possible to choose a cap that protects the essential parts of the RV while adding on to the vehicle. It is a momentary expense that can translate into a very big difference on the go!
Universal vs. vehicle-specific dust caps
In the case of the RV Dust Caps, I prefer the vehicle-specific caps instead of the universal RV dust caps. This also depends on your use case. If you focus positively on the cost aspect, as in the ones for the RVs, they are cheaper and easier to apply. The universal ones fit many different RV models, which is a good asset for someone looking for ease of application. But from what I have witnessed, the issues of sealing tend to fade away as the specific caps work better in making sure the model fits well and works. Further down the road, better sealing will lead to a longer operative model. If your main concern is installation and adjustment, then the universal caps should be a good option for you. However, if you want ones that perform better, then the specific caps are better.
How can I maintain my wheel-bearing dust caps?
Ensure that the wheel bearing dust caps are kept clean and free of dirt and debris, otherwise they will be difficult to wear. To prevent them from wearing out, check them regularly to see if they are damaged, worn, or leaking. If they look loose or damaged, replace them as soon as possible to avoid having the wheel bearings exposed to dirt and dust. Also, add a thin layer of grease, preferably on the outside, in order to seal better and avoid rusting the caps in the future. This will ensure that the caps will be in working order for longer periods of time.
Regular inspection and cleaning procedures
the routine care of wheel-bearing caps is simple but essential. To begin with, I wipe the covers perfectly clean with a cloth or a light cleaner. In the process, I also inspect the capping for any cracks or dents that could impair the sealing. Anything out of the ordinary, like this, I get it replaced straight away to prevent any future risks. I apply some grease seal on the flanges before attaching them, which secures everything to refrain from corrosion. Following such simple approaches not only prolongs the lifespan of the caps but also averts deterioration, which can be rather expensive when dealing with wheel bearings.
Lubricating dust caps and bearings
I believe that appropriate lubrication of dust caps and bearings is a guarantee for the smooth running of the operation at hand and thus enhances longevity. Here’s how I go about it:
- Choosing the Right Grease: When working with bearings, it is essential to select grease that is high quality and waterproof. This will help protect the bearings from moisture and ensure that there is no rust buildup. Different greases will be needed depending on the application, so always check the manufacturer’s specifications.
- Cleaning Before Lubrication: It is important to remember to clean the bearings as well as the dust cap before grease is applied. This is to make sure that no dirt, old grease, or debris is left, as these will lower efficiency and lead to excess wear after use. Schaeffer synthetic products provide a wide range of cleaning solutions that are effective.
- Applying the Grease: Putting on just the right amount of grease is important during the lubrication process, applying too much or too little can lead to issues. If too much grease is applied, overheating can occur from friction, and similarly, applying too little puts the bearings at risk of damage. To make sure all bearings receive grease, I use either a grease gun or manual grease.
- Reassembling Carefully: After the dust cap has been attached again, I make it a point to put grease around the inner edge of the cap so that the bearing is sealed properly and moisture cannot seep in. Also, remember to ensure the cap is in its original position.
- Routine Checks: Maintenance is an ongoing important aspect. Previously, I had a regime in place for applying grease and examining its quality, but in due course, some of the grease would not min age well and would acquire dirt, which would interfere with the greasing process.
Ao usar esses tipos de modificação, não apenas aumento a durabilidade das buchas e capsulas de poeira, mas também mantenho um funcionamento nas melhores condições reduzindo assim o risco de caro reparo ou substituição.
When to replace vs. when to clean
Figuring out when to throw away an item and when to just clean an item is entirely dependent on the look and the working condition of the part. In the event I detect extreme deterioration through signs such as rust, heavy physical damage, or worse, bearing dust caps, there is little choice but to replace them. If the dust caps/ bearings become cracked, warped, or otherwise unsnapped, then replacing them will be impossible to avoid, no matter how much you clean and lubricate them. On the other hand, if they are structurally correct but just have dirt and used grease in them, only a deep wash and re-oiling should do the task. Close-up inspections do allow me to find such issues at an early stage so that I replace only those components that I’m left with no option but to replace, in turn making their lifetime longer and improving efficiency.
What are common issues with wheel-bearing dust caps?
One of the most common problems encountered with wheel bearing dust caps is the dust caps not being properly sealed, which can allow elements like dirt, water, or debris to penetrate and contaminate the wheel bearings. Over several years, these contaminants are likely to cause corrosion, reduce the effectiveness of lubrication, and cause the bearings to wear out much faster than they should. Moreover, dust caps can also get broken or loose because of an impact or if the closure may have been done improperly which jeopardizes their protective purpose. These preventive procedures aim to avoid these problems.
Dealing with stuck or seized dust caps
while dealing with seized dust caps, there are many salient points that I need to take with me, first and foremost, the right approach and a little bit of patience. For starters, I usually tend to apply some penetrating oil around the circumference of the dust cap in order to loosen the built-up debris or corrosion surrounding it. It is then that I wait a couple of minutes before utilizing a rubber mallet or a flathead screwdriver at an angle in order to gently hammer and turn the cap in an effort to free it up. At the same time, however, I tend to avoid using too much force as this can result in damage not only to the dust cap but also to the hub. In case the cap is still stuck, employing a puller tool that is designed for dust caps usually does the job with little or no bystander damage. Going forward, I always check to ensure that the caps are installed securely, which greatly reduces the chances of seizing at a later time.
Addressing leaking grease issues
The first preventive measure I take in order to solve the leaking grease problem is to do an inspection. Components such as components like the dust cap, seals, and bearings are examined because they are more likely to be installed incorrectly or worn. If a defective seal is found, it will be the first one I change. That way a proper seal can be obtained and secured in place and the equipment will function as required. It is a habitual practice to dislike grease exudation, and thus, I avoid packing the hub with an excessive amount of grease because it increases the chances of leakage in the bearings. Hence, I also inspected the amount of grease that was to be used, leaving enough room for expansion due to the heat generated. I also double-check the type of grease to be used, ensuring that only a high-temperature, high-pressure specific grease that will not disintegrate under stress is chosen. I have always believed that constant maintenance and following the guidelines provided by the manufacturer make certain that the hubs do not leak any grease and stay lubricated.
Reference
- Dust Caps Chart – This source provides detailed information about different types of dust caps and their specifications.
- How to Measure a Trailer Hub or Dust Cap – This guide explains how to measure dust caps and hubs, which is crucial for proper maintenance.
- Wheel Bearing Maintenance – This article discusses the importance of maintaining wheel bearings, including the role of dust caps.
Frequently Asked Questions (FAQs)
Q: What is a wheel-bearing dust cap, and why is it important for my RV or trailer?
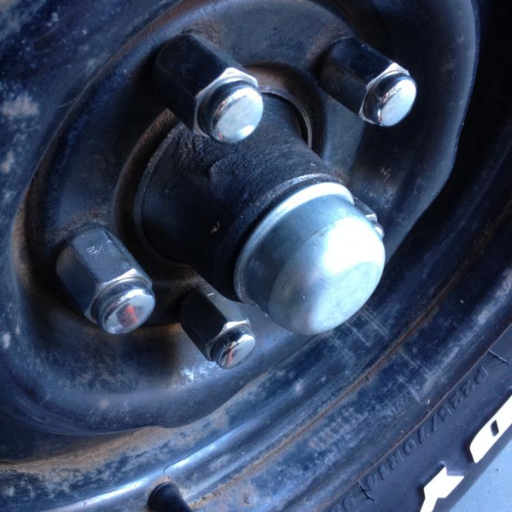
A: A wheel-bearing dust cap, also known as a hub dust cap or grease cap, is an essential accessory that covers the end of your trailer axle or wheel hub. It’s important because it protects the wheel bearings from dirt, debris, and moisture, which can cause premature wear and damage. By using a dust cap, you can extend the life of your bearings and ensure smoother operation when hitting the road.
Q: How do I know if I need to replace my trailer’s wheel-bearing dust caps?
A: Signs that you may need to replace your trailer-bearing dust caps include visible damage, cracks, or dents in the cap, grease leakage around the hub, or if the cap is loose or missing. It’s a good idea to inspect your dust caps regularly, especially before long trips or as part of your routine maintenance.
Q: Are there different types of wheel hub dust caps available?
A: Yes, there are various types of wheel hub dust caps available. Some common options include metal caps, plastic caps, and rubber caps. Premium auto parts manufacturers like Dorman offer a wide selection of dust caps for different vehicle makes and models, including options for small utility trailers and RVs. Explore our selection to find the best wheel dust cap for your specific needs.
Q: How do I install a new hub dust cap on my trailer wheel?
A: To install a new hub dust cap, first ensure the hub is clean and free of old grease. Then, align the new cap with the hub opening and gently tap it into place using a rubber mallet or a block of wood and hammer. Be careful not to damage the cap during installation. For some models, you may need to use a special tool or insert to properly seat the cap.
Q: Can I use any wheel dust cap on my trailer or RV?
A: It’s important to use the correct size and type of wheel dust cap for your specific trailer axle or wheel hub. Using an improper fit can lead to inadequate protection or even loss of the cap while driving. Check your vehicle’s manual or consult with an auto parts specialist to ensure you’re selecting the right dust cap for your trailer wheel.
Q: Are OEM wheel-bearing dust caps better than aftermarket options?
A: Both OEM (Original Equipment Manufacturer) and aftermarket wheel-bearing dust caps can be effective. Genuine OEM Toyota parts, for example, are designed to fit perfectly with Toyota vehicles (like the TRD Off-Road Premium or 40th Anniversary Edition models). However, many aftermarket brands, such as Dorman, offer high-quality alternatives that can be just as effective and sometimes more affordable. The key is to choose a reputable brand and ensure proper fitment for your specific trailer or RV.
Q: How often should I replace my trailer’s wheel-bearing dust caps?
A: There’s no set timeframe for replacing wheel bearing dust caps, as their lifespan depends on various factors such as usage, road conditions, and maintenance. However, it’s a good practice to inspect them every time you service your wheel bearings or at least annually. If you notice any damage or wear, replace them immediately to ensure continued protection of your wheel bearings.
Q: Can wheel-bearing dust caps help prevent water from entering the hub when launching a boat?
A: Yes, wheel-bearing dust caps play a crucial role in preventing water ingress when launching a boat. They create a seal that helps keep water out of the hub and away from the bearings. However, for frequent boat launching, you might want to consider specialized marine-grade dust caps or bearing protectors designed specifically for this purpose, as they offer enhanced water resistance.